Tagged’s 140 Johnson Resurrection

Tagged

Petty Officer 2nd Class
Joined
Jul 10, 2012
Messages
123
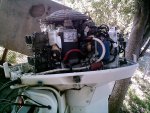
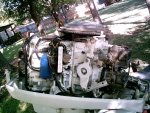
This thread will document the work I’m doing on a 1982 crossflow V4 140 hp Johnson: J140TLCNB.

i picked up up the motor today off of Craigslist. All I know so far is that it turns over on the starter, has even compression (about 95 psi on my harbor freight gauge), has spark on both banks, and the tilt/trim works if you jump it directly to the battery. The guy I bought it from had pulled it from a salvage boat, the last registration sticker was 2005. So I t probably hasn’t run in 12 years.

I’ve got a lot of work to do.

The plan is to start with the water pump/cooling system, ignition system, and then fuel system. Then hit the key and listen to her purr. ;-)

Nope, scratch that. The plan is, clean the work bench, finish a couple of honey-do’s to keep Mama happy, then start in that list.

I bought this motor to replace a ‘96 that dropped a cylinder. My uncle had one a late ‘70’s Johnson 140 just like this one, so I already have a sentimental attachment to this project.

Climb aboard, and come along for the ride.
 

Tagged

Petty Officer 2nd Class
Joined
Jul 10, 2012
Messages
123
[No message]
 

Attachments

  • photo283305.jpg
    photo283305.jpg
    212.8 KB · Views: 0
  • photo283306.jpg
    photo283306.jpg
    220.5 KB · Views: 0
  • photo283307.jpg
    photo283307.jpg
    1.2 MB · Views: 0

jimmbo

Supreme Mariner
Joined
May 24, 2004
Messages
13,638
Brings back memories, the first motor of my own was a brand new 82 Evinrude 140. Good little engine. I see yours is missing the air silencer. There used to be a 'Waking a sleeping outboard' thread that had some good advice, but it seems to have evaporated during the latest upgrades to the site
 

spybot

Chief Petty Officer
Joined
Jul 4, 2016
Messages
504
Hey Tagged i look forward to reading this thread.
I am in the process of turning a 1980 85hp into a 140hp.
Maybe get some pointers from each other.
 

Tagged

Petty Officer 2nd Class
Joined
Jul 10, 2012
Messages
123
Brings back memories, the first motor of my own was a brand new 82 Evinrude 140. Good little engine. I see yours is missing the air silencer. There used to be a 'Waking a sleeping outboard' thread that had some good advice, but it seems to have evaporated during the latest upgrades to the site

The air silencer is with it, but not any mounting screws. So I’ll be tracking some down. After looking it over last night, I’ve got several small things out of place. I’ll keep looking it over this week while I catch up some other projects. I bet I’ll find a few more pieces missing.
 

spybot

Chief Petty Officer
Joined
Jul 4, 2016
Messages
504
By the looks of things you are going to need choke primer solenoid as well.
 

racerone

Supreme Mariner
Joined
Dec 28, 2013
Messages
38,421
???---I think the choke ( electric primer valve ) is attached to the air box that is not shown.----Likely it is in the parts box.
 

Tagged

Petty Officer 2nd Class
Joined
Jul 10, 2012
Messages
123
???---I think the choke ( electric primer valve ) is attached to the air box that is not shown.----Likely it is in the parts box.

Yep. I have that too. It's hanging from the engine by hoses WAY too short for it to be mounted where it belongs. (see, lots of work to do.)

Keep the observations coming! You may see something I haven't noticed yet.

Tag
 

Tagged

Petty Officer 2nd Class
Joined
Jul 10, 2012
Messages
123
Hmm, Ken Cook doesn’t seem to have a service manual for this outboard? All I see is a service manual for all 1982 motors, 2-235hp. Anyone know whether there’s a service manual specifically for this motor, and where to find it?
 

jbuote

Lieutenant Junior Grade
Joined
Aug 17, 2016
Messages
1,001
Edit.. Never mind.. Manual I saw was the same as you already mentioned...
 

Tagged

Petty Officer 2nd Class
Joined
Jul 10, 2012
Messages
123
Thanks for the idea. Found the 1981 v-4 manual. Ordered it.
 

Tagged

Petty Officer 2nd Class
Joined
Jul 10, 2012
Messages
123
Hey Spybot: Does your motor have vacuum hoses? This motor has black tubes running around the base of the powerhead, they appear to run from the base of the intake manifold (reed box area, behind the carbs) to the transfer ports. I have no idea what they are, or what they're for. They're probably not even vacuum hoses. Once the service manual comes in, I'll read up on them, but for now, I'm just curious.

Tag

Edit: I found online reference to a fuel recirculating system. So, for now, I’m just going to assume it’s a fuel record hose. I’ll figure it out when I have the manual.
 
Last edited:

spybot

Chief Petty Officer
Joined
Jul 4, 2016
Messages
504
Jakedawg has it correct.It is a drain for unburnt fuel gathered at idle from the bottom of the reeds,
Through one way valves (screwed into the manifold) these may be nylon or brass. The pipe runs to the bypass covers and feeds the unburnt fuel in.
Check if the valves work. They should only work one way. They are $25 each so hopefully you dont need them
 

Tagged

Petty Officer 2nd Class
Joined
Jul 10, 2012
Messages
123
Puddle drains is a nicely descriptive term. I like it!

Tonight’s progress: not much, altogether. I did a couple of Honey-do’s, skipped the clean-the-workbench, and started to putter.

I said earlier that the primer solenoid was attached to hoses that couldn’t reach the mounting location on the air silencer. Good news! I found a different mounting place molded on the #3 transfer port. All the hoses and wires reach. Bad news: two of the three hose nipples on the solenoid cap were broken. Basically, it’s junk. But, Good News! My dead 1996 motor has a perfectly good solenoid. Time to start scavenging parts.

The donor solenoid fits almost perfectly. But the attachment strap (stainless steel) did not. The donor motor mounted the primer diagonally, the new motor mounts square. I tried banging the strap flat and re-bending it, but that exceeded my metalwork skills. I’ve temporarily attached it with nylon webbing strap, and I’ll order the correct strap.

Also, the donor motor used bullet-connectors instead of ring terminals. I’ll pick up some ring terminals at the big orange Home improvement store tomorrow and clip—crimp—solder— silicone—heatshrink myself a new connector.

Grabbing the primer from the donor motor started a landslide. Next was the starter solenoid, to replace the Western Auto solenoid the previous owner had hacked on. This time, the strap fit perfectly.

Then I started stealing fasteners. 14 stainless screws, with blue locktite. That’s probably $30 worth of fasteners. And one nylon fastener for the carburetor linkage pin.

All told, I’m easily over $200 of donor parts. The primer solenoid is $160 by itself. It adds up quick. Add in the cost of the manual I ordered earlier today, and i’m half-again the cost of the motor.
 

spybot

Chief Petty Officer
Joined
Jul 4, 2016
Messages
504
You know you can just unscrew the front from your donor solenoid (4 Screws) and fit it to the existing one?
That way you have a spare and dont have to do all the connections just now.
 

Tagged

Petty Officer 2nd Class
Joined
Jul 10, 2012
Messages
123
[No message]
 

Attachments

  • photo283333.jpg
    photo283333.jpg
    734.3 KB · Views: 0
  • photo283334.jpg
    photo283334.jpg
    714.5 KB · Views: 0
  • photo283335.jpg
    photo283335.jpg
    828.5 KB · Views: 0

Tagged

Petty Officer 2nd Class
Joined
Jul 10, 2012
Messages
123
Here's my question of the day: Do you have a good technique for removing bolts that *might* be seized? I'm unreasonably nervous about removing bolts, but I've got to remove my port-side cylinder head cover to inspect the water jacket. The rubber water hose at the bottom of the head is missing, and I can see mud dauber nests inside the head. Its got to come off.

But my donor motor's final cause of death was saltwater corrosion that caused 6 of the 14 head bolts to break off in the block, plus five more of the exhaust housing cover bolts, and two of the block-to-midsection bolts. That's why I'm more nervous than I should be. I don't know the history of this motor, and I don't want to relive that experience.

What technique do you use to remove bolts when you suspect they might be at risk of breaking off?
 

oldrem

Commander
Joined
Nov 7, 2013
Messages
2,002
What technique do you use to remove bolts when you suspect they might be at risk of breaking off?

Patience. I usually give them a good soaking with CRC Power Lube or PB, repeating daily for a few days before I ever put a wrench to them.
 
Top