The inevitable 1973 15 Reinell tri-hull restoration!

Status
Not open for further replies.

dOb

Petty Officer 1st Class
Joined
Jun 14, 2010
Messages
244
Thanks for all of the great information on this site. And thanks to those that have helped me this far.
This is my first boat. It seems that every time I fix something, I discover something else that needs fixing. I have so many questions now that I figured it was time to start a thread. Im going to need a lot of help with this one. Heres a brief history to let you know where I am.
I bought the boat for next to nothing. The rollers had given out, and the boat was sitting on the roller mounts. It left a few small gouges.
keel.jpg

The seller told me that with a few minor repairs, Id be the water in no time. I replaced the rollers and got the boat sitting good on the trailer. When I was replacing the bilge pump, I realized that I could dig the old transom out with my fingers. The deck felt solid, and when I removed the old transom, the stringers seemed solid. I hit them with a hammer, and when I jammed a screw driver into the wood, it grabbed on pretty well. So I figured I was OK. Thinking the stringers and deck were fine, I just cut the splashwell off to get to the transom.
current.jpg

I took my time and replaced the transom (with help from this forum). I even painted it.
newtrans.jpg


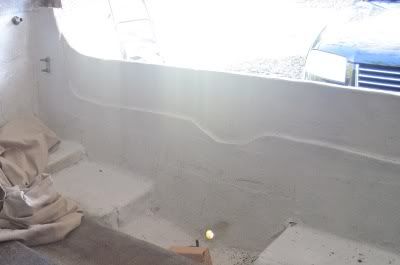
No all that is left is to grind out the gouges, do some patch work, and Ill be on my way. Right? Wrong!
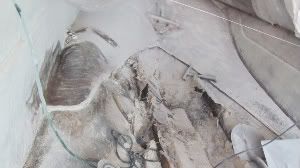
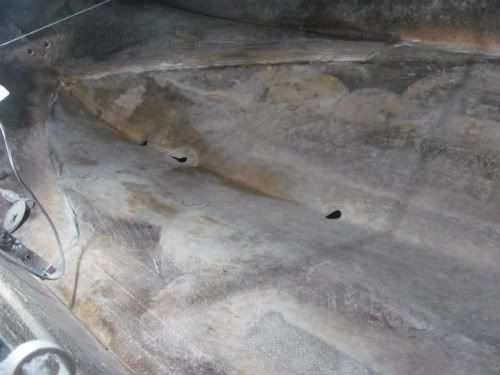
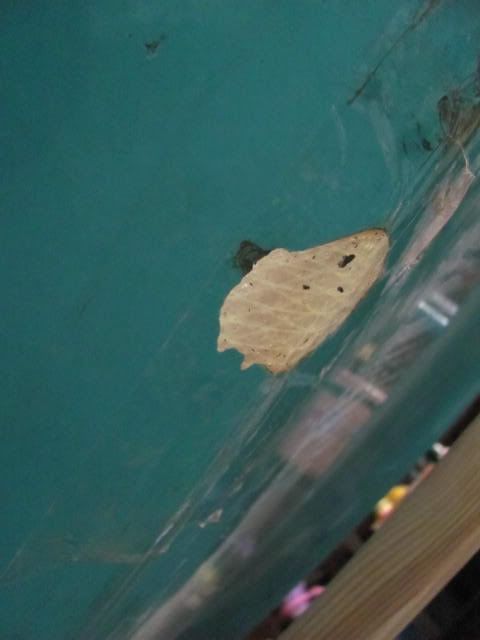
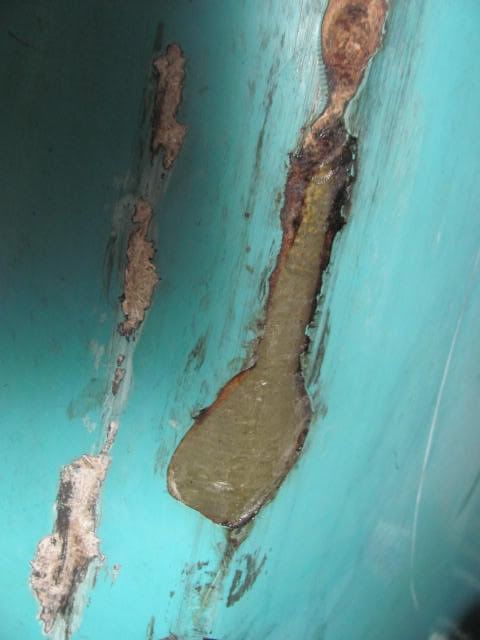
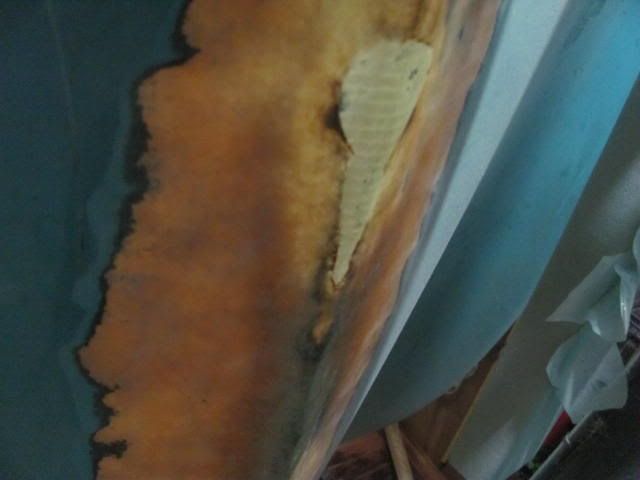
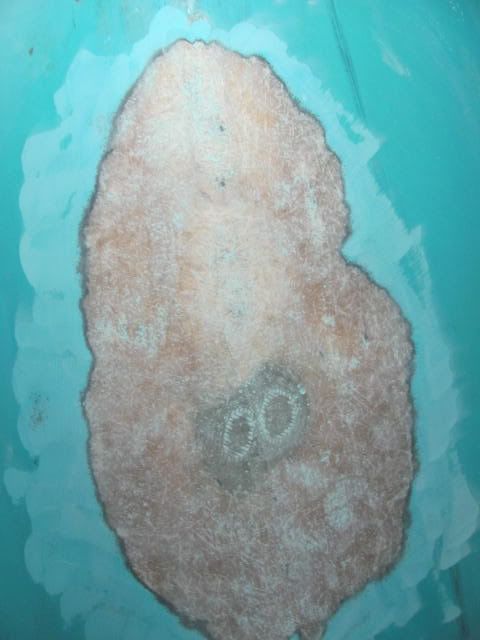
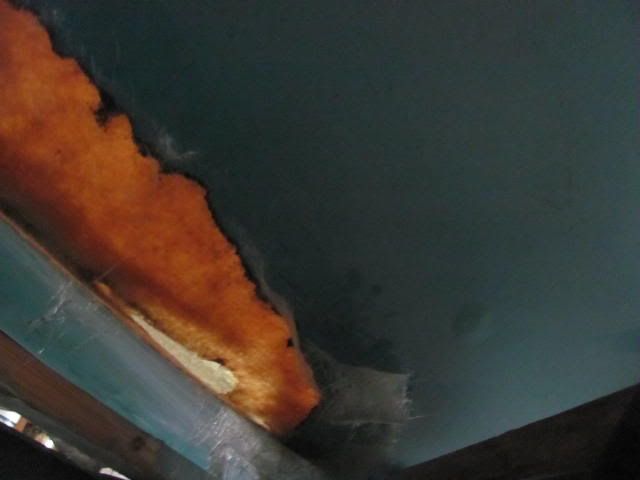
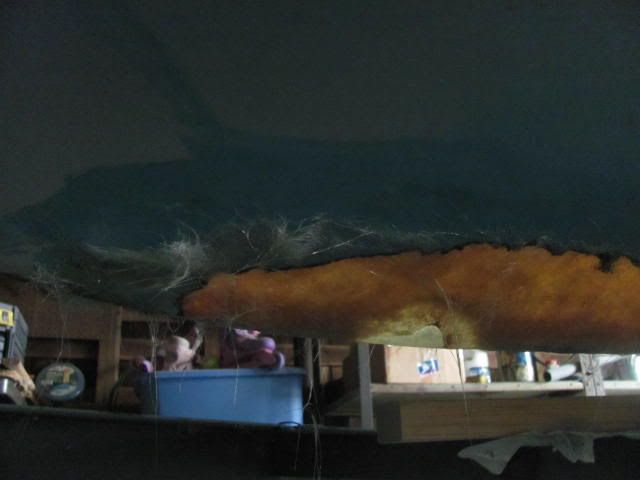
There are three gouges on the keel. When I ground out the first two, I could see the stringers (I didnt realize the gouges were that deep). I checked the stringers again. The wood was hard, but it was wet. Now Im getting concerned. On the third gouge, towards the bow, there was no wood. But there was foam. I could sink a screw driver in, and feel the squeak of wet foam. So I cut a hole in the deck, and stuck the screw driver in, and again, squeaky wet foam. Im pretty sure the boat is filled with heavy wet foam. That would explain why I cant lift the front of the trailer.

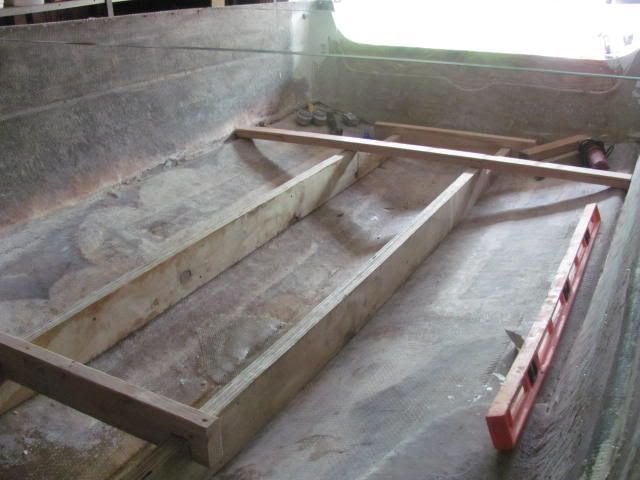
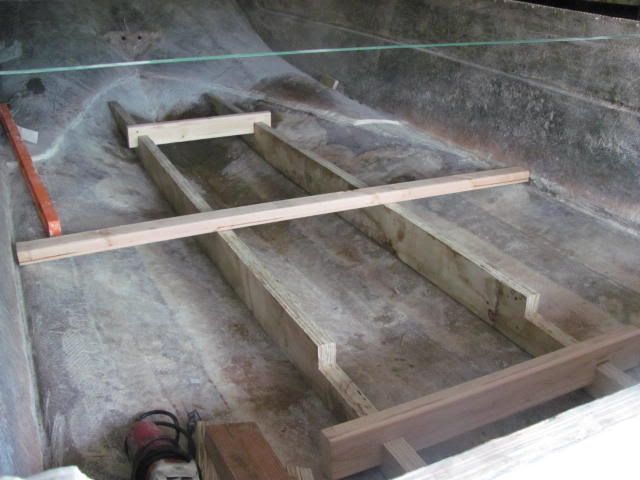
So here I am. Too far in to stop now. Ive made some mistakes, but Im enjoying the process. Im going to pull the rest of the cap, replace the stringers, foam and deck. And then see what else this boat has in store for me. I should point out, Im not looking for a pretty boat, but I do want a safe boat.

And heres the first question -

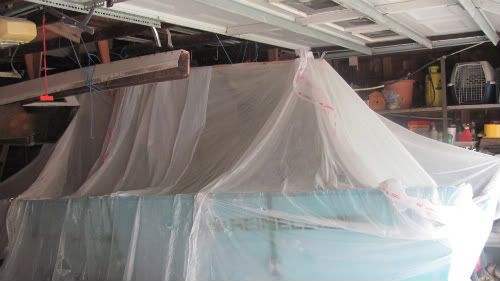
I decided to remove the windshield before I pop the cap off to lessen the weight. Im going to have to hang it from the rafters in my garage. I discovered that all of the windshield bolts are rusted out.
windrust.jpg

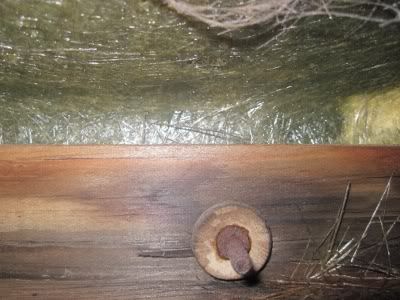
I tried to remove one of them, and it snapped of.
broken.jpg

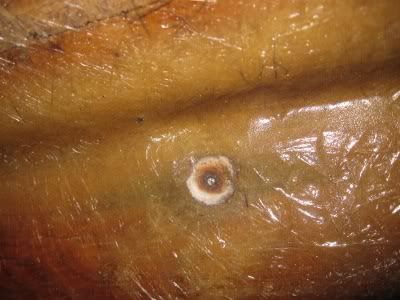
If I snap off all of the bolts to get the windshield off, will there be a way of replacing them later? Ive searched but I cant find out how these things are constructed. Or, should I just leave well enough alone and hang the cap with the windshield in place?

Thanks.
 
Last edited by a moderator:

Fisherball

Chief Petty Officer
Joined
Mar 19, 2009
Messages
470
Re: The inevitable 1973 15? Reinell tri-hull restoration!

You may have to drill/grind to get the bolts out but they should be replaced with new stainless ones. That wood looks like it spread the stress evenly along the glass it's bolted to. I'll bet a windshield gets a lot of force on it when you are flying on the water & there is a headwind.
 
Last edited by a moderator:

dOb

Petty Officer 1st Class
Joined
Jun 14, 2010
Messages
244
Re: The inevitable 1973 15? Reinell tri-hull restoration!

Thanks. I agree. I'll figure out how reattach it when the time comes. It also occurred to me that an of balance passenger could grab the windshield for balance, and with those rusted bolts, could be bad news. Might as well take care of it now. What's one more thing on the list.
 
Last edited by a moderator:

tallcanadian

Captain
Joined
Sep 7, 2006
Messages
3,250
Re: The inevitable 1973 15? Reinell tri-hull restoration!

Your doing the right thing. Do it right and you won't have to do it again. The windshield bolts will be the easiest to replace. As far as your gouges go, to repair it properly do it from the inside. More than likely your stringers are rotted anyway along with the foam. Nice job on the transom. You did that well enough, you won't have any problems with the rest of your repairs.. Good luck and have fun. It will be be better than new.
 
Last edited by a moderator:

dOb

Petty Officer 1st Class
Joined
Jun 14, 2010
Messages
244
Re: The inevitable 1973 15? Reinell tri-hull restoration!

Re: The inevitable 1973 15? Reinell tri-hull restoration!

Still grinding away and removing old glass. Last night I was removing the lip that was left when I removed the deck. As I worked my way forward I noticed that there was a lot of glass that had been built up to the level of the deck. I was able to cut and pry out a lot of it. Then I came to this spot. It is about an inch thick. It goes back about another foot and tappers to the curve of the hull. I will plan to continue to cut away and grind it down to the layer of roving on the hull. But it occurred to me that this may have been done for strength. I'm not sure if I should remove it and extend the deck into that area, or leave it and cut the deck around it. Sorry the picture isn't the best. I'm doing this on my lunch break.
thickglass.jpg

Thanks
 

Cadwelder

Lieutenant Commander
Joined
Aug 30, 2010
Messages
1,780
Re: The inevitable 1973 15? Reinell tri-hull restoration!

Re: The inevitable 1973 15? Reinell tri-hull restoration!

Still grinding away and removing old glass. Last night I was removing the lip that was left when I removed the deck. As I worked my way forward I noticed that there was a lot of glass that had been built up to the level of the deck. I was able to cut and pry out a lot of it. Then I came to this spot. It is about an inch thick. It goes back about another foot and tappers to the curve of the hull. I will plan to continue to cut away and grind it down to the layer of roving on the hull. But it occurred to me that this may have been done for strength. I'm not sure if I should remove it and extend the deck into that area, or leave it and cut the deck around it. Sorry the picture isn't the best. I'm doing this on my lunch break.
thickglass.jpg

Thanks

How was the old deck installed, was this 1" thick glass holding it? I would say leave it although anything that thick I doubt was factory....not on a 15 footer, anyway. Hope you got all the safety equipment on with all the grinding. Protect yourself....
 

dOb

Petty Officer 1st Class
Joined
Jun 14, 2010
Messages
244
Re: The inevitable 1973 15? Reinell tri-hull restoration!

Re: The inevitable 1973 15? Reinell tri-hull restoration!

The old deck had about 1/8" to 3/16 " of glass on top. It looks like this a way to build up the hull to be level with the deck in that spot. I don't think it was "holding" the deck. I cut away a lot of loose stuff after removing the deck. You can see the line on the other side that hasn't been removed yet.
 

dOb

Petty Officer 1st Class
Joined
Jun 14, 2010
Messages
244
Re: The inevitable 1973 15? Reinell tri-hull restoration!

Re: The inevitable 1973 15? Reinell tri-hull restoration!

OK - first things first, this is a 1974 Reinell. I read '73 somewhere and started this thread before I knew it was in the HIN. If that's the biggest mistake I make on this boat I'll be thrilled. But I'm sure it won't be. Maybe the Mods can change the title in case someone is looking for specific info.

I managed a good amount of time grinding today. Until now it's been a couple hours a night, and half of that is cleaning up. But I have most of the hull cleaned out and smooth. There are a couple of spots I need to knock down, and I know I will have things to grind here and there. But for now, I am saying good-bye to the grinding palace.
IMG_0202.jpg

The next thing on the list is to patch the holes that got me here in the first place. I have ground them down on the inside. Tomorrow I will grind the out side of the hull.
IMG_0214.jpg

My plan is to alternate 2 layers of CSM with 2 layers of Roving or 1708, increasing in size on the inside. And then a layer of each on the outside. Is 4 layers enough for the inside of the hull? And I don't plan to paint her until next fall, so I was wondering if I finish up the outside with waxed resin, would that be enough to put her in the water to test some things this summer, or does it need to be coated? I have a small gel coat kit that I could use.
 

DALLEN7

Petty Officer 2nd Class
Joined
Mar 21, 2010
Messages
143
Re: The inevitable 1973 15? Reinell tri-hull restoration!

Re: The inevitable 1973 15? Reinell tri-hull restoration!

it looks like you had the same issue i had on my bow with the way the deck was mounted to the hull take a look at my thread and see.
I ground all of that crap out and plan on running the deck all the way to the hull all the way around. I believe it was one of the problems that led
to wet foam in my boat.
 

dOb

Petty Officer 1st Class
Joined
Jun 14, 2010
Messages
244
Re: The inevitable 1973 15? Reinell tri-hull restoration!

Re: The inevitable 1973 15? Reinell tri-hull restoration!

Dallen7 - I came across your thread a few days ago. I've gone back and forth on this, and decided to leave it in. I want to be sure that the deck is the same level as before. I've already cut the stringers, same as original, and have the deck wood, same thickness as original. Leaving it in means less build up later, and gives me a guide to work with. Thanks for the input. I'll be watching your thread to see what you do with your boat.
 

dOb

Petty Officer 1st Class
Joined
Jun 14, 2010
Messages
244
Re: The inevitable 1973 15? Reinell tri-hull restoration!

Re: The inevitable 1973 15? Reinell tri-hull restoration!

It's been slow going the last couple of weeks. The storms we had left me with a fallen tree and a leak in the attic. That ate up a lot of boat time. I'm back to a couple of hours a night until this weekend.
I did manage to get the wood for the stringers glassed together. And I've been saturating the wood for the hull supports so they'll be ready when the time comes.
The next project is to tackle the holes in my hull. I ground out the holes from the inside, down to dark glass. I've been reading volumes on this and I'm still not sure of the best approach. Originally I thought that I would put layers of CSM, 1708, CSM, 1708 in increasing sizes on the inside, and then grind down the outside and lay one layer of 1708 and CSM on the outside. I was also planning on using poly resin.
I also considered patching the two holes in the picture with one large patch since they are close together. There is one more hole farther back that I will patch by itself. Here's what I'm dealing with:
IMG_0334.jpg

IMG_0337.jpg

I know this needs to be strong and solid being on the keel and below the water line. I welcome any suggestions or opinions?
 

dOb

Petty Officer 1st Class
Joined
Jun 14, 2010
Messages
244
Re: The inevitable 1973 15? Reinell tri-hull restoration!

Re: The inevitable 1973 15? Reinell tri-hull restoration!

I managed to get some work done today. I rough cut the stringers using the old ones as a template. The two old stringers weren't exactly the same size. I'm guessing that the water logged wood swelled up before it dried out. I think I got pretty close.
I also made an attempt to patch the holes in the hull along the keel. I used a layer of CSM, and then two layers of 1708.
hole12.jpg

hole3.jpg


I plan to go back and patch them form the outside when this all sets up. Question: If I use another layer of CSM, 1708, and CSM on the outside, that would be three layers of CSM and three layers of 1708. Will that be thick enough for the hull? and also, how long should I wait before I start to work on the outside of the repair?
 

Cadwelder

Lieutenant Commander
Joined
Aug 30, 2010
Messages
1,780
Re: The inevitable 1973 15? Reinell tri-hull restoration!

Re: The inevitable 1973 15? Reinell tri-hull restoration!

Now this is just me, but the keel takes the blunt of force on the hull as well as punishment from running up on the bank, etc. Personally I'd add another layer of 1708 on the inside and extend it pass what you have now by...oh say 4" or so.

You're plan on the outside is fine.

You can start the outside repair the next day....or just after the current work cures....
 

dOb

Petty Officer 1st Class
Joined
Jun 14, 2010
Messages
244
Re: The inevitable 1973 15? Reinell tri-hull restoration!

Re: The inevitable 1973 15? Reinell tri-hull restoration!

Thanks. That's a good idea. I might as well build it up while I'm in there. That would give me 9 inches on either side of the hole. Should I build up the outside as far out as the inside. The outside is pretty banged up.
 

Cadwelder

Lieutenant Commander
Joined
Aug 30, 2010
Messages
1,780
Re: The inevitable 1973 15? Reinell tri-hull restoration!

Re: The inevitable 1973 15? Reinell tri-hull restoration!

Just enough to get it back up to the original surface, plus a little grinding shaping room....
 

dOb

Petty Officer 1st Class
Joined
Jun 14, 2010
Messages
244
Re: The inevitable 1973 15? Reinell tri-hull restoration!

Re: The inevitable 1973 15? Reinell tri-hull restoration!

I laid another layer of 1708 over the hull repair. I remembered that the last time I had to fight gravity. I had to push the resin up the sides until it was thick enough to stay to keep it from pooling in the center. This time I added a little more catalyst, and it was a warm day. It worked out much better. But there was still a little pooling after I left it.

IMG_0434.jpg


While that was setting up, I did a little more work on shaping the stringers. I have some stringer questions, but I'll save that for another post.
Then I started to work on the outside of the hull. To do the inside repair, I put packing tape on the outside to help keep the shape and to give me something to work against.
IMG_0420.jpg


It worked out pretty well.
IMG_0421.jpg


Side View:
IMG_0423.jpg


I gound out far enough to cover the other deep scratches that were there.
IMG_0431.jpg

IMG_0427.jpg


I have a couple of questions.
1. Did I grind far enough out from the damage?
2. I plan to use a layer of CSM, then a lyer of 1708, then a layer of CSM. But it seems that when I go back to smooth out the patch job, I'll just be removing the layer of CSM and maybe even some of the 1708 to get it flush with the rest of the hull. Or will it not be as thick as I'm thinking?

One more thing, should I use waxed resin for this to make sanding easier?
 

dOb

Petty Officer 1st Class
Joined
Jun 14, 2010
Messages
244
Re: The inevitable 1973 15? Reinell tri-hull restoration!

Re: The inevitable 1973 15? Reinell tri-hull restoration!

Today I decided to take a break from the dust and worked on the stringers. And I'm still reading up on the best way to finish the patch on the outside of the hull.
The original stringers were made of 10 foot 2 x 6s. I decided to go with 2 sheets of 3/4 inch plywood with a layer of glass in the middle. There was enough left of each of the old stringers to get a full template. After cutting and sanding for a while, I managed to get them the same as the original. I tested the height and curve of the hull. It was a pretty good fit.
IMG_0438.jpg


The 2 x 4s are just there to hold the stringers upright. The long one is to represent the bottom of the deck. I'll need to cut them down a 1/4 inch to allow for the bedding. The original stringers were directly on the hull. My plan was to use PL to bed the stringers, but now that I've seen them in place, I'm wondering if I would be better off using blue/pink foam. The bottom of the stringers is basically flat. I did put a slight angle on them when I cut them. But the "V" of the hull goes from about 20 degrees to about 35 degrees towards the bow. That leaves a large void under the stringer. It seems like that may be too big of a gap to fill with the PL. The pictures aren't that great. But you can kind of make out the shadow that gets bigger towards the bow on the inside of the stringer.
IMG_0440.jpg


Maybe I'll use a combination of both. Foam for the bigger voids, and PL for the rest of it.
 

dOb

Petty Officer 1st Class
Joined
Jun 14, 2010
Messages
244
Re: The inevitable 1973 15? Reinell tri-hull restoration!

Re: The inevitable 1973 15? Reinell tri-hull restoration!

So I?m probably over thinking this, but I want to make sure I do it right. Safety is the priority here.

I need to finish patching these holes before I move on to anything else. My original plan (see above) was to have a layer of 1708 on the outside of the repair. But I think that it might be too bulky, and that I will end up sanding it all down to make it level with the rest of the hull. So after a lot of reading, this is the new plan:
For explanation, I?ll call the holes hole 1, hole 2 and hole 3, from bow to stern.

Hole 1 ? I?ll rough it up a little, and lay a 4th layer of 1708, and extend it even more towards the bow.
Holes 2 & 3 will eventually be covered by a thin layer of PB and the flat stringers (hull stabilizers?) so they are good to go.
For all of the holes - On the outside, I will lay one layer of CSM 1 inch beyond the repair. After about an hour, I will lay another layer of CSM out to the edge of the grinded area. Then I will make a paste out of waxed resin and micro-bubbles and cover the CSM. When that is set, sand, prime and paint.

That?s the plan for now (unless I rethink it again). If any one has opinion on this, or if there are any Patch Masters out there, I?m all ears. If I get to this tonight I?ll post pictures tomorrow.

Thanks
 

dOb

Petty Officer 1st Class
Joined
Jun 14, 2010
Messages
244
Re: The inevitable 1973 15? Reinell tri-hull restoration!

Re: The inevitable 1973 15? Reinell tri-hull restoration!

Last night didn?t really go as planned. But hey, it?s all part of the learning curve. I?ll post it all ? the good, the bad, and the ugly. Maybe someone as green as me can learn from my mistakes.

I started of by lightly grinding and sanding to get the surface ready. I washed the areas with acetone. I measured and cut the glass I needed. So far so good. I stated by laying the fourth layer of 1708 on the first hole on the inside of the hull. Overkill, maybe ? peace of mind, definitely. That all went pretty smooth. Then I placed the first small patches of csm on the outer hull. They were approx. 6 inch circles. Everything was going well. While that started to set up, I used the left over resin to coat some of the wood that will be used later. (tip: I?ve learned that if keep any wood that I will use in the build available, I can use whatever resin I have left in my bucket to coat the wood. It really cuts down on waste. And when the time comes, the wood will be pre-saturated and ready to use).
Now it?s time for the big csm patches. I had originally planned on using wax paper or one of those flexible cutting boards to place the csm on the hull. I?m working from underneath. But I realized that I hadn?t brought it out with me. Now, fully suited up, and sticky with resin, I decided to not go into the house to get them. Plus, it was getting late and everyone was asleep. So I decided to use cardboard as a wet out table. I should have done the larger patch in sections. I wetted out the area on the hull. When I lifted the large patch, probably 18 ? x 12?, it immediately started to loose shape. I managed to get it on the surface, but when I would get one side to stay, the other would loose it?s grip. I worked it for a while, but now it?s getting sticky. The stuff was sticking to my hands and roller and not the hull. What a mess. Like toxic cotton candy. I finally got about 90% of it in place. And then I thought I would try to push down the little end piece that wasn?t holding. The corner stuck to my glove and it started all over again. I took a deep breath and slowed down. I eventually manage to get it in place. But it?s going to need some work to clean it up.

IMG_0456.jpg


IMG_0453.jpg


Lesson learned: When csm gets tacky, leave it alone. It?s easier to come back later and fix it when it?s had a chance to set up.
 
Status
Not open for further replies.
Top