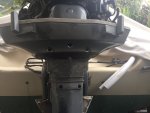
Working under the bubble exhaust is a pain. You'll need to remove the plastic shroud under the bottom motor pan, then remove the two rear bolts that hold the pan to the exhaust housing. After that's loose, pry the pan downward to give you some space and brace it there with a couple of scraps of wood (Koa is best).
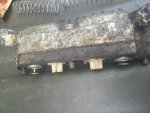
The screws may be frozen, so use patience for extraction. Once they're all out, be prepared for a small explosion of springs and poppets once the gaskets separate.
Make sure the two little holes in the plastic spacer plate are clear - if blocked, you'll air-lock the cooling system and it'll overheat. Some say enlarge these slightly to reduce the chance of blockage (I did but found it ran too cool as a result - YMMV).
Re-assembly is reverse, but I find it easiest to glue up the casting to the spacer using a new gasket and clamp it in a vice to cure. Then glue the poppet springs to the poppets, and the thermostats to the spacer. 3M 847 is my glue of choice. Then tie the poppets to the assembly with thin zip ties to permit finagling the assembly i place with a minimum of cussing. Once you get the bolts started, cut the zip ties then tighten the bolts evenly.