Thunder Craft Model 160

TitanTea

Petty Officer 2nd Class
Joined
Oct 4, 2009
Messages
102
Hello all, I am new to this forum so please be patient. I picked up a Thunder Craft Model 160 (I have no idea what year it is) Tri-hull that is about 15 1/2 ft. The hull and top deck is good but thats about it. The floor is shot. The previous owner started the restoration by pulling all the seats and a small section of the floor in the middle of the boat. I intend to replace the entire floor and floor framing (sorry dont know the tech terms) but Im not sure what it was suppose to look like. Is there anywhere I can get pics or info on this? My second question is... Towards the bow the floor goes up under the top deck fiberglass (starting at and past the walk through wind shield) How do I get the floor out of there to replace? Can I separate the upper and lower decks of the boat? On one side of the bow is a live well and the other is storage. The boat has no motor or steering controls. I am basically starting with a hull. Major rebuild/restore but I enjoy these types of jobs. Can anyone point me in the right direction? Thanks all! Sorry such a long post.:confused:
 

drewpster

Commander
Joined
Oct 17, 2006
Messages
2,059
Re: Thunder Craft Model 160

There are allot of complete builds going on in the forum right now. After you do some looking around I am sure you will find all the info you need. Below is a link to my thundercraft in the process of being restored. Feel free to post pictures and ask questions. That's what the forum is for.

Welcome

BTW- yes, the usual method to get to the forward part of the deck is to remove the upper half, or cap, of the boat.
 

TitanTea

Petty Officer 2nd Class
Joined
Oct 4, 2009
Messages
102
Re: Thunder Craft Model 160

Wow impressive job Drewpster. I spent the evening removing all the hardware so as to be able to remove the top cap of the boat. Rather easy actually. The bow seats are actually attached to the cap of my boat. I have a live well under one seat and storage under the other. Someone actually started removing the floor so I have no idea how or where the floor height is suppose to be? I need to get some pics up to better describe.... Thanks for replying!!
 

TitanTea

Petty Officer 2nd Class
Joined
Oct 4, 2009
Messages
102
Re: Thunder Craft Model 160

Drewpster, I have a question. How were you able to cut the wood for the floor/deck so exact? Did you make a cardboard template? Or is there a formula to it? Nice job man.
 

drewpster

Commander
Joined
Oct 17, 2006
Messages
2,059
Re: Thunder Craft Model 160

Thanks for the compliments, its been allot of work and allot of fun.

You mentioned that the bow seats are connected to the cap of the boat. Is the floor (deck) between the seats also part of the cap? If it is, this means the deck plywood will have to be high enough in the hull to meet the bottom of bow seat area. I suggest you remove all of the old deck up to the point where the bow seats start. This will help you determine how high to set the new deck in the hull. It also important to maintain the rise of the stringers and deck from the transom to the bow. If you build the stringers flat in relation to the keel the deck will not sit level as the boat floats in the water. The deck should rise slightly from stern to bow because when the boat is sitting still in the water the bottom of the boat sits lower in the front than the back.

Can you tell that the stringers are wider at the bow and narrower at the stern?
DSC04727.jpg


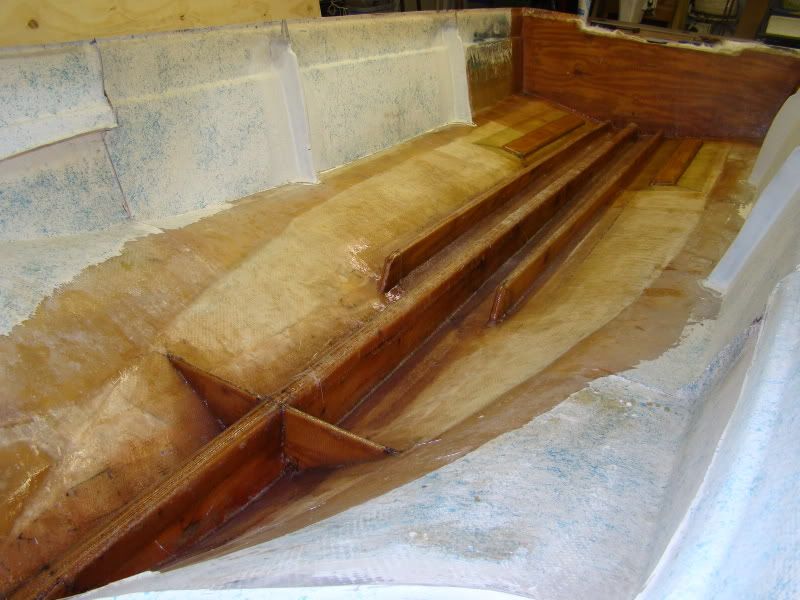
To shape the stringers I first cut the plywood oversize and glued all the pieces together before cutting them to shape. They are made of two layers of 3/4 plywood laminated together. I then used string lines taped to the hull to represent the finished deck height inside the hull. I took measurements from the string down to where the bottom of the stringer meets the hull. I subtracted 1" from those measurements to allow for the thickness of the stringer bedding, the fiberglass thickness on top of the stringer, the thickness of the plywood deck and the thickness of the fiberglass on top of the deck. This gave me the measurement of the stringer. I took measurements all along the stringer's length to give me the proper profile and transferred those measurements to the laminated stringers. You will have to do some fitting to make them sit the way you want. Each stringer came in and out many times to get them to fit properly.
I used tempered hardboard as template for the deck before cutting it out. It is like pegboard without the holes. You can get it from Home Depot for about $6 a sheet. I suggest you use it for the stringers also. It just did not occur to me to use it when I was building them. It is stiff and easy to cut.
To shape the deck I first rough cut a piece of hardboard oversized. I then marked a centerline on it. Back at the hull I took measurements at 6 inch intervals where the deck meets the sides of the hull. I then transferred those measurements to the template board at the same 6 inch interval along its length setting the marks from center.
The trick is to take all your measurements from center because the hull will not have an exact shape. confused? :redface: I am.
drewp
Btw- I am sure there is a formula that can be used to measure these shapes. I would not really matter if I knew them, I'm lousy at math.:p
 

TitanTea

Petty Officer 2nd Class
Joined
Oct 4, 2009
Messages
102
Re: Thunder Craft Model 160

Did you essentially replicate what was already in place from the factory or did you modify it?

There is a floor attached between the 2 bow seats yes. I figured that was the floor but towards the stern the floor actually follows the lines of the hull a bit. The floor rises towards the side of the boat and I thought that was odd or either not the floor? The thing that confuses me is there is 2 lengths of what looks like 2"x2" about... 3-5ft in length one on each side of the inside wall of the boat (from the driver seat area towards the stern) about 12" off of the remaining floor. The wood has fiberglass strips about every 6" holding it to the wall. I could be off on all the measurements...I'm going off visual memory... Sorry if that sounds confusing. This was making me thing this was the floor height but I couldn't understand how this would support the floor? Thanks for the great info and inspiration!:D
 
Top