Transom restoration on 1985 Bayliner 1950

dsorrell

Cadet
Joined
Dec 21, 2003
Messages
28
I was inspired by PeterMarcus to go ahead and dig into my transom. I have a Bayliner 1950 with a 125 hp I/O in it. I had noticed that I was getting a serious amount of wood rot on the lower part of opening and decided the day had come to take care of the issue.

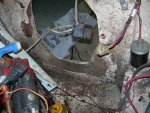
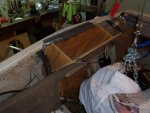
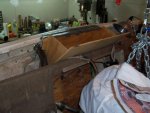
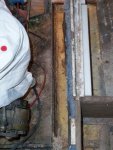
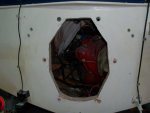
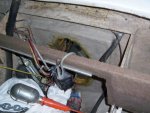
A friend came over and helped get everything apart. With the help of a small winch from Harbor Freight and the use of a come-along hooked to my garage rafters, I was able to get the outdrive, collar, and engine apart pretty easily. I had taken the outdrive off several years ago to redo a bunch of gaskets, tubing, and bushings.
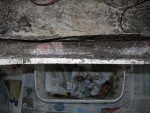
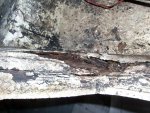
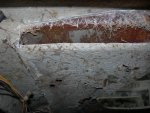
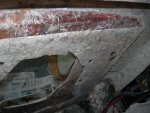
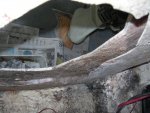
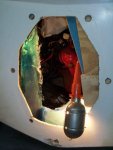
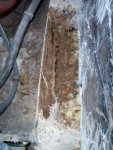
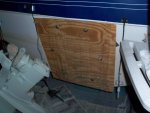
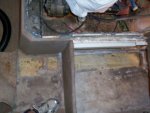
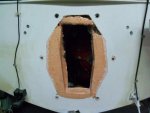
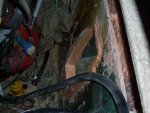
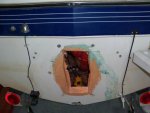
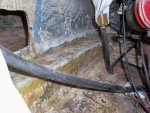
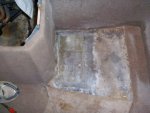
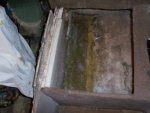
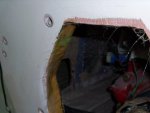
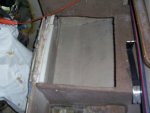
After getting access to the hole in the transom I could see the extent of the wood rot of the transom doubler. I was more than I expected and hoped. By the time I finished getting all the rotted wood out, there was only about 20% of the rest of the doubler that was any good. So I decided to just take it all out and redo it all cleanly. I've got some pictures that I hope show what's been done so far - if I can figure out how to attach pictures. I've only attached a few of the many I've taken just to give an idea of the work going on.

I'll add to this as I get further along.
 

Attachments

  • v4.JPG
    v4.JPG
    83.3 KB · Views: 0
  • v1.jpg
    v1.jpg
    146.4 KB · Views: 0
  • v6.JPG
    v6.JPG
    93.5 KB · Views: 0
  • v2.jpg
    v2.jpg
    121 KB · Views: 0
  • v3.JPG
    v3.JPG
    121.3 KB · Views: 0

jonesg

Admiral
Joined
Feb 22, 2008
Messages
7,198
Re: Transom restoration on 1985 Bayliner 1950

The good part is you skipped the initial 6 weeks of "maybe its just this little spot ".
Now you can get all that wiring out of there, remove the bilge pump etc and get to grinding.
 

proshadetree

Lieutenant Commander
Joined
Jul 19, 2008
Messages
1,887
Re: Transom restoration on 1985 Bayliner 1950

Not to bad a job. I had to do my 1952 cuddy. It took about 2 weeks. That is weekends and some evenings. I am no work adict so results may vary.
 

dsorrell

Cadet
Joined
Dec 21, 2003
Messages
28
Re: Transom restoration on 1985 Bayliner 1950

Work and life definitely get in the way of a steady approach to boat restoring and rebuilding. I've finally made progress. I found that I also had some stringer rot going on back by the transom. So I dug out the bad stuff (about 34 inches worth from the transom). I have pictures I'll post, but I need to reduce their size. More to come after the 4th of July.
 

dsorrell

Cadet
Joined
Dec 21, 2003
Messages
28
Re: Transom restoration on 1985 Bayliner 1950

It's been a long time since my last post. As stated previously, life and work get in the way of many things. But I wanted to report (with pictures) that I finished my transom rebuild. The Seacast method seems to work very well. I had a few issues with it but only due to being a first time user, nothing related to the product. I just didn't know what to expect as far as viscosity, flow into cavities, etc. I used the boat during the summer 2012 season with much success. No leaks anymore!

The first pic is looking down on the top of the cavity I created by digging out the rotted 1.5" plywood transom doubler.
Second picture is another view of the empty cavity along with inner fiberglass shell that needs beefing up.
Third picture is the outside view of the transom.
Fourth picture is adding in fiberglass to rebuild the inner shell. This will give me an inner and outer shell in which to contain the Seacast.
Fifth picture is the funnel I created, setting at the top of the cavity into which I'll pour the Seacast.
 

Attachments

  • 100_3903.jpg
    100_3903.jpg
    81 KB · Views: 0
  • 100_3905.jpg
    100_3905.jpg
    89.3 KB · Views: 0
  • 100_3940.jpg
    100_3940.jpg
    34.8 KB · Views: 0
  • 100_3955.jpg
    100_3955.jpg
    86.2 KB · Views: 0
  • 100_4023.jpg
    100_4023.jpg
    62 KB · Views: 0

dsorrell

Cadet
Joined
Dec 21, 2003
Messages
28
Re: Transom restoration on 1985 Bayliner 1950

In this set of pictures -
The first is another picture of the funnel for pouring the mix.
The second is when I discovered a great deal of rot in the stringer on one side. Oh joy! How rotted IS my boat. I dug out rotted wood forward until I got to good wood - about 34" from the rear. Hope I truly got it all.
Third picture is the plywood backing board to close the opening you saw in a previous picture. I did the same thing on the inside. This created one big fill of Seacast that you'll see in a later picture.
Fourth picture is a top down look at the floor, just outside the engine compartment. It had rot as well. The mix was going to replace the transom wood, stringer wood, and floor wood. You can also see the yellow foam that I poured to fill the space. That stuff works well and is closed cell, so it's supposed to not get water-logged.
Fifth picture is another angle of the floor/stringer - after foam, before Seacast.
 

Attachments

  • 100_4025.jpg
    100_4025.jpg
    63.8 KB · Views: 0
  • 100_4032.jpg
    100_4032.jpg
    59.9 KB · Views: 0
  • 100_4035.jpg
    100_4035.jpg
    51.1 KB · Views: 0
  • 100_4043.jpg
    100_4043.jpg
    57.7 KB · Views: 0
  • 100_4046.jpg
    100_4046.jpg
    54.4 KB · Views: 0

dsorrell

Cadet
Joined
Dec 21, 2003
Messages
28
Re: Transom restoration on 1985 Bayliner 1950

In these pictures I'm getting closer to getting done.
First is the hardened Seacast after removing the forms inside and out. You can see at the top of the hole that I didn't have enough. That's because more of it ran through the connecting channel inside to where the stringer was that I cleaned out. I didn't expect that and had a mess. I thought it was more viscous and wouldn't flow that easily. It did.
Second picture is an inside view of the same thing.
Third picture is after the second pour of Seacast. You can see they changed the color of it. They said it was due to having some legal issues with Bondo. Gee, I can't imagine why. It looks like it, smells like it. But it does have different properties. The second pour filled the transom and ...
in the fourth picture I also used it to finish doing the stringer and all the floor area that needed doing.
The fifth picture is with the harded stuff cut to the right size hole - or so I thought!
 

Attachments

  • 100_4048.jpg
    100_4048.jpg
    54.6 KB · Views: 0
  • 100_4057.jpg
    100_4057.jpg
    79.6 KB · Views: 0
  • 100_4077.jpg
    100_4077.jpg
    55.6 KB · Views: 0
  • 100_4079.jpg
    100_4079.jpg
    47.1 KB · Views: 0
  • 100_4087.jpg
    100_4087.jpg
    45.9 KB · Views: 0

dsorrell

Cadet
Joined
Dec 21, 2003
Messages
28
Re: Transom restoration on 1985 Bayliner 1950

Continuing on...
First picture is the final fiberglassing of the top of the stringer. The Seacast stuff is supposed to be at it's best when sandwiched between fiberglass.
Second picture is fiberglassing part of the floor.
Third picture is fiberglassing the rear part of the floor.
Fourth picture is fiberglassing the top of the transom cavity now filled with the solid stuff.
Fifth picture - this is where I became aware that the original hole wasn't really cut to the right size. When I put the collar for the outdrive up to the holes it would bolt into, I saw from the inside that the sealing gasket didn't have any surface to seal against in a few places. So I had to add a little surface area. Bondo worked for that.
 

Attachments

  • 100_4088.jpg
    100_4088.jpg
    99.3 KB · Views: 0
  • 100_4089.jpg
    100_4089.jpg
    58 KB · Views: 0
  • 100_4091.jpg
    100_4091.jpg
    53.4 KB · Views: 0
  • 100_4095.jpg
    100_4095.jpg
    73.7 KB · Views: 0
  • 100_4123.jpg
    100_4123.jpg
    43.9 KB · Views: 0

dsorrell

Cadet
Joined
Dec 21, 2003
Messages
28
Re: Transom restoration on 1985 Bayliner 1950

Finishing it up. The first picture is the painted floor area. No more wood to rot there.
The second picture is the top of the transome all sanded and painted.

All that was left to do was to reinstall the engine and outdrive, which is no big deal. It was really nice when I was tightening the 6 bolts holding the outdrive collar to the back of the boat. They snugged down very well, a feeling I hadn't gotten from those in a long time.

I used the boat extensively throughout the summer of 2012 and have had no issues with it. I figure it can only be better than it was before, when the transom area was nothing but rotted wood. The engine was doing well just hanging mostly on the 1/4" fiberglass boat shell.

Project complete!
 

Attachments

  • 100_4129.jpg
    100_4129.jpg
    47.5 KB · Views: 0
  • 100_4130.jpg
    100_4130.jpg
    83.3 KB · Views: 0
Top