Per
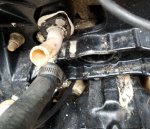
achris more info on your model outdrive will improve the accuracy of forum responses. If you don't know, a pic will help. Pics of both the out drive and the gimbal assembly. The outdrive is bolted to the bell housing from the rear. Your bellows are attached to the bell housing from it's front. The bell housing provides the up-down trim pivot function.
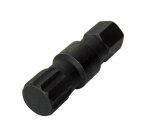
It's loosened by removing (depending on model) the trim senders, and the pivot pins. The tool below is a must to remove the pins, and get the 90 ft lb torque. It can be purchased for $7-$15 on eBay. "Mercruiser hinge pin tool". It's a very tight fit inside even with the pins removed. Maybe enough to force it aside to get the hose removed.
If not, you can get all the room you need by removing the rear of the drive shaft and exhaust bellows. This will require a second special tool to expand the exhaust bellows on reassembly, and a new retaining ring for the DS bellows.