U-Joint Bellows on Alpha 1 genII

Status
Not open for further replies.

G1K

Petty Officer 3rd Class
Joined
Jun 20, 2007
Messages
85
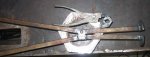
So today I replaced the gimble bearing and seal. Also got the new exhaust bellows and shift cable bellows on. Now I'm kinda stuck on the u-joint bellows. I know which end goes on the transom, and which goes on the bell housing. The manual is a bit unclear about what the proper step are to assemble.

Should I attach the transom end first? Should I attach it to the bell housing first? (seems that the transom first would be easiest)

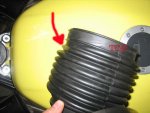
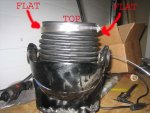
Also, one end of the bellows has two flats. How do these get positioned? I know there is a possibility of something rubbing, but can't remember (and I can;t find where I read it) if it has to do with these flats, or the position of the hose clamp screw. Where does the whose clamp screw go?


If all these questions are answered in the manual, a page number would be good also. The more I looked for it in there (transom minor disassembly and major disassembly) I got more and more confused.

Oh yeah, replacing the water hose was a first class PITA.

In the mean time, I;ll keep searching the old posts.

Thanks,
Ryan
 

G1K

Petty Officer 3rd Class
Joined
Jun 20, 2007
Messages
85
Re: U-Joint Bellows on Alpha 1 genII

Section 4a page 8: I see how the clamp needs to be positioned. I looked through all 52 pages, and still can not see where the flats go. Maybe I was not being descriptive, so I have included a pic of the flats I am referring to.

I've also read section 4b. Page 20 shows a picture of the u-joint bellows and the bellows has the word TOP printed on it. Mine doesn't have that imprint, but assuming that the ground clip is the same relative to the "top" I think I may have figured it out.

Attached pics show the flats, and how I THINK it should go. I labeled what I think is the top of the bellows. Clamp screw on the starboard side with the head facing down (so a nut driver can access from the bottom). Ground clip also on the starboard side, and the flats are on the port and starboard side (vs. top and bottom).

Sound correct? I've included a pic of the bellows attached temporarily to the bell housing to show my interpretation of the correct installation orientation.

Also, in the portion of the manual discussing trim sender replacement, them show how to reinstall the bell housing and drive the aluminum ring to hold the bellows in place. The leads me to believe, install the bellows to the transom first, then the bell housing. Makes sense to me. I would imagine it may be difficult to do the other way around... but that's why I asked.

Thanks Don for your help with the seemingly never ending project so far.. Hopefully I've read between the lines in the manual on this installation. I've built motorcycle transmissions that seemed simpler than this, but maybe that's because I've never serviced the outdrive or changed the bellows before.
 

Attachments

  • flat01.jpg
    flat01.jpg
    34.6 KB · Views: 8
  • housing 02.jpg
    housing 02.jpg
    44.8 KB · Views: 9

thunderroad

Chief Petty Officer
Joined
Jun 19, 2005
Messages
417
Re: U-Joint Bellows on Alpha 1 genII

I will obviously defer to the printed word and the advice of the pros around here, as I've only installed two u-joint bellows' in my life....but, on the first one I installed the transom end first and didn't think I was ever gonna get it pulled back to the bellhousing. On the second, I installed the bellhousing end first and it seemed easier to push it onto the transom end than pull it to the bellhousing. I got it on and held it for a few minutes until the glue started to grip, then put on the clamp. Maybe it was because it was my second one, but it just seemed a lot easier to me.
 

Don S

Honorary Moderator Emeritus
Joined
Aug 31, 2004
Messages
62,321
Re: U-Joint Bellows on Alpha 1 genII

I've also read section 4b. Page 20 shows a picture of the u-joint bellows and the bellows has the word TOP printed on it. Mine doesn't have that imprint

Did your old bellows have the word TOP on it? If so, compare where the flats are to it. That bonding clip can be anywhere on the bellows and comes off very easily.
 

G1K

Petty Officer 3rd Class
Joined
Jun 20, 2007
Messages
85
Re: U-Joint Bellows on Alpha 1 genII

Did your old bellows have the word TOP on it? If so, compare where the flats are to it. That bonding clip can be anywhere on the bellows and comes off very easily.

The old one did have TOP on it, under the ground clip, which is why I didn't see it.

I got everything back together with the exception of that aluminum ring to hold the drive shaft bellows on the bell housing.

I read that the exhaust bellows was a royal pain with out the expander tool, so I found a picture of one and built it this morning. The only local place open today didn't have one.


Ryan
 

Don S

Honorary Moderator Emeritus
Joined
Aug 31, 2004
Messages
62,321
Re: U-Joint Bellows on Alpha 1 genII

I got everything back together with the exception of that aluminum ring to hold the drive shaft bellows on the bell housing.

I get a can of Mercury Power Tuner in a spray can. Put a little on the bellows where the ring goes and it pushes in very easily by hand ............. when using an OEM bellows. If using aftermarket bellows, you will have a bit of a fight to get it started in, but it too will eventually go in by hand. No special tools required.
 

starsnstripers

Lieutenant
Joined
Nov 30, 2007
Messages
1,330
Re: U-Joint Bellows on Alpha 1 genII

I just dod my belhousing and the flats were toward the transom end at 3 and 9 o'clock. My bellows har top and bottom printed on it also but i matched how the old one came off. It was quite the project haha! I didnt have to much trouble with the water hose but the exhaust bellows was a pain. That bellows adhesive is like model glue or tire patch glue. Gooy stuff. Hope this helps ya.
 

tmagyar

Cadet
Joined
Jun 17, 2006
Messages
15
Re: U-Joint Bellows on Alpha 1 genII

Perfect timing on this thread. I'm in the process of the same task. Today me and a friend got the outdrive off, water pump replaced, bellhousing off along with all old bellows, water hose, etc. Began replacing everything.

My U-Joint bellows had a TOP indicator which I placed facing up, onto the gimbal housing. Also attached the shift cable and exhaust bellows. I think the water hose was an hour of work!! but we got both ends reinstalled.

My problem now is getting the U-joint bellows to bellhousing installed, with that metal ring. My drive unit has a groove which the bellows fits within. Then the metal ring slides in. Well...I can't keep the bellows within the groove, to get the metal ring started! I can get it into the groove using two hands inside the hole, but as soon as I let it go, the bottom half of the bellows comes up and out of the groove, contracting back toward the transom. The top stays in the groove well.

Not sure what to do. We called it a day. What we could think of was to use some bellows adhesive and some way to hold it in the groove until the adhesive can hold it (like a round wooden block, sized to fit it well that I can cut). Once dried, remove the round block, and then install the metal ring. I made a replica of the tool out of wood. But if we try to use the tool, all it will end up doing it pushing the bellows out towards the transom.

Hope this all makes sense. Any ideas? I read the suggestion of using Power Tune, and not needing the tool, but...I can't get it to go with just my hands. It feels like it tapers inward and is quite a press fit to get in...

Thanks,

Tom
 

Don S

Honorary Moderator Emeritus
Joined
Aug 31, 2004
Messages
62,321
Re: U-Joint Bellows on Alpha 1 genII

tmagyar
Best to start a new thread with your question, refer to this one, but don't turn someone elses problem into yours. It gets very confusing and your post will get lost in no time.
 

starsnstripers

Lieutenant
Joined
Nov 30, 2007
Messages
1,330
Re: U-Joint Bellows on Alpha 1 genII

Well with the bellhousing hinge pins out you can push the bellhousing towards the treansom and it almost stays on. what i did was take an angled lengthy pry bar and put some tape on the end so it wasn't sharp, put it through the bellows and catch the first groove near the transom end and apply inward pressure while tightning the clamp with a long ext. 1/4 drive. Just watch to make sure it's on all the way and you may have to push in on it in a few different spots to insure its in all the way. I was generous with the bellows adhesive too. :) good luck. There is a bellows expander tool for the right tool for the job, but i didnt have one either. I'm a poor boater so i make most of my stuff and improvise alot. A bid pair of hedge trimmers ground down took out my gimble bearing snap ring like a charm, hehe! have fun!:)
 

Don S

Honorary Moderator Emeritus
Joined
Aug 31, 2004
Messages
62,321
Re: U-Joint Bellows on Alpha 1 genII

Uhhhhhhh, who's question are you replying to?
 

starsnstripers

Lieutenant
Joined
Nov 30, 2007
Messages
1,330
Re: U-Joint Bellows on Alpha 1 genII

OOPs AAAAAHHH! The guy who took this thread over, i wasn't paying attention to the thread starter SORRY! :eek:
 

G1K

Petty Officer 3rd Class
Joined
Jun 20, 2007
Messages
85
Re: U-Joint Bellows on Alpha 1 genII

Don,
I used the power tune quite liberally, but could not get that ring started for the life of me. It is not a factory bellows, it's an aftermarket one... GLM I think? Next time it will be a merc one, even if it is twice the price, the cheap one is not worth the frustration.

I had to call it a day before I wound up breaking something..

I'll try again on Wednesday. I'm going to try to make one of the installation tools that I saw on the mercstuff site

http://mercstuff.com/bellowsdriver.htm

I'll post up what ever I come up with to get that ring on...


Here's the bellows expander tool:
attachment.php


I also made the crimping tool the manual explains how to make to crimp the collar on the end f the shift cable bellows.

Ryan
 

Attachments

  • expander.jpg
    expander.jpg
    25.8 KB · Views: 9

starsnstripers

Lieutenant
Joined
Nov 30, 2007
Messages
1,330
Re: U-Joint Bellows on Alpha 1 genII

Good looking fabricated tools there G1K ! Sorry about ansering the other guys ? in your thread, And the way i did mine worked for me because i have an older MC-1 And do not have the bellows sleeves like yours. Lookes like ya need one of them driver tools for yours. Good luck, good work.;)
 

tmagyar

Cadet
Joined
Jun 17, 2006
Messages
15
Re: U-Joint Bellows on Alpha 1 genII

Sorry to interject my problem in the thread; I just figured we were having similiar problems...but I see how it confused the issue. Though now it looks like G1K and I were at the same problem!

Anyhow I just went back out and messed with it...and got that ring on! I used some engine degreaser/cleaner on the OD of the ring (suggested in the Merc manual). After fooling with it a few minutes, i got it to stick. Then I hurried up and grabbed the tool and gave it a couple good hits and it seated nicely.

That exhaust bellows expander tool is a *must* (tackled that after the above problem). Your tool looks great.

Again, sorry to steal the thread. All yours again. :)
 

JustJason

Vice Admiral
Joined
Aug 27, 2007
Messages
5,321
Re: U-Joint Bellows on Alpha 1 genII

G1K... Nice Expander!!!!
Want to make me one? :) :)
 

rodbolt

Supreme Mariner
Joined
Sep 1, 2003
Messages
20,066
Re: U-Joint Bellows on Alpha 1 genII

rubbing alcohol works well as a rubber lubricant as well.
when doing the trim senders pay close attention to the index marks and while the drive is turned to install the hinge pin bolt attach that sender/switch with one screw to prevent it from being crushed when you turn it to access the other side.
the oil line is probably almost as big a pita as the water tube :)
I usually install the oil line before mounting the gimbal back to the ring.
if your in saltwater DO NOT use the clip on the shift cable bellows, use a merc or BRP tie strap and make sure the cut end points to stbd and is horizontal.
the clips tend to disapear rapidly here in the salt pond.
 

G1K

Petty Officer 3rd Class
Joined
Jun 20, 2007
Messages
85
Re: U-Joint Bellows on Alpha 1 genII

Anyhow I just went back out and messed with it...and got that ring on! I used some engine degreaser/cleaner on the OD of the ring (suggested in the Merc manual). After fooling with it a few minutes, i got it to stick. Then I hurried up and grabbed the tool and gave it a couple good hits and it seated nicely.

What tool did you use to install the ring? Pictures?

Thanks,
Ryan
 

achris

More fish than mountain goat
Joined
May 19, 2004
Messages
27,468
First person I've heard say anything about that bloody snap ring!
2 things...
First, and probably the most important is that this thread is 13 years old, and as pointed out in the forum rules you read when you signed up, please do not reply to threads more than 90 days old unless you are the original poster,
Secondly, the snap ring is only in early MC1 transom units, not in Gen IIs.

Thread closed.

Chris.......
 
Status
Not open for further replies.
Top