Waterpump Function

jrgcbg40

Seaman Apprentice
Joined
Apr 29, 2007
Messages
35
My question is where is the pee-hole/telltale located on my motor.How can I tell if the waterpump is working?
My Engine is a 1988 Force 125 Serial # 1254X8B
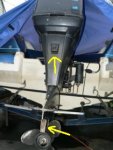
I just bought this on a Bayliner Cobra. I checked compression and its 150 in all cyliders on a cold engine.I took the thermostat out and ran the engine in a rubbermaid tub and had the ears on it.Water was coming out of the two holes in the square rubber part about halfway up the engine.It was coming out like a glug..pause..glug...pause @ 2000 rpm.The water felt cold.
Now down just above the prop and below the "whale tail" there was quite a bit of circulation/turbulance in the tub.(Prop was still).After I drained the tub and took ears off the lower part was warm. Is this where the tell tale is? I ordered a new thermostat and waterpump assembly anyway but just want to be clear on how it works. I am going to include a photo with arrows pointing to the two locations in question. (If it works)
Thank You
 

Attachments

  • engine.JPG
    engine.JPG
    12.3 KB · Views: 1

Frank Acampora

Supreme Mariner
Joined
Jan 19, 2007
Messages
12,004
Re: Waterpump Function

There is no indicator or "pee hole" on early Force 3 and 4 cyl. engines. I don't know about past 1990. The lower arrow is pointing to the exhaust snout. That's why it was warm. About 80% or the water comes out there and the other 20% exits the two holes at the upper arrow. These two holes are called the idle relief and they function to reduce backpressure when the engine is sitting low in the water -- like when you are traveling slow or off plane. That's why you tend to see smoke at slow speeds.
The exhaust snout serves several functions: It exhausts the combustion products, it exhausts cooling water, and it is adjustable left and right to help cancel torque steering.
 

jrgcbg40

Seaman Apprentice
Joined
Apr 29, 2007
Messages
35
Re: Waterpump Function

Frank,

Thank you for the quick response.I guess I was a little paranoid about the waterpump.I have both the Clymer and Seloc manual and neither explained how much or where the water comes out.
Thanks again.
Jim
 

Frank Acampora

Supreme Mariner
Joined
Jan 19, 2007
Messages
12,004
Re: Waterpump Function

You won't get nearly as much water from the muffs in the driveway as you will when the boat is actually in the water. The muffs just can't supply the amount of water the pump can deliver. If the bayliner does not have an overheat indicator--either a water temp gauge, a buzzer, or a light, buy one and install it for your peace of mind.
My experience is: You really need to drop the lower unit each year to check the pump. There is a hidden bolt inside the exhaust snout. Unless you have done something really bad like running it without water or running through a sand bar, the impeller should last at least 2 years. There is a little cylinder at the end of each impeller vane. When this cylinder is worn even with the vane, It's time to replace the impeller. When you first take off the pump body, be careful. The pump tends to corrode and seize up the bolts. When you reassemble, use grease, or anti-seize, or Vaseline petroleum jelly on the whole bolt--not just the threads. By disassembling each year, you prevent snapped bolts.
The other thing you need to do each year is to check and change the lower unit oil. If it is milky, or if free water is in the case, you have a leaking seal and replacement of seal or seals is required to prevent damage.
 

jrgcbg40

Seaman Apprentice
Joined
Apr 29, 2007
Messages
35
Re: Waterpump Function

Frank ,
Thanks for the great advice. The waterpump kit came today so I may attempt the repair. I have 2 more questions. The impellor vane looks to be too large? Looks like I'd have to really squeeze it in to the pump body? Is this how its meant to be? I will attach a photo. The kit number is Quicksilver FK 1069. Second question is I bought some synthetic 75-90 Gear lube for the lower unit.It is extreme pressure GL-5 rated. Will this be ok for the lower unit. I will take the vent and fill screws to my local West Marine to see if they have the correct seals.When I was there last week it looked as though the Mercury brand seals were similar.Whenever I mention that I have a Force motor the people burst into a fit of laughter.Not very comforting.Cant wait to get this in the water to see if it runs well. Thanks. Have a great day.
 

Attachments

  • pump kit.JPG
    pump kit.JPG
    31.1 KB · Views: 0

roscoe

Supreme Mariner
Joined
Oct 30, 2002
Messages
21,754
Re: Waterpump Function

impeller info answer is in your other post.

If you can't find a screw seal, any Mercury dealer will have them. Or go to MercuryPartsExpress dot com and order them.

The gear lube must be rated for marine use.
Marine grade lube will protect your lower unit if water gets inside.
 

jrgcbg40

Seaman Apprentice
Joined
Apr 29, 2007
Messages
35
Re: Waterpump Function

Thank You.....I found the screw seals...I'll get the correct gear lube tomorrow.Got the waterpump in gave up for now can't get the lower unit lined up.Thougt I saw a post somewhere here on tips to getting it back up. Having trouble getting the shift shaft through the tiny hole and the rubber boot on the top of the driveshaft keeps falling off while I'm wiggling the unit.Can I use a little rtv to hold the rubber collar to the spacer?
Thanks
Have a great day.
 

jrgcbg40

Seaman Apprentice
Joined
Apr 29, 2007
Messages
35
Re: Waterpump Function

Thought I'd give back for a change. This is what I did to get the lower unit lined up and together without much trouble.

Drilled a few large holes about halfway through a 6" piece of 2x4 then slid the drill across them to make a slot. Put the 2x4 on a floor jack. Got the lower unit together pretty close by hand then slid the jack under the skeg and the slot in the wood held it from sliding and scuffing it up. I then took one of the 6 screws and threaded through the "hidden hole" by the exhaust snout. this lined up the case pretty good. I was then able to line up the water tube and pushed up a little then raised the jack very slightly. The shift rod was very close to lining up.I then pushed up on the L/U again and turned the prop slowly and felt the splines line up with the top. I gave it a push and it went together. I jacked it up a little more then got the remaining bolts started and it was done. I want to stress that I only used the jack for support because my arms were giving out.You dont want to force anything up with the jack. Line up the water tube,shift rod then splines..resting in between. Worked for me hope this helps someone.
 
Top