Worse than I thought

infx708

Cadet
Joined
Jul 28, 2008
Messages
16
I have today off and from reading this forum, I've realized that removal of foam is one of the longest jobs so I decided to start removing the two large pockets of foam on each side of the stern. At the bottom of the first pocket, I found some super-saturated foam, which is the stuff under the floor. Looks like I'm going to have to remove the floor, which makes this project much more difficult. All of the storage compartments and the console are screwed into the floor, but they are riveted to part of the hull. I've never dealt with rivets before. How difficult are they to remove and replace? Do I have to be able to access both sides of the joint? It looks like the plywood is one giant sheet. What's the best way to join two sheets together so that I don't have a crack? Should I just try to remove the existing wood without damaging it, dry it out, seal it, and reinstall it?
 

oops!

Supreme Mariner
Joined
Oct 18, 2007
Messages
12,932
Re: Worse than I thought

the wood will also be saturated with water.......the deck should come out.

its not one giant peice....but 4x8 sheets that are fiberglassed togeather.

search foam removal......there are various methods....

a pick axe with a wide blade on it....makes short work of foam...just dont go crazy and go thru the hull....
 

infx708

Cadet
Joined
Jul 28, 2008
Messages
16
Re: Worse than I thought

The foam in the two side areas came out easily enough with a keyhole saw and a hammer. Currently removing the screws from the deck. Here's what it looks like - there's no fiberglass on the boat. The front deck is smaller than a standard sheet, but the back is much bigger.
DSC02799.jpg

It looks like the foam under the deck isn't the standard closed cell expanding foam, but rather a sheet of foam 3" thick with "cells" about the size of a blueberry. This also lines the sides of the hull. Looks like I'm going to be drilling out the rivets with holes in the middle and figuring out how to remove the ones that are solid.
 

oops!

Supreme Mariner
Joined
Oct 18, 2007
Messages
12,932
Re: Worse than I thought

what kind of boat is this?....can you post an overall pic?
 

infx708

Cadet
Joined
Jul 28, 2008
Messages
16
Re: Worse than I thought

It is a 1980 Sea Nymph JB-161.
DSC02797.jpg

Normally there are two pedestal seats and the driver seat. The live well is under the driver seat. It has a 50 HP Evinrude. The motorcycle helmet is covering the mounting bracket for the original depth finder to keep it from ripping the tarp.
 

reelfishin

Captain
Joined
Mar 19, 2007
Messages
3,050
Re: Worse than I thought

When you have a seam and no support the only real choice is to either back the joint with aluminum sheet metal or to cut the wood so as all seams fall along a support. I've seen lots of original decks done with no support on the seams of just tiny metal tabs joining the ends. On my Starcraft, I joined the floor sections from behind with sheet aluminum and sealed it all in with epoxy before laying it in place. No part of any wood was exposed to air or water when I was done.

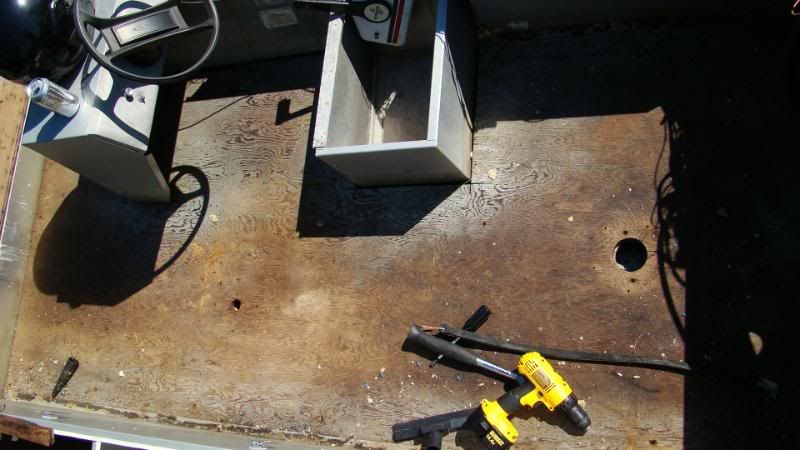
I laid my sheets long ways side to side, that way I got the least flex since all of my lower supports on which the deck sat, ran front to back. I cut all my pieces to fit just perfect, then removed the new wood, flipped them over, routed out the area to be joined with metal and then screwed and epoxied aluminum to the joints. I then coated both sides with epoxy resin and did the top sides with glass mat. I installed the floor as one piece and riveted it back in place. It will out last me for sure. I used 1/2" ply so it wasn't super heavy and my boat was only a 16'. The complete deck panel ended up being only three sections in all as I used separate, removable panels at the rear to allow access to the bilge and under splashwell area. It would also have been impossible to fit that area in place as a single piece. (I ended the wood deck at the rear splashwell and installed a single sheet of aluminum diamond plate at the rear to both increase storage height and to prevent an chance of water contact on the rear floor, which is where the old floor was the worst).

You can also ask the local lumber yard if they can get you larger sheets, I know larger panels are available for the sign industry, I've bought 5x10' sheets of plywood before. I was lucky and had four sheets given to me by a buddy in the sign business, if it holds up on a billboard, it will do fine in my boat. It was actually an odd dimension but it was pretty close to 1/2" when measured.
 

TBarCYa

Senior Chief Petty Officer
Joined
Apr 13, 2005
Messages
781
Re: Worse than I thought

The way a rivet works is by pulling a pin (looks like a finish nail) thru the rivet which deforms the tube in the middle causing it to lock in place. In the case of the ones you can't see thru, the pin simply broke off in the rivet so you should have no more trouble drilling those out than the others. Use a bit that's bigger than the hole and stop drilling when the head of the rivet pops off. The goal is just to remove the head and not to drill all the way thru.

Replacing rivets is simple and the tool to do it is cheap. Just make sure you know or have a good idea of the size rivet you need. They are measured in both diameter (of the shank not the head) and length which usually has a range that it will hold.
 

infx708

Cadet
Joined
Jul 28, 2008
Messages
16
Re: Worse than I thought

I have two types of rivets. The first looks like this on the top:
DSC02793-1.jpg

and this on the bottom:
DSC02794-1.jpg


The second look like this on top:
DSC02778-1.jpg

and this on the bottom:
DSC02792-1.jpg


I've seen this type at Lowes along with the tool to install them, so I'm not too worried about them. The other type I haven't seen in DIY form.
 

TBarCYa

Senior Chief Petty Officer
Joined
Apr 13, 2005
Messages
781
Re: Worse than I thought

Aaaah... I should have paid more attention to the fact that it's an aluminum hull and uses solid rivets. Unfortunately, I only have experience with blind rivets.
 

BlueDL1000

Cadet
Joined
Jul 6, 2008
Messages
8
Re: Worse than I thought

I replaced the solid rivets holding the seats in my aluminum smokercraft.

I used a chisel and hammer to shear off the inside (flat portion) of the rivets. I then used a drift punch to pop the rivets out of the hole. I didn't damage the holes this way. The aluminum is softer than you think.

You do need access to both sides of the rivets. I purchased the replacement rivets (brazier head) and installation tool (rivet set) online from Byler Rivets. The rivet set is used with a standard air hammer. I used an old hammer head as a mandrel.

You use the mandrel/air hammer on the rounded head of the rivet, and hold the mandrel agains the square end of the rivet. It only takes a few "hits" to flatten the end of the rivet. The rivets are cheap, and it looks like the factory installation.

I actually found this to be fun!
 
Top