Yay or Nay on Layup - Pics

rozicrc

Seaman
Joined
Sep 28, 2009
Messages
65
Hi,

Just finished my first fiberglass job, and unfortunately it is not turning out the way I'd hoped. I'd wet all the 1708 biaxial bias ply fiberglass out, but the weather was around 60F and I ended up with glass that had been wet out bubbling a bit (I did not think I needed the plastic wrap - I was wrong) after I let it set up overnight. The port side does look much better than the factory side believe it or not (not saying much), but I don't want to screw around with having something that is going to break in 5 years. I'd gone with 2 layers on the port stringers, on 6" layer to tab in and then a complete wrap afterwards. There is one pic with the outside of the inner port stringer where it ties into the transom that I am grinding out no matter what, but the smaller bubbles I am hoping I don't need to grind and wrap, as well as the tops of the stringers as I can't see them being load bearing.

I would much appreciate someone who knows what they are talking about helping me out here. I'll throw the pics on in a few minutes, thanks in advance!
 

drewpster

Commander
Joined
Oct 17, 2006
Messages
2,059
Re: Yay or Nay on Layup - Pics

Looks to me like your just not using enough resin. Did you wet the surface of the wood before you layed the fiberglass in place? What kind of resin are you using?

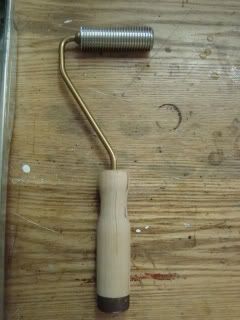
you may also want to get one of these,

DSC04737.jpg


Its a grooved roller, it helps the glass lay down in to the resin and it works all the bubbles out.
 

rozicrc

Seaman
Joined
Sep 28, 2009
Messages
65
Re: Yay or Nay on Layup - Pics

iso polyester resin, and I did roll it out wet (but I did not get the wood really wet first). The longer layup time seems to have hurt me, as it was clear when I left it but this is what I had after the fact. I went through 3.5 gallons of resin in the two stringers
 

mogfisher

Petty Officer 1st Class
Joined
Jul 13, 2009
Messages
237
Re: Yay or Nay on Layup - Pics

U say it took a long time to cure and it was clear when you left it. Could the resin be draining from the vertical surfaces. Is gravity your culprit here? I wouldn't know how to fix that, but perhaps that's the issue.
 

westexasrepublic

Chief Petty Officer
Joined
Jun 17, 2009
Messages
524
Re: Yay or Nay on Layup - Pics

3.5 gallas for that, that seems like a lot. grind down and start over again, that glass is just going to peel up. I found that a little resin on a roller should be applied to the would to soak it let it cure then lay your glass over that.
47571_1508851313559_1002607648_31517672_8349012_n.jpg

^me applying resin (easy on the hardener for a slow cure to avoid cracking and allow better soak into wood) to all the dry pieces of wood for my boat.

I want to think 2 things may have happened, the wood absorbed some of the resin and you got dry spots on your glass and/or the batch was not mixed hot enough (especially only being 60? outside) to cure before it all ran down to the lower half of the stringers....
 

rozicrc

Seaman
Joined
Sep 28, 2009
Messages
65
Re: Yay or Nay on Layup - Pics

thanks guys, looking at it I can see that it would drain down if allowed to cure too long. For grinding out, what is permissible to leave there air gap wise, is a silver dollar too big to leave? I'm not sure if someone could give a go or no go based on some of the examples I snapped
 

Mark42

Fleet Admiral
Joined
Oct 8, 2003
Messages
9,334
Re: Yay or Nay on Layup - Pics

Sometimes the glass wants to straighten out after being applied, especially over the top of stringers. It helps to pull it tight and staple, then roll and add more resin if needed.
 

clockwatcher

Petty Officer 1st Class
Joined
Nov 8, 2009
Messages
289
Re: Yay or Nay on Layup - Pics

Did you add anything to thicken the resin? You may want to add some Colloidal Silica so it doesn't run.
 

erikgreen

Captain
Joined
Jan 8, 2007
Messages
3,105
Re: Yay or Nay on Layup - Pics

Actually, thickened resin won't wet out the glass as well, and in fact that would make it impossible to see the bubbles :)

What this looks like to me is a combination of outgassing from wet wood or resin starved glass and bubbles created by the glass refusing to turn corners.

Given the amount of resin you used, I'd suspect that it's outgassing plus the cloth trying to straighten itself. I say this because the bulk of the bubbles are up high near the stringer tops. When you run cloth up one stringer side, over, and down the other the cloth on top wants to tent up, and as a side effect it pushes the sides near the corner out too. You can counter this by rolling it over with plastic later, clamping it, staples, etc.

When the glass "springs" up, it sucks in air/gas from wherever it can to form the bubble, like a suction cup pulling on a window. Mostly it draws air from outside the glass, sometimes if there's water in the wood it pulls some of that too.

Personally, I think the easiest thing to do on the top of the stringer is end the side glass at the corners, then run a separate strip down the top. Of course, you lose the extra stiffness provided by the glass on top this way, but you're not using glass for stiffness and strength in this boat anyway... it's just to tab the wood to the hull and protect it. Alternatively use peel ply or plastic on top, or a vacuum bag, and hold the glass in place.

Frankly your glass work doesn't look too bad. Just figure out why the bubbles are there, then re-do it and correct the problem.

How much resin you should use depends on a lot of factors. 1708 drinks it down, so for a complete set of stringers with 3 layers of 1708 including tabs 3.5 gallons isn't out of the question. It is a bit more than I'd expect to use. I suggest you take time when wetting the glass out... don't soak it, but roll the resin on then let it sit for 2-3 minutes to give it time to wet out. You'll see it wet the glass transparent in the same amount of time you would have used to roll on more resin.

Unfortunately for the amount of bubbles you have, you should probably grind them out. They're not in a critical location (the fillet would be worse) but there's a lot of them. Do it and have peace of mind.

Erik
 

Yacht Dr.

Vice Admiral
Joined
Feb 26, 2005
Messages
5,581
Re: Yay or Nay on Layup - Pics

Hello Rozicrc...

Sorry .. Ill say it ..

No go on this.. :(

There is just WAY too much delam.

Why did it happen so not to make the same mistake ?

Think of fiberglass like a suction cup.. and what you put your suction cup on is VERY important ( theres a reason for proper prep before you start glasswork )

Can a suction cup stick to a dry sponge ? or anything thats not really completely sealed ? .. Nope..

Prepping the wood is Very important..not just for the seal/bonding affect. Its for proper glasswork without just lifting off of your work ( as in your case ).

You didnt seal the wood correcty therebye letting air from the inside of the glass coming out from undernside ( you will never staple or tape any glass like that ).

Another reason would be that you didnt have enough mat first. Mat will absorb resin and help hold it in there so you dont have air bubbles .. gettin bigger and bigger and..so-on ( as you have undoubtedly seen the more you messed with it the bigger it got ).

Here is how I do it..

Seal the wood ( the hull fiberglass is allready sealed ). Seal it ..

Pre wet ALL surfaces with resin. Layup with 1.5 oz mat ( or even 2 layers of 1.5 oz ) First .. then go with your 1708 or woven ( woven needs 1.5 oz mat between layers ).

It also helps to have your 1708 or whatever pre/semi resin coated when laying up ( dont put your glass on dry..wet it out on some cardboard or something first before you place it )

Hope this helps..

YD.
 

rozicrc

Seaman
Joined
Sep 28, 2009
Messages
65
Re: Yay or Nay on Layup - Pics

Guys,

Thanks alot for the opinions - I will go ahead and grind out the big bubbles on top of the stringers. This will, without any doubt, really suck; but I will of course have peace of mind with my son on the boat. For this, another few weekends of work will be worth it.

One question - on the new layups, how big a bubble is permissible? There is zero doubt in my mind that I will have bubbles in the new layups, I just need to know what i can get away with and look the other way ; )

Many thanks in advance!
Ron
 

erikgreen

Captain
Joined
Jan 8, 2007
Messages
3,105
Re: Yay or Nay on Layup - Pics

It's a cross between how many bubbles and what size they are.

You need to make sure you have enough strength to keep the glass and stringers in place.

Really, you could get by with a ton of bubbles, as there's some over engineering involved. But it wouldn't last as long (water gets into the bubbles and starts rot) and it'll be that much less safe.

Typically I require bubbles in a poly layup to be less than 8-10% of the visible surface max, and not in any critical areas like fillets. For epoxy I'll go a little higher, but really I try to avoid them entirely.

Erik
 

Yacht Dr.

Vice Admiral
Joined
Feb 26, 2005
Messages
5,581
Re: Yay or Nay on Layup - Pics

It just looked to me that Pictures 9,especially 10, and 11 are sever in delam .. could be the lighting though..

What I would do is cut out the Large delams..die grind the smaller bubbles ( dont worry about them itsy bitsy things .. just the air Pockets )..

Then resin coat the wood were it failed. ( the END grain of your ply is were your having the most trouble with from what I see make sure there nice and SEALED ).

May consider putting 1 layer of mat ONLY on the whole stringer and let that gel up without any pockets ( you can razor blade air pockets out when gelling and just patch them with some scrap mat ) then when you have minimal or no air pockets start lamin with your 1708.

keep your trusty throw away razor knife handy when lammin.. just razor any burrs out if its creating an air pocket :)

YD.
 

rozicrc

Seaman
Joined
Sep 28, 2009
Messages
65
Re: Yay or Nay on Layup - Pics

thanks guys, 9/10/11 are what that stringer looks like, I knew that one was a lost cause. Thanks again for the help on this, I'll start over in the spring and see if I can get this the second go-around.
 
Top