77 Starcraft Holiday 18 i/o - rebuild with pics galore

sschefer

Rear Admiral
Joined
Nov 13, 2008
Messages
4,530
Re: 77 Starcraft Holiday 18 i/o - rebuild with pics galore

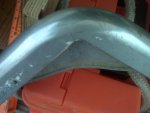
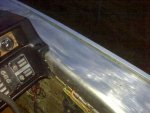
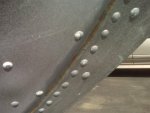
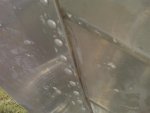
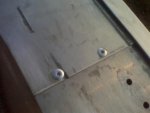
Yep, there are usually two 3/16 screws in the rub rail under the bow cap just like at the rear under the corner caps.

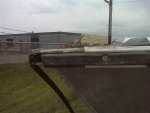
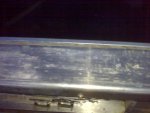
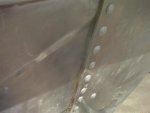
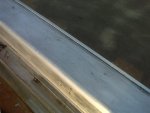
I noticed that you had pulled the rub rail out. The bow cap is removed by gently prying up under the edges and lifting forward. Once it's up on top of the rail guides use a block of soft wood and a mallet to drive if the rest of the way off. When the bow cap is off you can just start at one end and slide the rub rail out of the track. You can lube it up with dish soap and slide it back in when you get to that step.
 

North Beach

Commander
Joined
Sep 29, 2008
Messages
2,022
Re: 77 Starcraft Holiday 18 i/o - rebuild with pics galore

SS is right. You have to pry it up and then whack it with a rubber mallet. Be careful! I chipped one of the tabs off mine and you won't find any of these on eBay. The rubrail insert is continuous from stern to stern-one peice and there are a couple of screws holding the rub rail under the bow cap.

I worried more removing this peice than anything else on the boat:eek:
 

wrfalpacas

Chief Petty Officer
Joined
May 1, 2009
Messages
486
Re: 77 Starcraft Holiday 18 i/o - rebuild with pics galore

Cmon, just pry that thing up :D
 

sprintst

Commander
Joined
Apr 18, 2009
Messages
2,066
Re: 77 Starcraft Holiday 18 i/o - rebuild with pics galore

Just finished working some overtime again. That paint has got to get paid for somehow :)

Either tomorrow night or the night after and that thing is coming off one way or another.

I'd like to paint the topside and get all the hardware back before anything gets damaged. I picked up some rubber washers at Home hardware for under the fore deck along with some misc ss bolts and nuts to get everything put back the right way.

Thanks again guys. I don't know if I'll drag my boat down for the 2010 get together but I'll see when I show up if I can but a seat on one of the boats with booze :)
 

sprintst

Commander
Joined
Apr 18, 2009
Messages
2,066
Re: 77 Starcraft Holiday 18 i/o - rebuild with pics galore

The cap is off. I noticed the underside of the cap had a small crack in it before but I don't think it got any larger. I pried slightly with a slim profile pry bar and it just fell off.

Here's what's under the bow cap and the profile of my rub rails. There were two rivets holding the rub rails on. There were also two machine screws that hold the rub rail guides in place at the bow.
 

Attachments

  • IMG00201 (Small).jpg
    IMG00201 (Small).jpg
    31.6 KB · Views: 6
  • IMG00202 (Small).jpg
    IMG00202 (Small).jpg
    29.4 KB · Views: 6
  • IMG00203 (Small).jpg
    IMG00203 (Small).jpg
    24.9 KB · Views: 6
  • IMG00205 (Small).jpg
    IMG00205 (Small).jpg
    17.7 KB · Views: 6
  • IMG00206 (Small).jpg
    IMG00206 (Small).jpg
    27.6 KB · Views: 6

sprintst

Commander
Joined
Apr 18, 2009
Messages
2,066
Re: 77 Starcraft Holiday 18 i/o - rebuild with pics galore

I also filed down any aluminum in the gashes in the hull, sanded with 100 grit sandpaper and gave it a shot of self etching primer. Tomorrow I'll probably take some thickened epoxy and spread the epoxy to fill them in.

I'll be using the Six10 thickened epoxy that I picked up while on vacation. I;ll also use it to fill in a small gouge at the top of my gas tank and to hold some of the wood together for the ladder in the dash for the walk thru windshield.

Here's a link to this goop that will keep me from having to mix up a batch of my own epoxy.

http://www.youtube.com/watch?v=3Vs0Nwi-8BI
 

Attachments

  • IMG00207 (Small).jpg
    IMG00207 (Small).jpg
    30 KB · Views: 2
  • IMG00208 (Small).jpg
    IMG00208 (Small).jpg
    30.3 KB · Views: 2
  • IMG00209 (Small).jpg
    IMG00209 (Small).jpg
    24.2 KB · Views: 2
  • IMG00210 (Small).jpg
    IMG00210 (Small).jpg
    38 KB · Views: 2
  • IMG00211 (Small).jpg
    IMG00211 (Small).jpg
    34.6 KB · Views: 2

Rickairmedic

Commander
Joined
Apr 24, 2009
Messages
2,576
Re: 77 Starcraft Holiday 18 i/o - rebuild with pics galore

Sprinst she is looking great . I missed the bow caap deal or I woulda told you I just rocked it back and forth with a small prybar under each side till mine slid off :D.


Rick
 

sprintst

Commander
Joined
Apr 18, 2009
Messages
2,066
Re: 77 Starcraft Holiday 18 i/o - rebuild with pics galore

No sweat Rick... It's off now and I'm on to the next thing.

I pulled of the rub rail guide and stripped the top side tonight. I even tried sanding a section to see what it will look like finally clean and ready for the Interlux Vinyl Lux self etching primer.

http://www.yachtpaint.com/usa//product_guide/primers/US_viny_lux.asp?ComponentID=9862&SourcePageID=20607

I'll see if I can sand her and start the self etching primer and Interlux Epoxy Primekote for the topside or the Interlux 2000E for the hull below the waterline with VC performance epoxy.

I'm not sure if I can just use the 2000E for everything as a primer.
 

Attachments

  • IMG00212 (Small).jpg
    IMG00212 (Small).jpg
    29.1 KB · Views: 3
  • IMG00213 (Small).jpg
    IMG00213 (Small).jpg
    30.6 KB · Views: 3
  • IMG00214 (Small).jpg
    IMG00214 (Small).jpg
    32.7 KB · Views: 3
  • IMG00216 (Small).jpg
    IMG00216 (Small).jpg
    43.1 KB · Views: 3
  • IMG00215 (Small).jpg
    IMG00215 (Small).jpg
    40.8 KB · Views: 3

vegasphotoman

Lieutenant
Joined
Jul 13, 2009
Messages
1,411
Re: 77 Starcraft Holiday 18 i/o - rebuild with pics galore

Keep rockin and rollin Sprintst, looks like you're making some progress.
Must be nice to have all that room to work, looks like you have a massive work area!:)

Do you have any mechanical work you have to do to the I/O?
 

sprintst

Commander
Joined
Apr 18, 2009
Messages
2,066
Re: 77 Starcraft Holiday 18 i/o - rebuild with pics galore

It is a massive work area... It's my father in laws granite and marble shop in a industrial area about 10 miles or so from where I live. Ideal Tile and Terazzo in case you are looking for some custom stone work http://www.idealtileandterrazzo.com/

I do need some leg work as I want the engine and leg to be in top shape before I finish it off in the spring.

I picked up the primer Interlux 2000e for everything and Interlux Brightside Dark blue for the top and sides. I'm hoping to have the top half of the boat painted in the next week or so. I'm hoping to start work on the wiring and dash in the fall as it will get to cold over night soon to paint.

I'll have the top side done with the trim, windshield, horn, etc bolted back before I lose the pieces over the winter.

In the spring I'm hoping to have the engine and leg done so it's ready to go all year long next year. I'll also forget the pain over the winter and get carried away with the interior in the early spring I'm sure.
 

APPALOOSA2

Petty Officer 1st Class
Joined
Jul 9, 2008
Messages
354
Re: 77 Starcraft Holiday 18 i/o - rebuild with pics galore

Spintst looks like you are doing a really nice work.
You really are moving along and it will be well worth it when your done, just ask North Beach.
If you have any questions on your engine or outdrive feel free to ask .
 

sprintst

Commander
Joined
Apr 18, 2009
Messages
2,066
Re: 77 Starcraft Holiday 18 i/o - rebuild with pics galore

I'll definately ask some questions come the engine and leg work. I will probably get the heads done with hardened seats or a total rebuild if I get carried away.

I did some hull and deck prep with some sanding and filling defects with epoxy. I also got going and filled the seams at the bow area of the hull with epoxy as well. I went after the pics were taking and cleaned up and extra epoxy with some acetone I had on hand. There were some small gashes in the top of my gas tank which I filled with epoxy since it was already mixed.

There is even a shot of my mixing palette on a piece of ceramic tile.
 

Attachments

  • IMG00217 (Small).jpg
    IMG00217 (Small).jpg
    19.5 KB · Views: 4
  • IMG00218 (Small).jpg
    IMG00218 (Small).jpg
    29.7 KB · Views: 4
  • IMG00219 (Small).jpg
    IMG00219 (Small).jpg
    22 KB · Views: 4
  • IMG00220 (Small).jpg
    IMG00220 (Small).jpg
    22.5 KB · Views: 4
  • IMG00221 (Small).jpg
    IMG00221 (Small).jpg
    59.1 KB · Views: 4

sprintst

Commander
Joined
Apr 18, 2009
Messages
2,066
Re: 77 Starcraft Holiday 18 i/o - rebuild with pics galore

Here's my gas tank filled and a shot of materials used. My old Explorer is loaded up until I finish this boat.

I'm selling what's left of it to a guy at work so I've got to finish this thing before the snow flies.

Tomorrow is an all out sanding and hull prep day. Just wondering if I should finish up the top side first or do lower half of the hull. The topside is more attractive as I'd like to get the hardware bolted back on.

What do you guys think of that Durabak stuff for the floor and ladder area?
 

Attachments

  • IMG00223 (Small).jpg
    IMG00223 (Small).jpg
    37.4 KB · Views: 4
  • IMG00226 (Small).jpg
    IMG00226 (Small).jpg
    17.9 KB · Views: 4
  • IMG00229 (Small).jpg
    IMG00229 (Small).jpg
    36.2 KB · Views: 4
  • IMG00228 (Small).jpg
    IMG00228 (Small).jpg
    29 KB · Views: 4
  • IMG00230 (Small).jpg
    IMG00230 (Small).jpg
    47.2 KB · Views: 4

sprintst

Commander
Joined
Apr 18, 2009
Messages
2,066
Re: 77 Starcraft Holiday 18 i/o - rebuild with pics galore

Hey Apploosa2,

I might drive over to knock out the transom, engine and leg work in a day :)
 

APPALOOSA2

Petty Officer 1st Class
Joined
Jul 9, 2008
Messages
354
Re: 77 Starcraft Holiday 18 i/o - rebuild with pics galore

No problem, want coffee when you arrive ? We will have it out in about 1.5 hours. I do cheat and use my backhoe to lift the engine completely out.:D
 

Attachments

  • 07-16-2009.jpg
    07-16-2009.jpg
    97.4 KB · Views: 1

sprintst

Commander
Joined
Apr 18, 2009
Messages
2,066
Re: 77 Starcraft Holiday 18 i/o - rebuild with pics galore

I'll bring the Bailey's or Kahlua...

2,294 miles Google maps says 37 hours of driving. It's almost worth it to get the boat torn down that quick. :)

I did a bit more sanding as I'm hoping to paint next weekend. I picked up some rivets to pop down some bad ones that were holding down the bow deck. The 1/8 rivets will have to go back as they were steel and not aluminum. It look like the 1/8 will work to get some of those snaps back in after painting.

I also drilled out some holes and bolted the rest of my winch down in stainless steel.
 

Attachments

  • IMG00239 (Small).jpg
    IMG00239 (Small).jpg
    34.2 KB · Views: 4
  • IMG00234 (Small).jpg
    IMG00234 (Small).jpg
    30.8 KB · Views: 4
  • IMG00235 (Small).jpg
    IMG00235 (Small).jpg
    40.4 KB · Views: 4
  • IMG00238 (Small).jpg
    IMG00238 (Small).jpg
    20.8 KB · Views: 4
  • IMG00236 (Small).jpg
    IMG00236 (Small).jpg
    21.3 KB · Views: 4

sprintst

Commander
Joined
Apr 18, 2009
Messages
2,066
Re: 77 Starcraft Holiday 18 i/o - rebuild with pics galore

Sorry about the lack of progress. All this ot is getting in the way.

The good thing is it paying for paint and extras.

I'll take some pics of what I bought so far and do a breakdown on costs so to date.

Still a helluva lot better than buying new... I might even get stupid enough to do a cabin cruiser at some point.

The only slight inconvenience is finding some of the older parts like the rub rail. Has anyone seen anything like this in their travels? It's 1 inch inside the rail and the part that extrudes is 3/4 of an inch.
 

Attachments

  • IMG00203 (Small).jpg
    IMG00203 (Small).jpg
    24.9 KB · Views: 0
Last edited:

vegasphotoman

Lieutenant
Joined
Jul 13, 2009
Messages
1,411
Re: 77 Starcraft Holiday 18 i/o - rebuild with pics galore

The boats coming along nicely! Awsome floor work...keep up the steam!
 

sprintst

Commander
Joined
Apr 18, 2009
Messages
2,066
Re: 77 Starcraft Holiday 18 i/o - rebuild with pics galore

Thanks guys. I'll press on...I just needed a kick in the a**.

Thanks for the rub rail info... It's crazy enough that it just might work :)

I'll see if I can lookup a performance cam shaft in the meantine for the engine. I'm not sure if they made one for the boat version of the engine but they seem to make one for every car engine on the planet.
 
Top