77 Starcraft Holiday 18 i/o - rebuild with pics galore

sprintst

Commander
Joined
Apr 18, 2009
Messages
2,066
Re: 77 Starcraft Holiday 18 i/o - rebuild with pics galore

Anybody wanna talk about strippers?

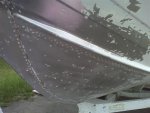
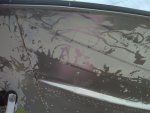
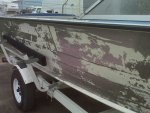
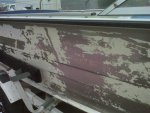
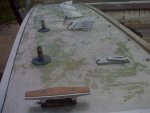
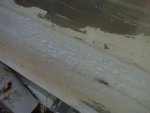
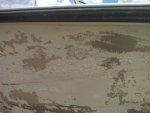
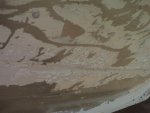
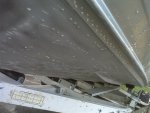
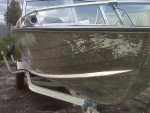
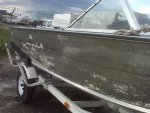
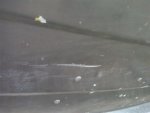
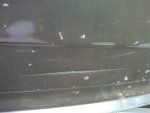
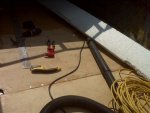
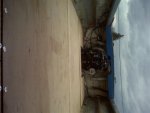
I took my first crack at using the efs-2500 stripper on the boat. It was about 80 or so outside...the stuff loves heat apparently. I rolled it on with a foam roller but I think it was put on too thin as it only stripped of the top coat in some areas. I applied it a little thicker with a brush and test fired the new 2900 psi pressure washer I bought this last weekend.

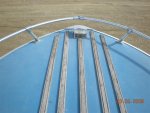
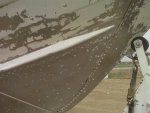
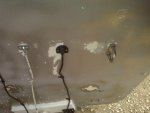
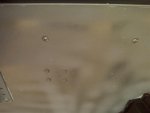
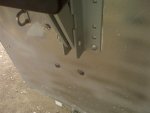
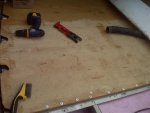
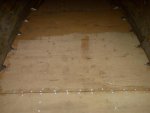
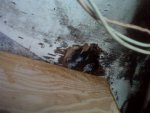
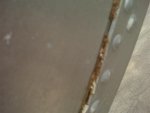
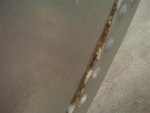
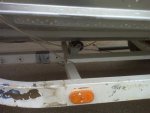
It was kind of a half assed attempt at stipping the paint but I did the stern deck as well as some the the painted interior. As you can see around the rivets in came pretty clean in the areas I tried. This weekend I'll finish the bulk of it as it looks like a monkey did it.
 

Attachments

  • Holiday 42.jpg
    Holiday 42.jpg
    37.8 KB · Views: 5
  • Holiday 43.jpg
    Holiday 43.jpg
    16.1 KB · Views: 6
  • Holiday 44.jpg
    Holiday 44.jpg
    28.9 KB · Views: 6
  • Holiday 45.jpg
    Holiday 45.jpg
    18.2 KB · Views: 6
  • Holiday 46.jpg
    Holiday 46.jpg
    26.9 KB · Views: 5

sprintst

Commander
Joined
Apr 18, 2009
Messages
2,066
Re: 77 Starcraft Holiday 18 i/o - rebuild with pics galore

Here's a couple more full length shots of my partial paint removal.

I pressure washed the snot out of some areas, like the bow, and there isn't a drop of water that made it inside after I did the inside bow area with Gluvit. I even accidentally dropped some stripper on a Gluvit'ed area and there was no effect.

I'm planning on removing more the the contact cement on the interior while the stripper lifts the exterior paint.
 

Attachments

  • Holiday 47.jpg
    Holiday 47.jpg
    35.5 KB · Views: 5
  • Holiday 48.jpg
    Holiday 48.jpg
    37.5 KB · Views: 5
  • Holiday 49.jpg
    Holiday 49.jpg
    36.9 KB · Views: 5
  • Holiday 50.jpg
    Holiday 50.jpg
    48.1 KB · Views: 5
  • Holiday 51.jpg
    Holiday 51.jpg
    47.1 KB · Views: 5

sprintst

Commander
Joined
Apr 18, 2009
Messages
2,066
Re: 77 Starcraft Holiday 18 i/o - rebuild with pics galore

Here's one more shot of the stern deck

I'll be drilling out all the snaps, ladder hardware, etc. I'll also have to find some replacement snaps online in the meantime.
 

Attachments

  • Holiday 52.jpg
    Holiday 52.jpg
    34.9 KB · Views: 3

sprintst

Commander
Joined
Apr 18, 2009
Messages
2,066
Re: 77 Starcraft Holiday 18 i/o - rebuild with pics galore

I'm also looking at replacing the visible stern rear deck lumber, etc in oak. Just wondering how it will hold up after a coating in epoxy resin. I think the original lumber under the vinyl is mahogany plywood.

I'm also wondering how long it will take to strip/sand the belly of the boat. I may use my father in laws forklift to lift the stern off the trailer, with straps, to get at the underside a little easier.
 

halas

Petty Officer 1st Class
Joined
Jan 27, 2009
Messages
347
Re: 77 Starcraft Holiday 18 i/o - rebuild with pics galore

That looks pretty good, but I am not sure if your pressure washer is good enough: 2900p/si does not tell me much. The gal./min. is more important.
For 25 years I use one that is 4.9 gal./ min at 3000p/si. 18Hp. Tecumseh. With a 0 degree tip it cuts like a razor blade.
I guess anything over 4 gal/min. above 12 Hp. would do the job.
Also the foam roller is a poor choice. Use a 3/4" nap synthetic or lambskin.
Really have to soak the remover for 30min. in a cool day or early morning in the shade. Keep reapplying it to stay working wet.
 

sprintst

Commander
Joined
Apr 18, 2009
Messages
2,066
Re: 77 Starcraft Holiday 18 i/o - rebuild with pics galore

Halas is right. A 4 gallon per minute pressure washer might have done it in one crack. My 2.5 is taking multiple applications of the stripper to get the old original paint off.

Here's a couple of pics of the stripper working...paint stripper that is.
 

Attachments

  • Holiday 53.jpg
    Holiday 53.jpg
    30.2 KB · Views: 2
  • Holiday 54.jpg
    Holiday 54.jpg
    33.9 KB · Views: 2
  • Holiday 55.jpg
    Holiday 55.jpg
    29.7 KB · Views: 2

sprintst

Commander
Joined
Apr 18, 2009
Messages
2,066
Re: 77 Starcraft Holiday 18 i/o - rebuild with pics galore

Making some progress with the stripping. Hopefully one more application and it will finally be done.
 

Attachments

  • Holiday 56.jpg
    Holiday 56.jpg
    37 KB · Views: 2
  • Holiday 57.jpg
    Holiday 57.jpg
    50.7 KB · Views: 2
  • Holiday 58.jpg
    Holiday 58.jpg
    49.9 KB · Views: 2
  • Holiday 59.jpg
    Holiday 59.jpg
    47.9 KB · Views: 2

sprintst

Commander
Joined
Apr 18, 2009
Messages
2,066
Re: 77 Starcraft Holiday 18 i/o - rebuild with pics galore

Here's a couple of scars that I'll have to fill in with some epoxy once I sand then down with some 80 grit.
 

Attachments

  • Holiday 60.jpg
    Holiday 60.jpg
    20.4 KB · Views: 1
  • Holiday 61.jpg
    Holiday 61.jpg
    22.4 KB · Views: 1

sprintst

Commander
Joined
Apr 18, 2009
Messages
2,066
Re: 77 Starcraft Holiday 18 i/o - rebuild with pics galore

I had a an hour or so while the paint was stripping so I laid in some of the wood. I took a tip from the forum and pop rivited the thin strips of aluminum on first before I laid in the next piece. I also pop rivited the ends of the sheet to the stringers so I could keep them stright and draw a line for the rest of the rivets.

Looks like next weekend I'll finish off the deck and start the cloth and epoxy.

The 3/4 inch decking is a big difference from my old decking. It seems to have stiffened up the hull even though I haven't finished riveting or glassing yet.
 

Attachments

  • Holiday 63.jpg
    Holiday 63.jpg
    39.5 KB · Views: 4
  • Holiday 64.jpg
    Holiday 64.jpg
    31.3 KB · Views: 4

ezmobee

Supreme Mariner
Joined
Mar 26, 2007
Messages
23,767
Re: 77 Starcraft Holiday 18 i/o - rebuild with pics galore

The 3/4 inch decking is a big difference from my old decking. It seems to have stiffened up the hull even though I haven't finished riveting or glassing yet.

Yeah I went 3/4" in on mine and haven't regretted it. very solid and you can't even find the seams between the pieces.
 

halas

Petty Officer 1st Class
Joined
Jan 27, 2009
Messages
347
Re: 77 Starcraft Holiday 18 i/o - rebuild with pics galore

I also used the pink foam but on the top I reinforced it with about 10 cans of "greatstuff" expanding foam from Home Dep (under $ 4/can). Helped stiffening the floor (I used 5/8" ext. plywood). The foam melts the pink sheet and adhere to it when all dried.
 

Attachments

  • foam9.JPG
    foam9.JPG
    39.3 KB · Views: 4

sprintst

Commander
Joined
Apr 18, 2009
Messages
2,066
Re: 77 Starcraft Holiday 18 i/o - rebuild with pics galore

I'm definately digging the new deck. The added weight is a wash since I pulled out a couple hundred pounds of wet foam. It sure is nice not having to walk on the ribs. I got up at 5 this morning and did a couple hours of riveting and cleaning up on the deck before going into work.

On another note I was wondering if I should lose my glovebox and the black cracked plastic associated with it to clean up the dash area. It looks like your paint around the windshield area really stands out as it nice and clean on your boat Ez. I may build some sort shelf /storage unit on the left side under where the old glove box is to close off the bow area. Just wondering what other people have done or ideas they have.

I might use some of that foam around the top edges of the bow area as I didn't put much floatation foam in there. I just want to keep the keep the non bow area sides free and clear for water to make it's way down to the drain passages as the old foam kept the water from moving.
 

Attachments

  • Holiday 4.jpg
    Holiday 4.jpg
    39.7 KB · Views: 3

halas

Petty Officer 1st Class
Joined
Jan 27, 2009
Messages
347
Re: 77 Starcraft Holiday 18 i/o - rebuild with pics galore

Wow your dash definitely looks different from my 1969 one.
 

ezmobee

Supreme Mariner
Joined
Mar 26, 2007
Messages
23,767
Re: 77 Starcraft Holiday 18 i/o - rebuild with pics galore

The drivers dash looks like the one in an 80's Volvo. Gotta love it.
 

sprintst

Commander
Joined
Apr 18, 2009
Messages
2,066
Re: 77 Starcraft Holiday 18 i/o - rebuild with pics galore

I wonder how hard it would be to use felt and glass over it before laying down gelcoat. Considering I've never tried it before it might be quite the stretch.

I have seen custom car speaker boxes and interiors done that way that turn out show quality...
 

sprintst

Commander
Joined
Apr 18, 2009
Messages
2,066
Re: 77 Starcraft Holiday 18 i/o - rebuild with pics galore

Getting ready to go on vacation but I still need to get a lot done.

I managed to get the rest of the floor riveted down but I left the last piece loose until I pull the transom.

Here's some pics of the floor and the rotten spot in the transom.
 

Attachments

  • IMG00156 (Small).jpg
    IMG00156 (Small).jpg
    27.1 KB · Views: 5
  • IMG00157 (Small).jpg
    IMG00157 (Small).jpg
    25.8 KB · Views: 5
  • IMG00158 (Small).jpg
    IMG00158 (Small).jpg
    27.6 KB · Views: 5
  • IMG00152 (Small).jpg
    IMG00152 (Small).jpg
    35.7 KB · Views: 5

sprintst

Commander
Joined
Apr 18, 2009
Messages
2,066
Re: 77 Starcraft Holiday 18 i/o - rebuild with pics galore

What did you guys do to clean the seams on the exterior bow to remove the factory sealant. I'm thinking of redoing the seams with Gluvit before painting...

I also managed to relocate the spare tire to the front of the trailer as it was rubbing the boat when it was mounted on the side. There is the standard shot of the engine as it sits now before the engine removal.
 

Attachments

  • IMG00144 (Small).jpg
    IMG00144 (Small).jpg
    19.1 KB · Views: 4
  • IMG00145 (Small).jpg
    IMG00145 (Small).jpg
    23.4 KB · Views: 5
  • IMG00146 (Small).jpg
    IMG00146 (Small).jpg
    46.2 KB · Views: 5
  • IMG00155 (Small).jpg
    IMG00155 (Small).jpg
    36.1 KB · Views: 4
  • IMG00154 (Small).jpg
    IMG00154 (Small).jpg
    38.2 KB · Views: 4

sprintst

Commander
Joined
Apr 18, 2009
Messages
2,066
Re: 77 Starcraft Holiday 18 i/o - rebuild with pics galore

I've also changed my proposed paint scheme after reading some of SSchefer posts http://forums.iboats.com/showthread.php?t=285548&page=2

Here's using the Interlux VC performance paint on the lower half of the boat. It's meant for trailered boats where fouling isn't much of an issue and is slick and as hard as hell. I'm only looking at doing this stripping and painting thing once every decade or so :)

I also checked out my local Windsor plywood that carries exotic woods. I'll be redoing some of the interior pieces in white oak including some of the deck trim as mine is looking kind of ratty.

North Beach has also changed my mind on the whole wood thing. I'm only doing this once and will try to take a crack at coming even close to their work. http://forums.iboats.com/showthread.php?t=286412&highlight=north+beach&page=16

Many thanks to Ezmobee, Halas, Bob VT, Rickairmedic, Gunner1, Wrfalpacas and many others that have helped along the way... One day I'll actually have something decent to show for all the advice once I get some free time.
 

Attachments

  • DSCN1487 (Small).jpg
    DSCN1487 (Small).jpg
    45.6 KB · Views: 0

North Beach

Commander
Joined
Sep 29, 2008
Messages
2,022
Re: 77 Starcraft Holiday 18 i/o - rebuild with pics galore

Bret, I didn't do anything with the seam sealant. Figured the stuff was working so I should leave well enough alone. Mine was in about the same shape as yours, and once I shot the paint, it looked just fine.

Can you get the oak in exterior grade? You really need the waterproof adhesive on the plywood.

Keep up the good work and load up them pics:D

PS, this is really funny! I searched high and low for weeks for those danged snaps and finally found them guess where? AT IBOATS!!! What a doumas:D
 

sprintst

Commander
Joined
Apr 18, 2009
Messages
2,066
Re: 77 Starcraft Holiday 18 i/o - rebuild with pics galore

I may try 1 inch solid oak for the piece above the engine. I may also use the same 1 inch thick oak on the rear piece that spans the lower rear seats. I'll probably laminate 2x2 oak on the backside to give it some additional strength and to give the hardware something to bolt to.

I know the many plys in marine plywood will probably hold up better but damn if they wouldn't look good in solid oak though. Man did Starcraft ever like covering everything up in vinyl.
 

Attachments

  • IMG00146 (Small).jpg
    IMG00146 (Small).jpg
    46.2 KB · Views: 2
  • Holiday 5 (Small).jpg
    Holiday 5 (Small).jpg
    35.5 KB · Views: 2
Top