New vacuum bag setup

erikgreen

Captain
Joined
Jan 8, 2007
Messages
3,105
Re: New vacuum bag setup

Well, I got the wood leveled and ready for the MDF, then I started ripping the boards to length for the "grid". Turns out two of them were shaped subtly like potato chips (nice "quality" lumber) so I had to use my jig to straighten them, and that cost me enough wood to need one more piece of 1x10. So I'll get that tonight.

I see why woodworkers like to have a power planer around... it'd make this a lot easier.

Erik
 

BobsGlasstream

Commander
Joined
Sep 11, 2009
Messages
2,128
Re: New vacuum bag setup

erikgreen,
Woodworkers just love tools of all kinds. Well, at least I do. :p
Planners are great along with Jointers, thickness planners and lots more.
Looking good keep the pic's coming.
Bob
 

erikgreen

Captain
Joined
Jan 8, 2007
Messages
3,105
Re: New vacuum bag setup

Started work on the table last night and broke a belt in the table saw. I'm going to try to find a replacement at lunch today.

I watched the tutorial for making a torsion box today and found out the guy doing it used MDF for the grid as well as the top/bottom. I was planning on pine since it's cheaper and I have some. Anyone know if this will make a difference? I know MDF is more stable, but I thought the idea of the torsion box was to prevent warping or movement even if individual components tried to move.

Erik
 

erikgreen

Captain
Joined
Jan 8, 2007
Messages
3,105
Re: New vacuum bag setup

Okay, I found the answer to my question, and I'm ok going forward with the wood.

I bought a new belt for the table saw ($22 for a 5 inch loop, argh) and got to work.

Here's a pic of the internal grid of the table:

nPB140001.JPG.jpg


I had to cut out:

Outer edges: 2x97", 2x 49"
Cross pieces: 12x 47.5"
Lengthwise grid: 72x 7"

I formed all these pieces, which were 4 inches across, from 1x10 lumber that I trued up in the table saw. I had to buy some more cross pieces later which were 1x4s, and which aren't full height, but I was low on cash.

Lots o' cutting.

I assembled the thing with an air brad nailer and gorilla glue (and later another polyurethane glue). First I checked and shimmed the sawhorses, cross pieces, and MDF board to ensure a true flat surface, then put a piece of plastic on the MDF to protect it from glue.

I started with the outside edge, making sure the corners were square, and glued and brad nailed them to each other.

Then I proceeded from one end using 7" pieces to make the first line of cells, and using another 7 inch piece as a spacer to make them even. I probably should have chosen spacing to make the cells come out even across and lengthwise, but I had done the math for a 7 inch grid and I felt lazy :)

As I went along each piece got glued to its neighbors and then brad nailed.

Once the grid was complete I let it dry, then checked for high spots. Then I nailed and glued on the first piece of MDF, for the bottom skin of the table. Then took it off the table, took off the plastic and MDF it was sitting on, I flipped it over, checked for level, and that's what you see above.

I cleaned some glue off the top of the grid and sanded high spots, then I put the other MDF sheet on with more glue and brads. That's drying now and should give me my top table surface:

nPB140003.JPG.jpg


As far as I can tell with my straightedges it's flat and square. The table is 49" x 97", which should be plenty big for any use. It's going to get a sealing coat of polyurethane tonight. After that I'll put a sacrificial melamine surface on top (a 4x8 piece of white board) and maybe some edges, then I should be ok to start molding and bagging on this.

I'm pretty sure the table is good enough to use for a CNC router base later on, but we'll see how it holds up to use.

Erik
 

BobsGlasstream

Commander
Joined
Sep 11, 2009
Messages
2,128
Re: New vacuum bag setup

erikgreen,
The table cam out great. Looks like a lot of work was put into it.
did you just butt joint the cross pieces or are they interlocked my eyes aren't as good as they use to be?
Well, great looking table and we'll be looking forward to seeing you get some work out of it.
Bob
 

erikgreen

Captain
Joined
Jan 8, 2007
Messages
3,105
Re: New vacuum bag setup

All the parts are butt jointed with gorilla glue and at least one brad nail.

I'm not quite nuts enough (just close) to want to interlock all those pieces.

The strength of the table is supposed to come from the "skins" of MDF anyway, so the grid is just supposed to resist compression. The structure is supposed to resist warping or change over time.

I put a couple coats of polyurethane on last night and bought a melamine top for it. I'll be coating the back of the melamine tonight and putting a third coat on the table. When that dries the melamine gets attached as a sacrificial surface, then I'll wax it and I'm ready to start fiberglassing. I suppose I need a shelf or worktable for the resin nearby....

Erik
 

erikgreen

Captain
Joined
Jan 8, 2007
Messages
3,105
Re: New vacuum bag setup

Well, I finished the table with a melamine top, and some vinyl edging. I like how it came out.

I waxed it with a couple coats of partall, then broke my polisher and ended up finishing by hand. It should resist anything sticking to it, though.

Then I tried my vacuum bag setup out. I stuck a pair of crimping pliers under a piece of commercial vacuum bag.

nPB190006.JPG.jpg


The red tape sealed ok, the tank and vacuum switch worked, everything was ok except the aluminum fitting I bought to attach to the bag.

The fitting leaks either on top of or on the bottom of the gray silicone seal disc... I don't think the fitting squishes the disc hard enough.

nPB190008.JPG.jpg


The lower part, shown to the right, has a circular ramp on the bottom that the cross pin in the upper part rides on (the pin is hard to see in this pic, it's in the part that projects below the disc).

You put the lower part inside the bag and the upper part through a hole in same, and twist them together. There's no set "latch" point for the halves, you just twist harder to get them in tighter. I twisted as hard as I could without tools and it still leaked.

I'm thinking I might try a different/softer seal material, or maybe this is just a poorly designed fitting?

Comments, suggestions?


PS: I decided a couple weeks ago that I'd not bag my transom itself, but rather some bulkheads I'm going to make as soon as this thing is working. That way the vacuum bag stuff won't hold up the boat work.
 

erikgreen

Captain
Joined
Jan 8, 2007
Messages
3,105
Re: New vacuum bag setup

SB, that doesn't seem to help at all.

Also, looking at the fitting, the plate inside the bag has circular ridges on it, I'm guessing they're meant to push the bag material into the silicone for a better seal.

The top half of the fitting is smooth, which tells me it's meant to seal against the smooth silicone with nothing in between.

So I'm back to getting a different seal material, and maybe changing fittings at some point. I can vacuum bag with a sponge fitting I think, maybe I'll try that.

Erik
 

SBTOM

Petty Officer 1st Class
Joined
Jul 22, 2009
Messages
275
Re: New vacuum bag setup

Thats a great looking table! If you ever get tired of mold releasing you can always resort to just swapping in some polyethylene. Also, have you tried using glass as a mold surface? I haven't tried it myself, but I have heard that it works great for flat parts.

I used to use those same fittings, although I recall using some yellow vacuum tape in between the top surface of the bag and that ridged portion of the vacuum fitting. We were using a different kind of vacuum bag though. (one was pink and the other one was green) If you have trouble twisting the fitting after you add the tape, you can use a little bit of a non-silicon lubricant as long as you make sure the vacuum is drawing the tape towards the bag.
 

Squid Billy

Petty Officer 2nd Class
Joined
Jun 3, 2008
Messages
152
Re: New vacuum bag setup

Erik,

Here is a picture of the ones I use. I by them from http://www.cstsales.com in California. For some odd reason, ... I don't see them on their site anymore so a phone call might be necessary.

I have NEVER had a leaker and I have about 6-7 of them.

If I were you, I would take a serious look at the quick release fittings part # E201. THE BEST thing I ever added to my bagging systems. Everything breaks down FAST! It's great for repetitive bagging. When one bag is ready to open, you just simply disconnect from one bag, and connect to the next bag, instantly!
 

Attachments

  • bagfitting1.JPG
    bagfitting1.JPG
    111.3 KB · Views: 0
  • bagfitting2.JPG
    bagfitting2.JPG
    104.5 KB · Views: 0
  • bagfitting3.JPG
    bagfitting3.JPG
    108.2 KB · Views: 0
  • bagfitting5.JPG
    bagfitting5.JPG
    110.9 KB · Views: 0
  • bagfitting4.JPG
    bagfitting4.JPG
    109.8 KB · Views: 0

erikgreen

Captain
Joined
Jan 8, 2007
Messages
3,105
Re: New vacuum bag setup

It's basically identical to mine except for some ridges on the lowest disc that form circles around the hole, and the color of the sealant disc. Yours looks rubber, mine is silicone.

I might try a thinner/softer rubber disc tonight. The place I got it from confirms I'm assembling it correctly...

Erik
 

Squid Billy

Petty Officer 2nd Class
Joined
Jun 3, 2008
Messages
152
Re: New vacuum bag setup

It's basically identical to mine except for some ridges on the lowest disc that form circles around the hole, and the color of the sealant disc. Yours looks rubber, mine is silicone.

I might try a thinner/softer rubber disc tonight. The place I got it from confirms I'm assembling it correctly...

Erik

Mine is not that soft, probably right around the same softness of the sole of a tennis shoe. Does the bottom of your lower disk have a ramp up were the pin contacts that makes it tighter when you turn it like mine does on the left ramp? The picture is of the bottom side of the lower disk and as you can see from the rub mark, ... I only contact only one side of the disk and it only needs about 1/8 of a turn and I am tight and sealed.

Refer to the picture below.

The only other thing that's it could be is your sealing washer, ... might need to be just a tad bit thicker, like .015" - .030" thicker than what you have.
 

Attachments

  • bagfitting4.JPG
    bagfitting4.JPG
    109.8 KB · Views: 0

erikgreen

Captain
Joined
Jan 8, 2007
Messages
3,105
Re: New vacuum bag setup

Yes on the ramp.

I did some experimenting last night, and couldn't get the thing to seal on the bag on the table.

I even switched the fittings connecting it.

But then I cut a piece of bag and put it into the fitting, then covered the bottom with my hand... pulled a vacuum with no leaks.

So I'm going to try again with a different bag tonight, being careful to keep the fitting upright, not let it fold or pull the bag, etc. and see if that helps.

Erik
 

erikgreen

Captain
Joined
Jan 8, 2007
Messages
3,105
Re: New vacuum bag setup

Okay, time for a big update with pics.

This weekend I finally tried things out, vacuum setup, table, and all.

I started with something simple... I was trying to make a laminated panel. I had cut off part of the transom of my boat as part of the re-core process, and I needed a 90 inch by 22 inch panel to go in its place. I wanted a piece of plywood with fiberglass reinforcement.

So, I went at it with my bagging supplies, bought from a local shop, plus my assembled pump and tank rig, detailed in previous posts.

The layup went as follows:

I cut a section of bag to size.. the bag material is folded on one edge, and large enough to surround the wood core on the other three. I am using a piece of 1/4" plywood here as a core. I started by coating the core with epoxy with a scraper:
npc020011.jpg.jpg


Then I applied two layers of 8 oz cloth (pre cut) using the same method. Sorry for the blur:

npc020013.jpg.jpg


Then for good measure (also to test this process) I applied a 4 inch wide strip of 12 oz biaxial cloth on the top edge:

npc020014.jpg.jpg


So far so good.

Since I was testing this whole setup and materials, I decided to use a peel ply layer and breather layer. The peel ply was locally obtained nylon/polyethylene taffeta fabric, which was cheap on sale at the fabric store:

npc020015.jpg.jpg


On top of the peel ply I used some green plastic mesh that I'd bought from the local store... supposedly a nice quality flow/breather layer. This would let the vacuum reach all parts of the part.

Then I flipped the whole thing over carefully (to not make bubbles or have the sandwich come apart and did the other side.

Finally, I placed the whole thing in a good location, and closed the envelope.

npc020018.jpg.jpg


I sealed along the edges with "sticky tape" which is a half foam half clay sort of thick tape I bought for this purpose. I had to wipe loose resin off the edge where the tape would go to make sure it stuck. Then I had to make sure I placed the vacuum inlet carefully to avoid leaks there.

But I managed to pull the air out. Woo!

But, there were problems. I noticed hissing leaks along the edges, and the pump was running nonstop. So, I started leak hunting.

There were some obvious places with leaks, like folds where the tape didn't stick evenly. There were also places where the tape overlapped and leaked, etc. Lots of spots where there were little leaks near folks and such.

After 2 hours I couldn't get them stopped enough to stop the pump running..I had to give up. I let the resin harden (I was using medium speed epoxy).

More in next post...
 

erikgreen

Captain
Joined
Jan 8, 2007
Messages
3,105
Re: New vacuum bag setup

So, the next day I had to undo all the bag stuff and pull the panel out.

I had a little too much epoxy in the layup, and it hadn't stuck to the flow media or peel ply, but rather it had pooled enough to go "around" it and grab on when it hardened like a whole bunch of little hands. I had to really work to peel it off (pic is sideways):

npc030019.jpg.jpg


The glass was pretty nice as far as I could see, although the force needed to pull up the flow media at the corners delaminated a bit there. I suspect it didn't have enough resin there for some reason.

Once I got the flow media off most of the way, the peel ply came off in strips... I think the polyethylene threads weren't strong enough to hold the nylon, and they ripped.

So, I couldn't get it all cleaned up, and the finished panel, while strong, was too flexible anyway. I wanted something less "giving". So I gave up on cleaning it. The pain helped.... plastic mesh plus epoxy = cheese grater:

npc030020.jpg.jpg


So... after thinking things over I decided what I'd done wrong was A) Not checking the peel ply to see if it worked before use B) too much epoxy (although this wouldn't be a problem if the vacuum worked) and C) I'd let the vacuum bag crinkle too much, leaving me with a lot of folds and creases that leaked.

I started fresh with a piece of 1/2" plywood. Stiffer, needing less glass. It also saved time cutting.
npc030021.jpg.jpg

I cut two pieces of 8 oz cloth to laminate on either side.

This time I cut the bag bigger, and was careful to avoid folds and crinkles... there were still a few places where the bag had too much material, but I did my best to avoid leaks. I didn't know how to pleat the bag, I only learned that later.

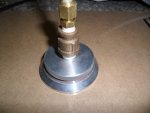
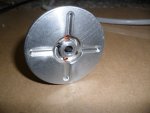
I sealed the board with epoxy, laminated glass, flipped it and did the other side, then put it in the bag. Same sticky tape, fitting....

and again, no luck. I just could not get the bag to seal on three edges well enough to avoid running the pump. Not even the expensive sticky tape helped. Argh.

So, rather than let this all harden into a useless mess, I tried one more thing. I took a scrap of bag from my earlier cutting (a big scrap) and took the panel out of the bag it was in (fitting off, sticky tape off, etc).

Then I put the panel on my big table, directly on the waxed melamine, and put the bag piece over it. I wiped the table down, and sealed it with red tack tape around the edges:

npc030023.jpg.jpg


Success, sort of. The bag held a tight vacuum to a point... I set the pump to pull about 15 inches of vacuum, and it ran maybe twice a minute.

But it was pumping hard/fast enough to "jerk" and it would turn on/off at least 2-3 times per cycle. Kinda hard on the pump.

I fixed what leaks I saw, and a couple I didn't see clearly, and still had the same problem. In fact, it seemed to get worse.

I scratched my head for a while, and walked around to look at every part of the setup.

Oddly, oil was "boiling" out of the top of the pump. It wasn't hot, it just looked like the pressure was low enough for it to give off gases. I'd topped off the pump with compressor oil since I ran out of vacuum oil (as the pump runs it throws out a vapor of oil, which means I had to fill it often). I'm not sure that was a good idea. Maybe the compressor oil had a component that would boil off at low pressure.

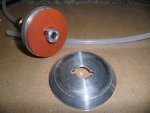
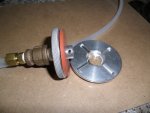
Weird.... ok, so I decided to check what happens if I used a valve to cut off the bag from the pump. The vacuum gauge decreased, but the bag seemed to lose only a little vacuum. So it seemed like the pump was putting gas into the system... odd.

But there was a solution for that... I used a vise-grips to pinch the hose shut between the pump and the tank, after running it up to a 20 inch vacuum. That meant only the tank and bag were connected.

Then I did evening things like watch some TV, and went back to check later.

It still was holding pretty well... very little leakage on the bag it seemed. I decided to leave it overnight.

This morning it's still doing ok, no sign of leaks in the bag.

So.... my conclusions so far are as follows:

1) Don't try to build an "envelope" bag without either a tubular bag roll, an impulse sealer, or something similar unless I have to.. it's hard to seal three double edges.

2) If you get epoxy resin on the sealing surfaces, it's even harder to seal.

3) Avoid folds/creases at all costs. If you have extra bag material, form a pleat.

4) Get a check valve for the pump, and move the vacuum controller to measure bag vacuum instead of the pump circuit. That way the pump runs when pressure in the bag drops, which should work better, and the vacuum in the tank and bag won't cause cavitation or moisture in the pump to gasify. Someone suggested the check valve above somewhere, and I'm sorry I didn't pay better attention.

5) Cut cloth, bag, and flow/peel ply carefully...extra gets in the way.

6) Get some real peel ply.

Comments welcome.

Erik
 

BobsGlasstream

Commander
Joined
Sep 11, 2009
Messages
2,128
Re: New vacuum bag setup

Hey erikgreen,
I really like your table and process. Overall it looks pretty good.
The check valve is also a must.
I have one more suggestion for you. Why don't you make a frame around the your table top attach your bag material and in essence you would have a vacuum press. You can build it pretty cheaply and it works really good.
I made mine using the procedure outlined in a document by Joe woodworker.
You can use maple and it's not hard to seal.
Just a thought and I know it works.
Great job man.
Bob
 

WizeOne

Commander
Joined
Mar 23, 2008
Messages
2,097
Re: New vacuum bag setup

Indeed, taping the cover sheet to the table was good. What I question is your point of suction. When I did a project I used a metal tire valve thru the base board/table and ran the project right up to just short of touching it. I then hooked my vacuum source to the tire valve (less core) on the underside of the table.

This allowed the vacuum to literally get around the project before the bag material drew down and isolated the vacuum pull to the point of connection. I did this all with a much more irregular shape of project than you have.
 

erikgreen

Captain
Joined
Jan 8, 2007
Messages
3,105
Re: New vacuum bag setup

Good points. I've been thinking of a better way to set the table up, and I'll experiment with a frame on top. I'm not sure if I'll normally be making parts this big, but it seems possible.

I can't easily bring a vacuum outlet up from the bottom due to the table's construction, and frankly the method I have seems to work ok. I like being able to move the outlet to where I want it, and that'll become more important if I start vacuum infusing parts instead of just bagging them.

I bought a cheap roll of vinyl window film and some "shoe goo" adhesive last night... it looks like it'll work well for making big bags with 2-3 sides pre sealed.

I also unbagged my panel from yesterday. Here's how it came out:

npc040002.jpg.jpg

Shiny... this is the bottom, the part molded against the waxed melamine. I'll have to be sure to clean the wax off before I try to glass it in place on the boat.

Just a couple defects. First, a folded corner due to my rearranging the bag after I tried the "envelope" method:

npc040003.jpg.jpg


No big deal, I can put that on the inside against the transom wood, and it won't be a problem.

Also there's what looks like a slightly resin starved area... it might just have less resin than the rest of the panel, it's hard to tell. I'll probably make some small holes in it and flow resin in before I permanently put it in place, since it looks like all one interconnected area.

npc040004.jpg.jpg


All in all, not bad considering the problems I had with getting to this point.

Next up, I'm going to laminate a 3/4" bulkhead with two sides of biaxial 17 oz. glass. Probably I'll do one side at a time for simplicity.

Erik
 

BobsGlasstream

Commander
Joined
Sep 11, 2009
Messages
2,128
Re: New vacuum bag setup

erikgreen,
Overall it looks very good.
I use the same frame for small and large parts and the vac port is through the wood.
I really think you would like it.
Once again very nice job.
Bob
 
Top