New vacuum bag setup

erikgreen

Captain
Joined
Jan 8, 2007
Messages
3,105
Re: New vacuum bag setup

Wow, I kept waiting for that boat to take off and fly.... they should sell a Batman mask and cape for the pilot to wear.

Those infusion setups look complicated but effective.. I like the little PVC can manifold, when I start going to multiple bag fittings I'll have to make one of those. That looks like the same flow media I have, the green mesh stuff.

I didn't get much done last night on the bagging.. I spent a lot of time prying fittings off the old compressed air tank. The thing is solid, I think it was welded out of steel pipe and a couple of dome ends. There was a little really, really old oily water inside and some solid corrosion. I think it would still hold 140 psi, although I won't trust it for that.. a vacuum ought to be ok though.

I managed to get one hole set up for a 1/4" fitting, and then I had to re-use some of the old hardware (a flanged fitting with a valve) with holes plugged to get another 1/4" tapped hole. One improvised gasket later and I have an approximately 5 gallon vacuum tank with two fittings ready for a test.

I started my pump setup and closed the valve near the bag (the bag leaks, and I wanted to test the tank). The gauge went fast up to about 20 inches, then slowed and eventually stopped at about 27 inches. I adjusted the pump switch to turn off at that level. Then I unplugged the system.

The new tank held 27 inches for at least a couple hours until I went to bed. This morning air had leaked into the system, but I suspect it was from the valve on the end or possibly hose ends, or maybe even some water evaporating in the tank. But I think the pump/tank system is ready for a try. I'm mounting it on a hand cart ATM so it's portable and I can move it out of the way when not needed.

I promise I'll get some pics tonight.. I was going to take some of the setup with the new tank, but then I felt embarrassed about how slapdash the whole thing looked :)

Erik

PS: My pump puzzles me... it burps oil in little drops out the output hole, that cover everything nearby. It also occasionally puts out fog for a bit, even when running cold, which I'm guessing is just moist air coming through?
 

ondarvr

Supreme Mariner
Joined
Apr 6, 2005
Messages
11,527
Re: New vacuum bag setup

PS: My pump puzzles me... it burps oil in little drops out the output hole, that cover everything nearby. It also occasionally puts out fog for a bit, even when running cold, which I'm guessing is just moist air coming through?

That's normal on the small pumps, if left running for long periods they will run low on oil and get hot. Since they aren't really designed for continuous use they eventually wear out and seize up.
 

erikgreen

Captain
Joined
Jan 8, 2007
Messages
3,105
Re: New vacuum bag setup

Oh, good. Glad to know it's "normal" :)

I suppose if using one works well for me I'll eventually invest in a decent bigger pump...
 

system-f

Senior Chief Petty Officer
Joined
Dec 3, 2008
Messages
667
Re: New vacuum bag setup

I was going to take some of the setup with the new tank, but then I felt embarrassed about how slapdash the whole thing looked

Who cares, you are in the devlopment phase anyways. I want to see pics of this thing!

Here, I will post a pic of my nasty welds when I was in the devlopment phase of the york/alternator install. If this dosen't make you feel any better I have some really ugly pictures of my first front skid plate.

Look at that bracket, that is weldor nastiness right there!

100_0059.jpg
 

SBTOM

Petty Officer 1st Class
Joined
Jul 22, 2009
Messages
275
Re: New vacuum bag setup

Thats a good idea to set up a vacuum reservoir. In our prototype shop, we use modified propane tanks... probably not the safest, but those small ones you buy at home depot can be taken down to 28 no prob. It helps to speed up the initial run of the resin so that you will have to install less resin inlets on a bigger part. Also, if you going to be ordering from Comp 1, you might want to invest in some HDPE fittings like quick disconnects for your overflow pot etc... on larger parts where there is a bigger margin of error for calculating the amount of resin needed, it helps to have a plan C. If you want to get really fancy you could invest in a leak detector. They are expensive as hell even if you can find one on e-bay, but they definitely save you some time poking around with yellow tape when you are mysteriously losing vacuum! I agree with Ondarvr, you probably want to go with actual vacuum bagging, especially when you get into parts which require a bunch of pleats.

As a side question, what type of resin are you planning on using and for what types of parts? We have our resin custom formulated now, but when we first started with the infusion process a few years back, we would thin down off the shelf poly with a little bit of extra styrene.

Seems like you are off to a great start... this should be a fun winter project!
 

erikgreen

Captain
Joined
Jan 8, 2007
Messages
3,105
Re: New vacuum bag setup

Heh, this is only one of three (at the moment) projects... the others being the refit of my boat, which this will help with, and construction of my basement machine shop (to go with my 2 garage workshops). :)

Right now I'm just going to be vacuum bagging my parts after I lay them up with rollers using standard US Composites epoxy, the thin boatbuilding stuff they sell. It's not too thick when mixed, but I'll need to test how it works for infusion.. it may be too thick to work well and wet everything out. No worries on kick time, the stuff is slower than most other epoxy products, even in medium fast.

The local shop I get supplies at (which sells online, by the way - www.expresscomposites.com) has a nice vinylester that they say flows very well for infusing parts(Hydrex 100?). When I get to the point that I'm doing multiple layers of cloth and gelcoat at once I'll probably want to use an infusion specific resin instead of my usual epoxy.

They showed me some nice parts done in carbon fiber with the resin and they were well wet out and looked quite good. The stuff is about the same price as I pay for epoxy from US Composites.

Erik
 

ondarvr

Supreme Mariner
Joined
Apr 6, 2005
Messages
11,527
Re: New vacuum bag setup

Epoxies are typically too thick to infuse with and when they're thinned with solvent to reduce the viscosity to a range where they will work, the solvent tends to weaken them a great deal. VE is easier to use, but the cost should be much lower than the epoxy and check to see if the Hydrex comes un-promoted, this means you need to add cobalt plus you'll need to use a special catalyst. Composites One can get you a pre-promoted infusion VE that will use normal Catalyst.
 

erikgreen

Captain
Joined
Jan 8, 2007
Messages
3,105
Re: New vacuum bag setup

According to the doc from the local place the Hydrex includes cobalt and uses a normal catalyst... although after reading it I'm not 100% sure I want to use a resin that needs cobalt :)

I'm guessing you'd want a full and proper ventilation system to use the stuff?

I'm glad I'm starting with just vacuum clamping some parts, looks like there's a pretty good learning curve for infusion.

For more exotic infusions like carbon/kevlar fabrics do people use vinylester, or is there an epoxy that will work for infusion? According to what I know, you need to use epoxy with the non glass fabrics.

Erik

PS: I took a couple pics last night of the pump cart (I have it mounted now) and my newly clean transom, but I grabbed the wrong cable on the way to work. I didn't have the mem card in when I took pics so they're on the internal memory and I can't use a card reader to get 'em.
Pics soon, I really really promise.
 

ondarvr

Supreme Mariner
Joined
Apr 6, 2005
Messages
11,527
Re: New vacuum bag setup

Most resins have cobalt in them before you buy them, so you can't really get away from it, some VE's require you to add it just before use though.

When I looked up the data sheet, it said to add cobalt and to use a CHP catylst and "do not use MEKP". He may carry a slightly different version not listed that is pre-promoted for MEKP.


It can be difficult to infuse with epoxy and when its formulated for infusion the strength is reduced dramatically, almost to the level of VE, so VE is frequently used with these fibers. When bagging, epoxy works great and it gets used a great deal.
 

erikgreen

Captain
Joined
Jan 8, 2007
Messages
3,105
Re: New vacuum bag setup

Not much time for work last night either... I did manage to get my table saw into the basement finally, and got a space cleaned out for it. I'm planning on building a nice flat table to use for bagging parts there since there's no space in the workshop with the boat.

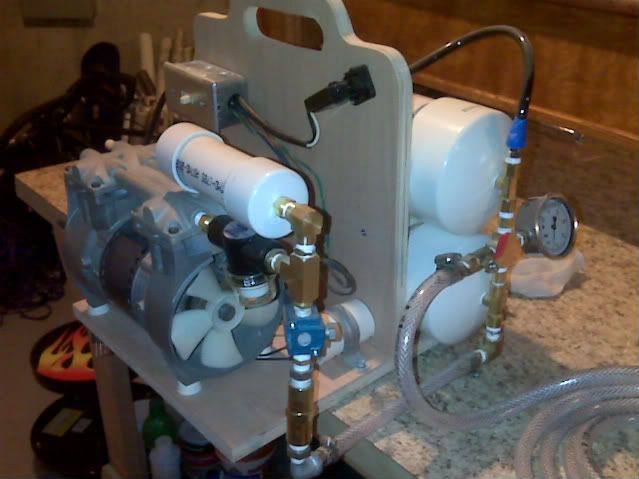
I did get the cable for the camera today though. Here's what the cart looks like at the moment:

nPA230003.JPG.jpg


That's the ancient compressed air tank on the bottom, it has two large bolts welded to the back that were used to mount it... I re-used them and the large, hand made square nuts that were on it. Been a long time since I've seen hand made nuts like that.

The little shelf for the pump is mounted using a galvanized angle on the bottom and a couple screws from the back of the plywood. I put a couple pieces of gasket cut from a round seal for pipe joints in there, hopefully it'll cut vibration a little bit.

The two outlet boxes at the top are connected with romex between them on the bottom... the left one with the blue cord going in is basically an extension from the wall, since I didn't want to run the wall wart 12v supply to the wall whenever I used this setup. That also gives me a low amperage extension outlet for a light or radio.

The other outlet box with the switch is the one controlled by the relay. If the switch is on, then the relay can switch on the pump as needed. I also have a spare outlet there that's switched the same way. Don't know what I'd use it for yet though. I'd think a heater or hair dryer to aid curing, but that would suck too much power if the pump is running at the same time. Maybe an electric clock, so it would count how long the pump ran or something.

Right now the vac switch isn't mounted.. it's hanging on wires at the top left of the plywood, and the relay is screwed down on the top right. I may put both of 'em in a protective box, don't know yet.

None of the tubing is on here at the moment either... I have to find a good way to mount the vac gauge and manifold near the top of this setup.

The plywood has plenty of space for other attachments and drawers/boxes.. I know I at least want to put a couple nails or bolts on so I can wind the power cord up, and given the rate the pump spits out oil I also want a bottle holder for that. After that maybe a spot to put all the fittings when they're not on the air hose. Some of those little plastic storage boxes might be nice. There's enough space on the left side to put a couple PVC tubes so I could also store some rolled up bag there, but that's not too practical.

Anyway, tonight I may finish this, or I might work more on the table saw setup... I'm going to build a torsion box table for bagging, since I want flat parts, and I can re-use it for another project later on. Pics of that here as I go on too.

I still really want to get some more done on my transom in the boat too, I'm gonna update that thread now.

Erik
 

BobsGlasstream

Commander
Joined
Sep 11, 2009
Messages
2,128
Re: New vacuum bag setup

erikgreen,
Nice start on the vac system, :D
I used a brass tee and a shut off valve near the reservoir, for the vacuum gage and to shut it off to allow the tank to be charged prior to trying to vac the bag.
I also put a check valve near the pump to help hold the vac.
Like I said great start.
Look forward to seeing the actual transom being vacuumed.
Bob
 

Yacht Dr.

Vice Admiral
Joined
Feb 26, 2005
Messages
5,581
Re: New vacuum bag setup

Hello again :)

You should use nylon clear tube.

A T at your suction end with a simple cheater valve to controll how much you pull .. use a pump 2x for what you really need. IMO.

As soon as it starts to hard gel..pull your frogs off and take your rubber gaskets off.. soak your alum frogs..clean your gaskets by hand. have a dental pick ready for your fittings. soak in acetone. clean clean clean.

Dont worry about 20$ back check fittings.. there only gonna get wasted. ( unless the job paid for them )

Use only vac bagging materials.. it will save you.

Dont pull the tape backing off untill the last moment ( after you resin coat.. layup..etc.. I know you allready know ;) )

YD.
 

erikgreen

Captain
Joined
Jan 8, 2007
Messages
3,105
Re: New vacuum bag setup

Thanks for the nitty gritty suggestions YD.

I've got a bucket with a good sealing lid that I'll fill with vinegar for cleaning the fittings. Since I'm in my basement for the most part I prefer that to acetone. I'll be ventilating anyway, but why add more vapors if I don't have to? I can't let the parts just soak in it unfortunately, they'll turn black.

I do have an in-line valve at the end of the suction hose near the bag, I'll be using that to let the reservoir build vacuum before I bag.

I am using reinforced vinyl tubing, 1/2", the kind with woven white fibers in the walls. No problems with kinking or crushing yet.

So far the adjuster on the vacuum switch works well for setting the vac level, I'll probably just set that to the level of suck I want and let it run on its own when I bag.

So far, so good. I spend a good part of the weekend working on things related to bagging and the boat. Not much new with the cart here, but a lot of cleaning and making space for my work table. I also bought $150 in parts (ouch) for it and my transom core and set up some lights.

My table is going to be a torsion box:
http://www.finewoodworking.com/ProjectsAndDesign/ProjectsAndDesignArticle.aspx?id=28855

I'm using 5 inch "quality" grade pine for the grid and edges, and 1/2" MDF for the top and bottom. I'll coat the MDF with epoxy or clear polyurethane, and I'm going to put a sacrificial piece of melamine white board on top for a bagging surface. It'll be 4x8 feet, and probably stand about 4 feet off the floor.

Erik

PS: Forgot to mention I hauled my table saw in from my garage, cleaned and waxed the table, got my accessories and blades out for it, and set it up with a foot switch. Phew.
 

erikgreen

Captain
Joined
Jan 8, 2007
Messages
3,105
Re: New vacuum bag setup

Only a little news today, I spent last night working on the table because my coveralls were in the wash (no grinding on the boat).

I have cleared an approx. 12x15 corner of my basement and put a couple of shop lights overhead. I'll be building the table in place with about a 2 foot walking path all around.

Last night I finally started building a bit. I have two metal sawhorses I brought in from the garage. They'll be the base/legs to start with. To the top of each one I glued a 4 inch by 4.5 foot strip of 5/8 MDF board. I used PL concrete crack and mortar sealer since I had some spare. It's basically the same composition as 3m 5200.

I know the MDF boards are flat (MDF is very dimensionally stable) and I was careful when gluing them to not force them to curve... basically I set them into three large blobs of the stuff and let them settle on their own.

So each sawhorse is topped by a flat plane of MDF about 4.5 feet long... once the glue hardens I'll level both of them, so then the two pieces of MDF (spaced about 8 feet apart) will be in the same plane. This will give me a base to which I can bridge the sawhorses with boards stiff enough to support the MDF I'll use as a reference surface while I build this table.

If the MDF on the sawhorses is level, and the sides of the boards I use to bridge the sawhorses are parallel, then the upper sides of those boards should form a flat plane about 4 feet by 8 feet. The MDF I'll put on top is also flat, so whatever I build on it will have at least that side nice and flat to a small fraction of an inch. Not too important for fiberglass work, but I'm thinking I'll eventually re-use this table as a CNC router base for wood cutting.

I have to cut the bridge pieces carefully..2x4s from the lumber yard aren't straight enough even if they look it. I'll be using another strip of MDF or metal that is a reference straight edge to trim one side of each 2x4 straight against the table saw fence, then I'll flip each one and cut to the same width using the flat side against the fence, and I should have two parallel sides.

Phew. Lots of work to make a table, but I want to do it right :)

Erik
 

BobsGlasstream

Commander
Joined
Sep 11, 2009
Messages
2,128
Re: New vacuum bag setup

erikgreen,
Hey, glad to hear you are moving forward with the project.
I told you that when I got home I would post a pic of my vac system. so I will. the table it is sitting on is also my vac table. I built mine out of two 3/4" MDF and Laminated Formica on top. Very flat and on wheels. You can't see it but mine steel cross braces under the MDF.
IMG00176.jpg

Have a great evening.
Bob
 

erikgreen

Captain
Joined
Jan 8, 2007
Messages
3,105
Re: New vacuum bag setup

Hey, I've seen pumps like that in the local surplus store for about $35. I may have to pick one up and see how well it works.

I did a bit more on the table last night, mostly spent time grinding (literally) on the boat. More grinding tonight, then hopefully measuring and templating, and some more work getting the flat table built.

I had placed an order for some epoxy supplies and things from US Composites, got that yesterday, so I'm all set to bag my new transom as soon as I get the table set up and the wood cut.

I'm hoping the holiday will let me spend some more time on this stuff... my family is having a delayed christmas on the weekend of the 2nd, so I don't have many time demands for the next week.

Erik
 

erikgreen

Captain
Joined
Jan 8, 2007
Messages
3,105
Re: New vacuum bag setup

Thanks Bob, same to you and yours!

I had Christmas part I this last week... first part of the family. The second part comes this next weekend when the extended family gets together... that'll be more fun, with little kids running around playing with presents.

I've gotten some time to work on things over the break, I mostly spent it working on my boat transom, although I did do a bit on the table I'm building.

More pics soon.

Erik
 

erikgreen

Captain
Joined
Jan 8, 2007
Messages
3,105
Re: New vacuum bag setup

I did get some time to work on this. I need it now, too, since I've finished laminating the wood for my transom and I need to vacuum bag some glass on it as soon as I can.

Last light I leveled the sawhorses, checked flatness of the MDF tops, and then used a simple straightedge jig to run 2x4 boards through the table saw, to get one edge straight. Then I flipped the boards and cut the other edge parallel to that one, which narrowed the boards to a consistent 2.5 inches across. I laid these on edge on the sawhorses to check consistency and level, and there are just a couple small level issues. I'll fix that with some shims tonight and tack the 2x4s in place.

nPB100094.JPG.jpg


Sorry for the spots, it's time to clean the lens again.

Then I'll be putting a sheet of MDF on them (without fastening) to give me a surface to build my grid on, followed by ripping boards to width for the grid, grid construction, etc.... finally I'll glue/screw another MDF sheet on top of the grid to form the bottom surface of the table, then flip it and fasten the first sheet on as the top. Then finishing comes..

I'm hoping by the end of the week I'll have both surfaces attached and be ready to apply polyurethane over the MDF plus some edging. Then I'll lay a thin sheet of melamine on top and use the sawhorses for legs, and I can laminate the transom.

Erik
 
Top