94 alumacraft 16' backtroller transom repair

wglanville

Seaman
Joined
May 13, 2010
Messages
59
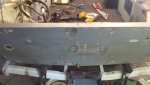
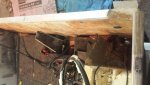
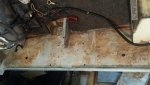
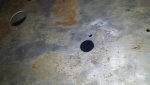
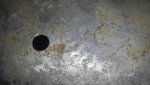
I'm replacing the rotten transom. It came out in a thousand pieces, very rotten! I think I see why, look at all those holes! Luckily, I get to cut off the transom cap as well because it's not a riveted on cap. Can I cut it off with a sawzall, or is that too rough? Should I use an angle grinder, or doesn't it matter? Also, does it matter where I cut it off at? Meaning should I cut a few inches down the back of the boat, or stay really close to where it bends. Plus the transom skin that is on the inside of the boat side of the transom wood is pretty weak in a few spots, mainly where the u-bolts and washers from the previous owner's tilt and trim were in contact with the transom skin. How should I repair those weak spots?
 

Attachments

  • photo222315.jpg
    photo222315.jpg
    144.8 KB · Views: 8
  • photo222316.jpg
    photo222316.jpg
    188.7 KB · Views: 5
  • photo222317.jpg
    photo222317.jpg
    69 KB · Views: 5

Tnstratofam

Commander
Joined
Aug 18, 2013
Messages
2,679
I don't think I would cut the transom cap. I would clamp two 2x4's top and bottom and try to bend it up 90 degrees. Then slide the new transom wood down and bend the cap back over it. Cutting the cap off and trying to reattach it seems like it would be more trouble. If you do have to cut it off I would use a grinddr instead of a sawzall. I would think the grinder with a thin metal cutting wheel would give you the cleanest cut. You would then have to have a new transom cap made or figure out how to reatach your old one.

Make sure you sand the transom skin really well and fill any pitting with jb weld or marine tex. Then hit it with some self etching primer before installing your new transom wood.
 

bonz_d

Vice Admiral
Joined
Apr 22, 2008
Messages
5,276
That transom looks quite different than the one in my 1988 Classic 16. On mine the wood is incased by aluminum on the inside and doesn't extend all the way to the bottom.
 

sutor623

Rear Admiral
Joined
May 23, 2011
Messages
4,089
I don't think I would cut the transom cap. I would clamp two 2x4's top and bottom and try to bend it up 90 degrees. Then slide the new transom wood down and bend the cap back over it. /QUOTE]

This is great advice here. That aluminum will bend nice and easily.
 

wglanville

Seaman
Joined
May 13, 2010
Messages
59
Hopefully someone can talk me through how to and where to cut the cap off at, I'm not sure I like the idea of bending it.

My wood is encased as well, the inside aluminum skin is the aluminum that has the issues with cracks and pitting where the previous owner's tilt and trim was connected. He must not have used ss washers.
 

wglanville

Seaman
Joined
May 13, 2010
Messages
59
Explain the process of using 2x4s top and bottom to bend, unfortunately it's not making sense to me
 

Tnstratofam

Commander
Joined
Aug 18, 2013
Messages
2,679
Hang on I may be giving you the wrong advice. Did your transom come out as one piece in an aluminum shell without needing to go around the transom cap? Or is the interior skin a separate piece of aluminum that goes on the front of the transom wood after the transom is set in place?

I was assuming it was similar to our Starcraft's and you needed to either bend the transom cap up or remove it to allow the new transom wood to slide down into place. If this is the case this is why I recommended bending the transom cap up versus cutting it off. To do so you could cut two 2x4's the same length as your transom cap. Then place one on top and one underneath making a sandwich with the cap inbetween. Clamp everything together with several clamps running the length of it. Then you can bend it like it is in a sheetmetal break making a clean bend. It's important the bottom 2x4 is snug against the corner of the 90 degree bend that is there now. Work slowly and it should bend up nicely.

To bend it back down is a repeat of the up bend with the exception that the new transom will prevent you from making the complete bend back down. You will probably have to work it back down in place by hand or with a flat piece of wood and a hammer. The aluminum is pretty malleable so it should bend pretty easy. Remember to work slow and you can get it back in shape.

Good luck and post up some more pictures of your set up so I/we can be sure we're giving the correct advice.
 

wglanville

Seaman
Joined
May 13, 2010
Messages
59
The interior skin is a separate piece that is basically a mirror image of the outside transom, it's shaped like the number 7. That interior skin came out easily because there was really no transom wood left to get in it's way.
 

Tnstratofam

Commander
Joined
Aug 18, 2013
Messages
2,679
Okay that makes sense to me. So in that case I would bend the cap up versus cutting it off and trying to reatach it.

Cutting it off is an option though. If you decide to cut it off, again using a grinder is gonna give you the cleanest cut. I would cut it maybe a half an inch down from the top. Others with better knowledge will hopefully chime in to give you more ideas.
 

Tnstratofam

Commander
Joined
Aug 18, 2013
Messages
2,679
Once or twice I wouldn't think so. Multiple times in a row yes. The metal will stretch , but if you bend it back and forth enough times it will rip or tear. Bending it up once and then pushing it back down should be okay. If the metal is fatigued or cracked or if it seems weak then cutting it is the better option. If there are no stress cracks it should bend fine.
 

sublauxation

Lieutenant
Joined
Oct 13, 2008
Messages
1,317
You could always try bending at and worst case if it doesn't survive have a new cap made. Mine was screwed on but I changed the transom shape and just had somebody bend a new, thicker piece if aluminum into a C Channel that slid over both the inside and outside skin of the transom.
 

wglanville

Seaman
Joined
May 13, 2010
Messages
59
No Title

Here is a couple photos of the transom skin, it's pretty pitted. Apparently the po either used treated plywood" an old transom repair, or just didn't use ss hardware on all the holes he put in the transom. Just jb weld it smooth?
 

Attachments

  • photo222453.jpg
    photo222453.jpg
    187.2 KB · Views: 3
  • photo222454.jpg
    photo222454.jpg
    63.9 KB · Views: 3

Tnstratofam

Commander
Joined
Aug 18, 2013
Messages
2,679
After a good sanding some jb weld and then some good self etching primer. I thought about your transom cap a little more and instead of 2x4's I think 2x2's will be easier to work with.
 

wglanville

Seaman
Joined
May 13, 2010
Messages
59
That's funny, I did use a2x2 on the bottom, but still a2x4 on the top. What's the reason for the self etching primer?
 

Watermann

Starmada Splash of the Year 2014
Joined
Jan 12, 2013
Messages
13,822
The pitting your transom skin has is from galvanic corrosion due to the wet wood being up against the aluminum, almost every AL boat I've seen has had it to one extent or another. It's stopped by a through cleaning with a medium wire wheel or nylox wheel on a drill and I use Heinz cleaning vinegar to help neutralize the alkaline corrosion. Once it's clean rinse, dry and then fill in the pitting with either marine tex or JB weld. Be sure to start sanding it smooth right after the cure time, because if you wait days it will be super hard to sand. Once smoothed out you'll want to use some self etching primer on the bare AL and then I would go ahead and seal it with some paint. The reason is simple, so the galvanic corrosion doesn't happen again as easily since there will be a barrier.

How is that transom cap attached on the one side, is it one with the transom outer skin, I can't tell by your pics?
 
Last edited:

wglanville

Seaman
Joined
May 13, 2010
Messages
59
Thanks on the reason for the primer. Yes, my transom cap is just a part of the transom outer skin. I wish it had been riveted on, the bending process was tough, plus it ripped at one of the corners a bit, less than 1/2" though, so I'm not too worried. I might jb weld the crack if it looks bad once it's bent back into shape.
 

Watermann

Starmada Splash of the Year 2014
Joined
Jan 12, 2013
Messages
13,822
The runny stuff is easy to spread with a bondo type rubber putty spreader. I even go as far as to use my heat gun to warm the AL first so it flows on real nice and smooth. I use the stick water weld JB to make a wad when I fill holes.
 
Top