75 18' Chieftain OB Treasure in the woods.

MARUSS

Seaman
Joined
Jul 12, 2015
Messages
60
No Title

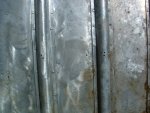
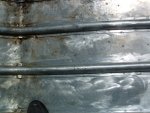
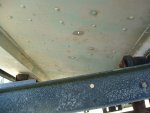
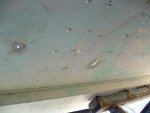
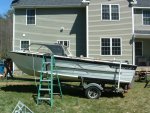
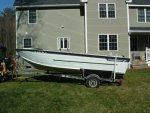
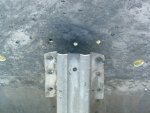
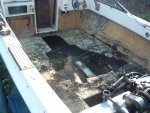
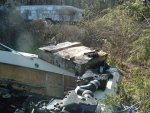
Here's a pic of the galvanic reaction from the pressure treated ply on the hull.
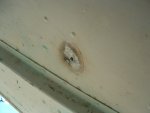
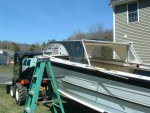
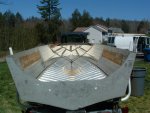
looking for different ideas for patching. I was thinking of filling with aluminum filler rod.
 

Attachments

  • photo241947.JPG
    photo241947.JPG
    310.8 KB · Views: 2
  • photo241948.JPG
    photo241948.JPG
    314.1 KB · Views: 2
  • photo241949.JPG
    photo241949.JPG
    312.1 KB · Views: 2
  • photo241950.JPG
    photo241950.JPG
    307.8 KB · Views: 1
  • photo241951.JPG
    photo241951.JPG
    333.2 KB · Views: 3
  • photo241952.JPG
    photo241952.JPG
    332.3 KB · Views: 3
  • photo241953.JPG
    photo241953.JPG
    335.9 KB · Views: 3

Watermann

Starmada Splash of the Year 2014
Joined
Jan 12, 2013
Messages
13,822
Looks like you have 3 holes all the way through that you filled with the stick. I can't tell how deep the rest of the pitting is. If the pits aren't almost through then you could fill them with JB or marine tex. It's hard to get a true perspective of what your facing are you thinking you might need a patch piece of AL?
 

MARUSS

Seaman
Joined
Jul 12, 2015
Messages
60
Looks like you have 3 holes all the way through that you filled with the stick. I can't tell how deep the rest of the pitting is. If the pits aren't almost through then you could fill them with JB or marine tex. It's hard to get a true perspective of what your facing are you thinking you might need a patch piece of AL?

I don't think I need a patch, there a about 6 holes that need filling. I was just looking for all way of patching before I jump into it.
Thanks
 

MARUSS

Seaman
Joined
Jul 12, 2015
Messages
60
No Title

I did dig into the old Chief Sunday. I took out the splash well and removed the transom. The PO paid a marina to install it. To my surprise they installed it in 3 pieces. What a hack job, all the drywall screws that were installed were rotted. I now the PO sold it to my buddy right after that was done so it didn't get much use after that.

Here's some pics.
 

Attachments

  • photo242037.JPG
    photo242037.JPG
    310.3 KB · Views: 1
  • photo242038.JPG
    photo242038.JPG
    313.5 KB · Views: 1
  • photo242039.JPG
    photo242039.JPG
    331.8 KB · Views: 1
  • photo242040.JPG
    photo242040.JPG
    325.4 KB · Views: 1
  • photo242041.JPG
    photo242041.JPG
    318.5 KB · Views: 1

MARUSS

Seaman
Joined
Jul 12, 2015
Messages
60
No Title

I also remove the Chief's head dress. Now I can get in all those hidden spots much easier. ​Starting to have that oversized row boat look.
 

Attachments

  • photo242042.JPG
    photo242042.JPG
    329 KB · Views: 1
  • photo242043.JPG
    photo242043.JPG
    337.9 KB · Views: 1
  • photo242044.JPG
    photo242044.JPG
    316.7 KB · Views: 1
  • photo242045.JPG
    photo242045.JPG
    327.7 KB · Views: 1
  • photo242046.JPG
    photo242046.JPG
    316.5 KB · Views: 1

MARUSS

Seaman
Joined
Jul 12, 2015
Messages
60
Besides patching the holes in the hull I was thinking now would be the time to think about installing reinforcement brackets if needed. Any ideas pros and cons?
​Also transom material, I would like something strong that will last but also won't break the bank.
This project just keeps getting bigger every time I turn around. The treasure in the woods isn't much treasure anymore.
But I just can't stop thinking about it. I'm addicted to this boat and cant wait to find more time to get it going.

Thanks
 
Last edited:

GA_Boater

Honorary Moderator Emeritus
Joined
May 24, 2011
Messages
49,038
Three piece transoms are the way Starcraft built these and many others back in the day. So the wood isn't a hack job, but drywall screws. :facepalm:

Where are you thinking about putting the reinforcement brackets?

I'll let the others give wood advice because other than Arauco, which seems to be getting harder to find, I haven't looked in a while.
 

classiccat

"Captain" + Starmada Splash Of The Year 2020
Joined
Dec 20, 2010
Messages
3,412
Thats one of the rattiest transom replacements that I have ever seen. I wonder if they used the original wood...just patch it up and slap some lipstick on it. Bottom shelf right there.

You're in good hands here. A sheet of 3/4" marine ply would run you around a c-spot. Exterior PLY is about 1/3rd of the price. You'd need a second mortgage for that coosa board that one of the guys just used :lol: thats about the range in materials/prices.
 

GA_Boater

Honorary Moderator Emeritus
Joined
May 24, 2011
Messages
49,038
I was trying to be sorta kind and gentle on whoever threw the wood in, CC. LOL
 

MARUSS

Seaman
Joined
Jul 12, 2015
Messages
60
Three piece transoms are the way Starcraft built these and many others back in the day. So the wood isn't a hack job, but drywall screws. :facepalm:

Where are you thinking about putting the reinforcement brackets?

I'll let the others give wood advice because other than Arauco, which seems to be getting harder to find, I haven't looked in a while.

For the reinforcement brackets I've seen a few guys install them on the corners of the transoms and from the bottom ribs to the side of the hull. It was for added strength for heaver and larger HP motors. I have a Evinrude 150 that's weighs more than the original 115 Evinrude that came on it and who knows someday I might look into a 4 stroke.
Thanks
 

MARUSS

Seaman
Joined
Jul 12, 2015
Messages
60
Thats one of the rattiest transom replacements that I have ever seen. I wonder if they used the original wood...just patch it up and slap some lipstick on it. Bottom shelf right there.

You're in good hands here. A sheet of 3/4" marine ply would run you around a c-spot. Exterior PLY is about 1/3rd of the price. You'd need a second mortgage for that coosa board that one of the guys just used :lol: thats about the range in materials/prices.

No that transom was replaced and PT was installed. I knew the guy who had it done. He sold it to my buddy that gave the boat to me 10 years later. It was just 2 pieces of PT drywall screwed together no glue or anything. The PT ate the screws up and was falling apart.
Yah I really like the coosa board but not for $600.
Thanks for the info on the transom material.
 

jbcurt00

Moderator
Staff member
Joined
Oct 25, 2011
Messages
25,111
Look thru Grandad Watermann and classiccat topics they all added the rib end reinforcement plates. CC added extra braces to the gunwales as well.

Not sure what extra braces you're referring too on the transom, dont recall that.

Unless you meant the repairs done to cracked transom knees....
 

MARUSS

Seaman
Joined
Jul 12, 2015
Messages
60
No Title

Here's the transoms from my 78 SS and my Chieftain. TIME FOR A FIRE.
 

Attachments

  • photo242081.JPG
    photo242081.JPG
    314.4 KB · Views: 1
  • photo242082.JPG
    photo242082.JPG
    315.8 KB · Views: 1

oldhaven

Chief Petty Officer
Joined
Aug 30, 2015
Messages
578
That was me with the Coosa, and it ran me about 3 times what fir marine ply would and about twice what Arauco certified marine ply would have. Since I have just put it in and seem to be one of the first, I have to say that whether it is worth it or not is an open question that will probably have to be answered by some owner in the future. I just put it in and tied in the knee brace and hull brackets and Z brace and it seems to be as rigid as the original wood. I would say following a middle road with good marine plywood well prepared and coated would be the best economical alternative for transom material between external construction ply and Coosa. I just like to experiment a bit.

Ron
 

MARUSS

Seaman
Joined
Jul 12, 2015
Messages
60
I never said it wasn't worth it,I love the stuff. It's just not in my budget. I can tell you if it's only $100 more per transom I'll put it in both my boats.
The prices I was getting fore 1 1/2" thick board shipped to my house was way more than I would pay. I couldn't find the stuff locally.
I never thought of buying 3/4" board and doubling it up. Like what you did. If that's the difference to make it affordable I think you'll see a lot more people buying it.
Great choice Ron.
 

MARUSS

Seaman
Joined
Jul 12, 2015
Messages
60
Worked on the Chief a bit today. Finished gutting out and noticed a few more issues that need addressing. The transom skin is full of pinholes and needs to be addressed. I'm going to steal Ron's (oldhaven) idea that he used to repair his 67 Starchief. I have to locate a sheet of 1/8" aluminum. I also have to replace the wood bow support braces they are rotted. I think I'm going to use Azack plastic wood. I can get free pieces of scrap off job sites I've been working on.
The PO really *&^*ed up using pressure treated plywood. Most people think it's the best stuff to use though. You wouldn't believe how many people have suggested that I use PT.
 

MARUSS

Seaman
Joined
Jul 12, 2015
Messages
60
No Title

Here's some photos
I also want to note I removed the Z bracket and the transom support bracket was compromised by PO, he cut into it and weakened it. it also needs to be repaired.
I'll get some more materials as I cant move onto primer & paint until I get all these hole repaired.
 

Attachments

  • photo242384.JPG
    photo242384.JPG
    318.5 KB · Views: 3
  • photo242385.JPG
    photo242385.JPG
    314.1 KB · Views: 0
  • photo242386.JPG
    photo242386.JPG
    313.2 KB · Views: 0
  • photo242387.JPG
    photo242387.JPG
    318.4 KB · Views: 0
  • photo242388.JPG
    photo242388.JPG
    319.4 KB · Views: 0

oldhaven

Chief Petty Officer
Joined
Aug 30, 2015
Messages
578
I ordered mine from a metals supplier who had 1/8 in 5052. I got an 18" by 60" piece cut, but it could have been a few inches longer and I could have made it look better by tapering the sides to match the angle of the hull sides as i have seen others do.

Ron
 

MARUSS

Seaman
Joined
Jul 12, 2015
Messages
60
No Title

After a little siesta, I went out in the back yard, as the Admiral calls it my boat bone yard. too scrounge around a 1986 Chaperel bow rider a guy gave me. (Just put new gas in it and your good to go.) Ya right. This thing is rotted to the core. I thought maybe I could get a good gas tank for the Chief. I got a good 28 gallon gas tank but I think it's to wide 29x36x7. It has a good 4.3 merc and outdrive. HMMM maybe another project down the road, as I've seen one of the prettiest Chieftains on this forum repowered from a downer boat. That's inspired me to snatch this thing up. I'm sure I can get some goodies off this thing. ​So I tore her down a little.
 

Attachments

  • photo242400.JPG
    photo242400.JPG
    324.6 KB · Views: 0
  • photo242401.JPG
    photo242401.JPG
    317.9 KB · Views: 0
  • photo242402.JPG
    photo242402.JPG
    321.8 KB · Views: 0
  • photo242403.JPG
    photo242403.JPG
    315.2 KB · Views: 0
  • photo242404.JPG
    photo242404.JPG
    327.6 KB · Views: 0

MARUSS

Seaman
Joined
Jul 12, 2015
Messages
60
I ordered mine from a metals supplier who had 1/8 in 5052. I got an 18" by 60" piece cut, but it could have been a few inches longer and I could have made it look better by tapering the sides to match the angle of the hull sides as i have seen others do.

Ron


Thanks Ron
I hope my repair comes out as nice as yours.
I have to start ordering materials and some tools. If I want to get this done next weekend. Any advise on a rivet gun and tooling for solids.
That's what I love about this forum help is everywhere.
 
Top