1992 Crownline - Transom Replacement

Natesms

Chief Petty Officer
Joined
Sep 8, 2012
Messages
464
Thought I would start a build thread on replacing the transom and engine mounts in my 92 Crownline.

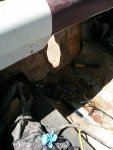
I replaced the back half of my floor and stringers in this boat 3 or 4 years ago, and honestly I hated the project. I knew the transom was starting to go but it wasn't bad and I've been checking on it constantly. Kept telling myself when the rot got to bad she was done for. Well this year I've decided that the rot has worked to close to the drive, seemed to almost double over the winter. I was faced with the hard decision to go through the work or sell it for parts.

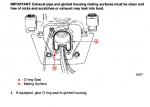
I only put about 20 hours on the boat last year, so I decided I should check on the drive-line and I went ahead and dewinterized it and fired it up. Ran absolutely horrible, wouldn't idle, sputtering etc. I knew I had a giant paperweight at this point that I couldn't sell for hardly anything. Spent the $28 on a carb rebuild kit and got my first experience with what I believe was ethanol issues. There was a white gel substance throughout the carb. After the carb rebuild, she ran fantastic on the muffs. Drive still shifts fine as well.

Interior is fair and so is the hull. Most importantly we've always really enjoyed the boat. For whatever reason she's just fun. I still have everything I need for the fiberglass work but the resin, so I'm looking at about $300 in material and parts that I know of. So, here we go. I'm probably going to need some help.

Last night I built a stand for the outdrive and then pulled her off today.. I hope to get the engine undone and pulled this week but we will see. I don't have a good way to get her out so I'm counting on a friend with an excavator to pick it out for me.

uc
 

tpenfield

Moderator
Staff member
Joined
Jul 18, 2011
Messages
18,149
Looking forward to your posts as you progress through the re-build. Since this type of work is not exactly fun, the general advice is to get it all done at once. As you saw the rot progression starts out slow and then accelerates as it take hold.
 

Natesms

Chief Petty Officer
Joined
Sep 8, 2012
Messages
464
When i did the floors and stingers I cut everything out until I hit solid wood, and then kept cutting to the next bulkhead.

I will take pictures of where I rigged up the bulkhead that the engine stringers hook to. I am going to pay for not doing this right the first time. Just not sure how yet.
 

Natesms

Chief Petty Officer
Joined
Sep 8, 2012
Messages
464
Removed the back seat and got the engine unhooked (I hope). So one of the shortcuts I took when I did the floor and stringers is that where the engine mount stringers run into the bulkhead, the wood was good enough so I left it. When I cut the engine mount stringer out should I mount a fresh 2nd bulkhead toward the engine or should I just leave it and tie into what is there?

uc


uc
 

Natesms

Chief Petty Officer
Joined
Sep 8, 2012
Messages
464
Motor came out today. All went well except one of the bottom gimble housing bolts broke. What should I use to replace it? The manual says it requires the rubber gasket. I found some bolts with annodes for $48, there has to be a cheaper option.

Engine coming out on the tractor bucket. Used a chain hoist for the first few inches and then used the tractor to do the rest. It went well.
uc


Everything out including the gimble housing. The wood right right around the opening is actually in great shape. Get a few inches outside and it's a different story.

uc
 

mxcobra

Chief Petty Officer
Joined
Jun 27, 2011
Messages
526
If your restore looks half as good as the out drive stand, then I think your in good shape
 

Natesms

Chief Petty Officer
Joined
Sep 8, 2012
Messages
464
No Title

In the manual for the exhaust o-ring around the y-pipe it says to use glue. What kind of glue do I use, bellows adhesive?
 

Attachments

  • photo244873.PNG
    photo244873.PNG
    31.9 KB · Views: 1

Natesms

Chief Petty Officer
Joined
Sep 8, 2012
Messages
464
No Title

3.5 hours of cutting. Got the motor mounts out and a good chunk of the transom. Seriously fighting the good wood though, I can't get it to come off the outer fiberglass. Remembering why I said I wasn't going to do this job...I do not like the cutting and grinding.
 

Attachments

  • photo244891.jpg
    photo244891.jpg
    45 KB · Views: 14
  • photo244892.jpg
    photo244892.jpg
    90.3 KB · Views: 11

Natesms

Chief Petty Officer
Joined
Sep 8, 2012
Messages
464
Got the 2 pieces of the transom cut and the new engine mounts built.

New and old engine mounts.

uc


Mocked up in the boat.

uc
 

Natesms

Chief Petty Officer
Joined
Sep 8, 2012
Messages
464
Question about the motor mount height. The transom is obviously going to change ever so slightly with a full rebuild. My question is, if I build the front mounts to the same height as the originals will I be OK for alignment or do I really need to test fit the motor? Putting the motor in and out is a big deal for me...I have to drive to a farm and use a friends tractor.


Bump...anyone?
 

52FordF2

Petty Officer 1st Class
Joined
May 31, 2013
Messages
372
As long as the same type of motor is going back in, you build the same. The rear motor mount to the Transom assembly, which would be the same. Front would be the same.
The transom should be from 2 to 2.25 inch thick surface coat to surface coat.

Even if your original Transom was 1.75 inch thick and you build to a 2.0 inch thickness The front motor mount would be the same height, the mounting bolt/ lag holes may/would move forward a little.

On Friscoboater Motor install looks like he used bellow adhesive on the Y-pipe.
 

Natesms

Chief Petty Officer
Joined
Sep 8, 2012
Messages
464
As long as the same type of motor is going back in, you build the same. The rear motor mount to the Transom assembly, which would be the same. Front would be the same.
The transom should be from 2 to 2.25 inch thick surface coat to surface coat.

Even if your original Transom was 1.75 inch thick and you build to a 2.0 inch thickness The front motor mount would be the same height, the mounting bolt/ lag holes may/would move forward a little.

On Friscoboater Motor install looks like he used bellow adhesive on the Y-pipe.


Thank you. That was my thought as well, I couldn't see a reason the angles would change enough that the motor mount bolts couldn't take up the required adjustment.

​I've watched I don't know how many hours of Friscoboater videos. I watched every single one on the searay rebuild a couple years back. If it wasn't for those videos I really don't think I would have attempted any of this.

I didn't catch the bellows adhesive mention on there but when I hit the parts store the other day that is what they gave me as well.
 

Natesms

Chief Petty Officer
Joined
Sep 8, 2012
Messages
464
Tonight is the mounting of transom board 1. I'll be using a layer of CSM between the wood and the hull with thickened resin on the hull. I'll clamp it and let it dry until Sunday.

The transom I took out had 2 layers of CSM between the 2 wood pieces of the transom so that is what I'm putting back in. Hope to get those 2 layers on, and the inner transom board glued in on Sunday. I may be able to tab in the motor mounts as well Sunday.

Getting exciting.
 

rad1026

Chief Petty Officer
Joined
May 1, 2006
Messages
443
hope it goes well for you. I glued mine in this past weekend. Went really well. Used two 750 ml batches with a 1% harder ratio. Gave me plenty of time. I was able to work in some extra peanut butter in around the edges. It really is solid.
 

Natesms

Chief Petty Officer
Joined
Sep 8, 2012
Messages
464
hope it goes well for you. I glued mine in this past weekend. Went really well. Used two 750 ml batches with a 1% harder ratio. Gave me plenty of time. I was able to work in some extra peanut butter in around the edges. It really is solid.

Glad it went well for you, good to hear stories of success!

I got the first board in tonight and I think it went well. I used about the same amount of resin to get it glued to the hull. I wetted out the CSM on the back of the transom wood first. I then used a thickened resin on the hull itself to fill in some of the voids from cutting and grinding out the old transom and pressed the wood and CSM into the hull.

I wasn't quite prepared for the amount of resin that came through the bolt holes around the keyhole. It dawned on me pretty quick I needed to deal with that immediately otherwise I was going to have my clamping boards glued to the outside of the boat along with a whole lot of hardened resin creating an uneven surface. Bunch of rags and acetone and we are all good.

Headed to the lake tomorrow to have some fun on the big boat instead of just working on em! Probably just cursed myself, I'll be in the engine compartment all weekend now...
 

rad1026

Chief Petty Officer
Joined
May 1, 2006
Messages
443
yeah, I used some tape to plug the holes and even that didn't stop all the resin from squeezing through. It did stop my boards from sticking though. Everything came off nicely. I'm not super happy with my first tab of 1708 but it will do. I got better at it as I went along and figured out how much work it is to wet the glass all the way. I definitely recommend only using a 1% hardener mixture to make sure you have plenty of time to work in the resin and wet the glass properly.
 

Natesms

Chief Petty Officer
Joined
Sep 8, 2012
Messages
464
Have both transom boards mounted and 2 layers of CSM on. So far so good. Debating switching from CSM to fiberglass mat for the last 2 layers. I only need 1 lay of CSM to get my thickness so I figure 2 layers of mat should cover it. Just want the smother surface. Any thoughts?

One thing I noticed as I was test fitting was one engine mount was about 3/8 of an inch higher than the other. I don't really know why. I took the top plates off the mounts so I can adjust the height by putting different thickness of boards on top / more layers of glass. My plan is to mount the gimbal housing and put a level across the 2 motor mounts on it and build the front mounts to match the level. Anyone see an issue with this plan?

I'm not very good with the glass...

uc
 
Top