Floor project, and other stuff.

Liquid_force

Petty Officer 1st Class
Joined
May 7, 2003
Messages
318
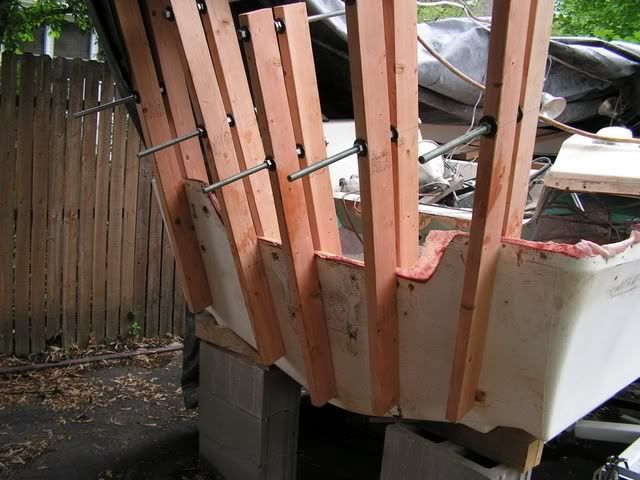
A few of you saw my cut through the hull thread, so obviously we're well underway on our little project, but since there seems to be a little interest (and a significant lack of knowledge on my part) I thought I'd start from the beginning.

My bro and I are hard core water sport enthusiasts. In '03 we bought ourselves this '89 Sunbird and upon delivery of a couple cases of beer an uncle installed a custom SS tower. We added a board rack, a bimini top and a pair of 8" Bazooka tubes and off we went. It is no Mastercraft, but for us - it might as well have been.

Had to replace lower unit gears in year #2, and year #5 we did some patchwork and new carpet on the deck knowing we were just buying time.

Long story slightly shorter -- recently, it started having some running issues and we traced it to the fuel tank. It needs to be replaced which means half our floor has to come out which means we'd be idiots not to take the opportunity to rehab the floor.

So here we are.

I'll get some pics posted soon -- I have a few on photobucket but can't access them at the moment.

This is not our boat, but this is what we're working with (Where can I find those seat covers?!?)

http://www.boten.be/fotos/16697-1_800x600.jpg

We cut the floor out from just in front of the engine compartment to just in front of the seats. We were hoping to have a couple inches of good wood along the gunwales but no such luck. We're going to have to replace it all the way across. It'll be most of 2 full sheets of 4x8 plus part of a 3rd.
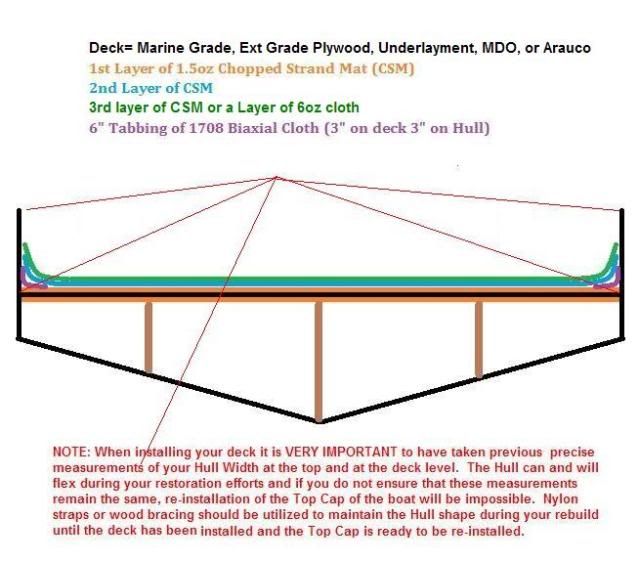
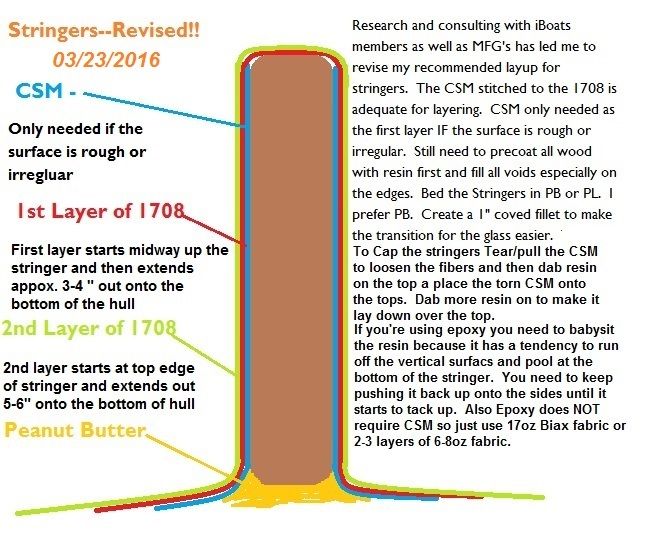
Stringers appear to be mostly intact. I have already cut out one ~1' section which will have to be patched in - thinking P.B. and a layer of 1708.. May find more when we grind off the sloppy factory glass.

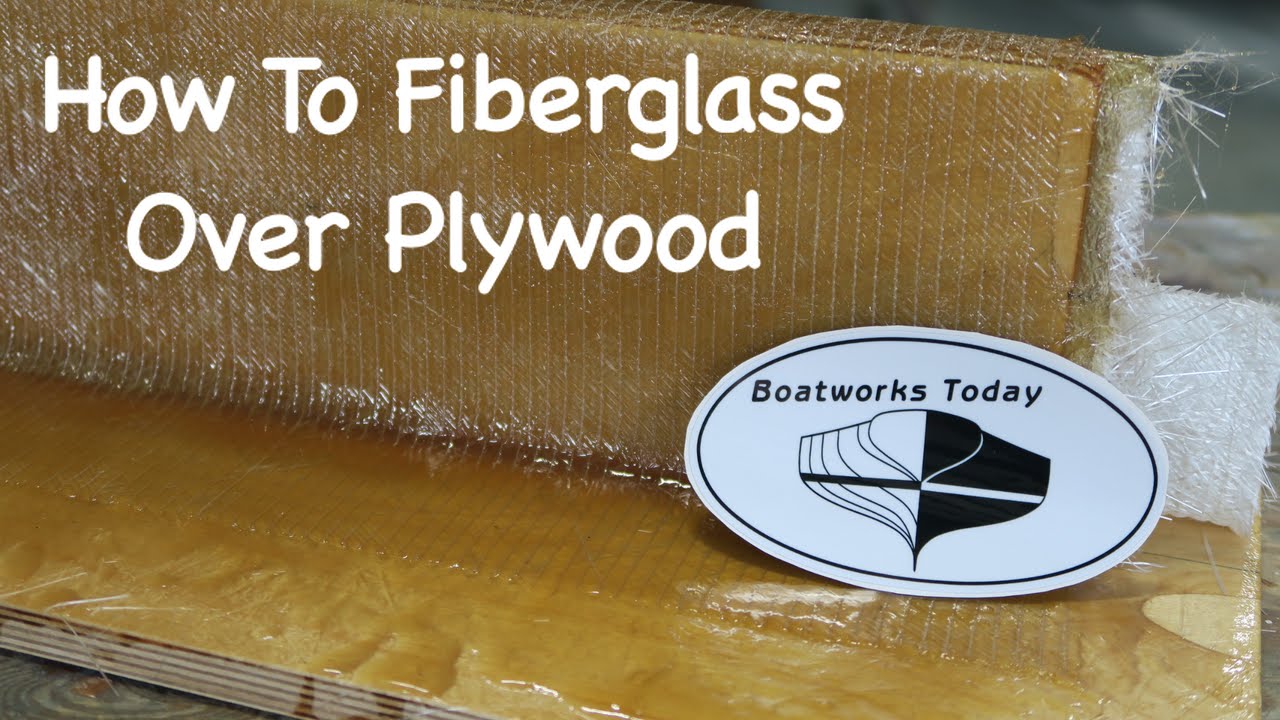
Based on quite a bit of reading I had done I thought it was a no brainer to use epoxy to water proof our exterior plywood -- but WOG has since made a convincing case for poly for everything. That is good to hear because this clearly is not a project we're looking to spend thousands on.

I can't coat plywood with straight polyester can I? Thinned?
 
Last edited:

Twainer

Petty Officer 2nd Class
Joined
May 10, 2016
Messages
178
I was told polyester has to have glass with it. It will harden up really well but will get brittle without it. I put one layer on the bottom. Glued & screwed (exterior screws) the sheets to the stringers. Then 2-3 layers of glass on all the seems, & finally 2-3 layers over the whole floor. Used bilge paint where motor & fuel tank is at & am going to use topside paint on the rest of the floor & carpet over that. Some of it might be overkill but I DO NOT want to have to be doing this again in a few years. There are a lot of great posts on here showing their floor projects from start to finish. "Completed Boat Projects" is another great place to search on here.
 

Liquid_force

Petty Officer 1st Class
Joined
May 7, 2003
Messages
318
Starting point -- seats out, carpet ripped up.


First piece of floor coming out.


Same area:


Other side --


Liquid_force

Petty Officer 1st Class
Joined
May 7, 2003
Messages
318
Speaking of which, is there a recommended grinding wheel for this job? I bought one of Harbor Freight's 60 grit paper-type wheels, but I seriously doubt that's going to get me far.

Woodonglass suggested I read up on one of his signature links, but it hasn't been working all day. I'm sure a lot of these simple questions would be answered there.

I thought I had a reasonable plan in place, but now, having been instructed to go with polyester over epoxy I'm doubting basically the whole plan since, from what I had gathered, epoxy was a no-brainer given its waterproofing ability.
 
Last edited:

Liquid_force

Petty Officer 1st Class
Joined
May 7, 2003
Messages
318
Try these links...

Fabricating Decks, Stringers, and Transoms

Seat covers that match will probably NOT be possible. You can make your own as many members do. It's NOT that hard to do IF you don't mind learning to Sew!!!

That link doesn't work. I've searched for and found that thread and tried to open it that way, still doesn't work.

Materials list is great. Thanks.

The seat cover comment was tongue-in-cheek. My daughter would have liked them when she was 8, otherwise, not exactly my style.
 

Woodonglass

Supreme Mariner
Joined
Dec 29, 2009
Messages
25,929
Hmm, how are you trying to access the link. It works just fine for me and for other members. Here's what it says...
[COLOR=#6A6A6A !important]December 31st, 2011, 06:43 PM[/COLOR]


Re: 1962 Lonestar "Flamingo" - I finally Started w/pics

My Recommendations on how to fabricate Decks, Stringers and Transoms. These drawings are based on my experiences and the vast amount of information I have gleaned from all the Pros and Skilled Amateurs and their projects here on the Forum. These are NOT set in stone, only Recommendations. It's your boat, so you can and should do as you see fit.
Decks - Marine Plywood IS the best and the most expensive. A very good alternative is the new Aruaco Plywood is Really Good stuff. I recommend it now for Deck, Stringers and Transoms unless you want to pay the extra. My opinion is if the glass layup is done correctly and Proper care and maintenance is done the Arauco will last many decades. Another good alternative is MDO.http://www.pacificwoodlaminates.com/...ywoodGuide.pdf

Best way to remove the deck is to use a Circular saw set to about 1/16" less than the thickness of your decking material and cut around the edge. then cut multiple cross cuts to cut the deck into sections and then use pry bars and chisels to lift each section out. Then use a 4 1/2" grinder with 24/ 36 grit resin coated sanding discs and a rubber backup pad to grind the lip off the hull sides.

REVISED 03/11/2014


EPOXY RESIN

Epoxy requires NO CSM (Chopped Strand Mat)! For added structural support for your deck and to attach it to the sides of the hull I'd recommend using 6-8 oz fabric extending 6-8 inches up the sides of the hull. 1 or 2 layers is sufficient. The Resin and Cloth/Fabric is all that's requred. Any gaps can be filled with PB just like Poly. Use epoxy resin mixed with Cabosil mixed to the consistency of Creamy Peanut Butter. You can't use Gelcoat with Epoxy! (Well maybe but, it takes special prep and even then it's debatable.) Epoxy has no UV protection so it must be coated with some kind of UV protectant, either Marine Varnish (to keep the Natural Wood Look, or Paint to protect it from the sun if it will be exposed to the sun), carpet...Something must cover it. It does have a bit more FLEX to it, it's a bit stronger of a Glue, and offers a bit more water resistance. It is also costs about 50% more than Polyester Resin. It can take up to 12 hours to cure. (poly will tack up in as little time as 25 mins.)

POLYESTER RESIN

To fabricate your deck you first fill any voids in the plywood and low spots with Peanut Butter or what we call PB especially in the edges and sand smooth. Then coat top and bottom surfaces with a good coat of resin. This is done to ensure that the following layers of CSM don?t become resin starved by having dry wood suck the resin out of the mat or cloth. This ?Pre-Coating? with resin should be done to all wood prior to applying any CSM or Fabric. After the resin coated wood becomes tacky to the touch lay a layer of CSM on the Bottom of the Deck wood and let it cure. Now install the deck wood. There should be a minimum of 1/4" gap between the deck and hull sides. Fill this gap with PB and cove the fillet. Then Tab this fillet with a 6 - 8" piece of 1708 Biaxial Cloth. When applying 1708 biaxial cloth I recommend placing the CSM side down. This allows the CSM to react with the Styrene in the Resin and bond much better. Once this Tacks up, install your first full layer of CSM on the deck running it 3" past the 1708 tabbing. Once this tacks up install another layer of CSM and extend it 3" past the previous one. Finally you can install one more layer of CSM (optional and not really needed) or substitute a layer of 6 oz Cloth ( gives a smooth finished look and a bit more additional strength). If you want a bit of a textured finish you could use a woven roving and then apply 2-3 coats of gelcoat. The texture/pattern of the woven roving will show thru the gelcoat and give a bit of texture to your deck. The Deck is finished.

DeckInstallation-1.jpg


Stringers-Updated 03/11/2014


Epoxy Resin

If you choose to use Epoxy for your Stringers, then you'll only need to use Fabric or Cloth to cover them.
2 layers of 17oz cloth will be adequate. The drawing is basically the same just won't use CSM or 1708. Layup will be a bit more difficult due to the fact that Epoxy cures at a much slower rate than Poly and is a bit more "Runny" so it will have a tendency to want to run off the side of the stringer and Pool at the bottom. You'll need to Babysit it and keep pulling it back up onto the surface of the cloth until it begins to tack up a bit.

Polyester Resin


fetch_zpsnoktzzpf.jpeg


FILLETING: Once you have your PB mixed, dump it in a Ziploc bag, cut off a corner then use it like a pastry bag to squeeze the pb along the edge where you are filleting. About a 3/4" cut is all you need. Then use a large plastic spoon dipped in Mineral spirits to form the cove. Being neat here will save on sanding later prior to laying the CSM and 1708.


***NOTE*** For I/O motor mounts, It's normally recommended to double the layup. i.e.4 layers of 1708. Again, I always recommend laying the 1708 with the CSM layer facing down so the Styrene in the resin can dissolve it and create a stronger bond. This gives more strength and bulk to the mounts where most of the weight is. The stringer that runs parallel to the mounts and sometimes attached to the mount gets the normal layup.


Transoms(updated 01/20/2015)

Epoxy

When using Epoxy for your transom it's basically the same as for Stringers. You'll use 17 oz Cloth instead of 1708 Biaxial and NO CSM!You could also use a couple of layers of 8.5oz glass. With epoxy lighter weight glass and multiple layers is sometimes a better method to build bulk and strength. Everything else is basically the same. Always precoat your wood with a coat of resin then apply you first layer of cloth. Ensure all air bubbles are worked out Pay attention to the edges.

Polyester Resin


Note: When using screws as clamps, it's best to predrill the holes a bit oversiized on one piece of the transom. This keeps the piece from catching the screw threads and allows the other piece to be drawn up tight against the pre-drilled piece.


Pics of clamps I recommend for clamping an Outboard Style Transom when the top cap of the boat has been removed. I modified the construction of them just a bit using bolts instead of all thread. Takes a bit longer to build em but I like em better. Doing it this way I can use my 3/8" air drive ratchet to tighten em down which make is a lot faster to clamp em down. You need to be as fast as possible when you are using that much PB. Don't want it to set up on you before you get it clamped in place. Speed is of the essence!!!!:D

Clamps.jpg


transomClamps.jpg


FINISHING UP THE TRANSOM INSTALL.

Once the transom is clamped into the boat, All that's left is to form the fillets and lay the glass. During clamp up, If you elected to create the OOZE holes you'll need to be prepared to smooth out the PB as it oozes out of the holes as well as form the fillets from the ooze out around the edges of the transom. You'll probably need to have a bit extra PB to form the fillets. A large Plastic Spoon is a great tool for forming these fillets and a bondo spreader is great for cleaning up the fillets and knocking down the inevitable left over waste and nubs that will occur. The cleaner and smoother you can make these fillets now the less work you'll have later when it all cures. After everything cures in a couple of hours you can remove the clamps and check for any rough spots on the fillets and sand them smooth. Cut your first layer of 1708 glass so it will extend out onto the sides and bottom of the hull approx 4-5 inches. I like to use Masking tape to hold it in place along the top edge of the transom and hull sides while I fit it in place and make my cuts. You can then start applying resin. Once the first layer starts to "Kick" and harden You can prepare to do the next layer and have it extend out onto the hull approx. 8-10". and repeat the resin process. If you want a smoother appearance you can follow up with a layer of 1.5 oz CSM to Hide the weave of the 1708 fabric. The Transom installation is now complete.


Last edited by jbcurt00; April 11th, 2016, 04:07 PM.
 

Liquid_force

Petty Officer 1st Class
Joined
May 7, 2003
Messages
318
Thanks for the copy/paste.
I've tried it from my home pc, work pc, phone. It opens the link to a white screen and just sits there...and sits there...
 

Liquid_force

Petty Officer 1st Class
Joined
May 7, 2003
Messages
318
Still problems here. It worked once yesterday early evening, but not again since then in a few tries. No worries though. With the info above and the How To's sticky I don't expect to have too many more questions.

This certainly won't be an all-out, last forever, type of repair I've been seeing a number of on this site, but I'll try to post some pics along the way showing our progress. The boat's worth, I dunno, $3k maybe and has probably lasted a lot longer than the mfg planned for (well, it lasted a lot longer than the mfg itself). So a full-blown big budget top to bottom rehab just doesn't make sense for us.

My brother still has two young kids and I have an 8 yr old son and I can't imagine him growing up w/o making some good memories on the 'ol ski boat.

I expect we'll figure out most hang ups intuitively. I'm more of a mechanical/math type and my brother has some general building/carpentry skills and is a bit of an artist as well.
One of my recent concerns is getting a good butt-joint at the edges of the original deck to the new. Especially since one of the joints is at the ski locker so it needs to be good and solid. I guess we can just hit the edges of the original with a couple coats of poly the best we can (difficult on the bottom side) and make sure to PB the joint thoroughly. I suppose a cleat on the bottom would be good for support, but it seems there'd be a lot of surfaces that would be difficult to waterproof and I could see the possibility of piercing the waterproofing with fasteners. Is there a how-to anywhere for that?
 
Last edited:

Liquid_force

Petty Officer 1st Class
Joined
May 7, 2003
Messages
318
Oh, tank installation...
When we pulled out the bad one there were two long rubber bumper type pieces under the tank, but they were not strategically placed. It looked as though they could easily have been placed along the edges of the tank for support, but it was obvious they were just laying there coiled up probably not doing any good at all (there were indentations made in the old glass). Other than putting some upward flex in the bottom of the tank. Looks like they laid the glass, flopped the rubber down any ol' way while the glass was still wet, and dropped the tank in.

I believe the replacement tank is a little shallower than the old one so my plan is to prop it up on ~3/4" blocks, glass the blocks to the hull, then adhere the rubber to the blocks along the outer edge of the tank (tank is angled/"belly" type bottom). Apparently 4200/5200 would be the way to go for the glass/rubber adhesive?
 
Last edited:

Woodonglass

Supreme Mariner
Joined
Dec 29, 2009
Messages
25,929
You for sure want to use cleats at the plywood joints. If you coat them well with resin and CSM they be fine. You ALWAYS want to predrill for all hardware fasteners and then use resin or marine caulking like 3M 4200 to coat the fasteners and fill the holes with. This ensures No water penetration.

Here's a link on how to install the tank...Your plan sounds solid!!

http://www.yachtsurvey.com/fueltank.htm
 
Top