Hi all,
I bought my merc tools from whoya on eBay. Seem like quality pieces. A few weeks ago I spent quite a few hours aligning the engine on a boat I just bought. Had to lower the front of the engine about 1/4". Alignment bar went in smooth as butter. Until I rotated the engine! I could barely get the bar in.
I bought a coupler and I'm going to install it this weekend. When removing the engine mount bolts, I discovered the starboard rear mount is busted (as the engine is sitting on the fiber washer and the mount is flush with the flywheel cover (port side its recessed). More parts ordered")
Anyway. I oringinally purchased this Merc gimbal bearing (permalube) because of a growling sound, which I figure is very likely the messed up coupler.
Since I ordered the gimbal bearing and I'm installing a new coupler I figured I'd put the new bearing in even though the old one seems smooth.
I positioned the engine where the bar slid in like butter, and used the alignment bar with the driver drilled per spec (insert into coupler and back it out 1/4" and drill). I had a heck of a time installing the bearing probably because the coupler is off center or angled to one side or the bad rear mount. Started with a normal hammer and upped it to a 3lb one, still had a heck of a time. Too bad I don't own a dead blow hammer!
After it was installed I had to align the bearing with the coupler by pulling the alignment bar starboard, now it's smooth as butter. I know Don said not to use a tool like this, but I figured I'm replacing the coupler anyway. I can see why he says this, because of the issue I had!
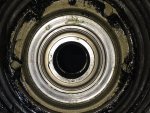
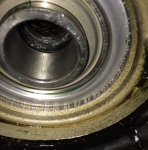
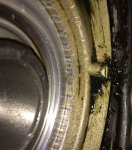
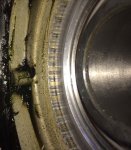
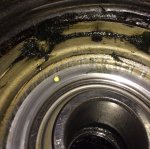
Here are 4 photos bottom, starboard, port, top. You can see in the bottom one, that the cartridge looks squashed compared to the rest?
Does that mean the tolerance ring didn't crush evenly ?
Bearing is smooth and I had the correct driver so the inner race was never touched.
I'm trying to decide if I should pull it (proper tool form whoya) and replace the tolerance ring and reseat it? More damage instead of just leaving it?? Could the small amount I'm seeing in the photos cause alignment problems?
Am I worrying about nothing? I measured with a caliper and the bottom and sides are evenily pushed in (within .002") but the top seems to be .018" further out (towards the stern). Assuming the casting is even, I was measuring to the flat part as seen in the photos.
Ben
I bought my merc tools from whoya on eBay. Seem like quality pieces. A few weeks ago I spent quite a few hours aligning the engine on a boat I just bought. Had to lower the front of the engine about 1/4". Alignment bar went in smooth as butter. Until I rotated the engine! I could barely get the bar in.
I bought a coupler and I'm going to install it this weekend. When removing the engine mount bolts, I discovered the starboard rear mount is busted (as the engine is sitting on the fiber washer and the mount is flush with the flywheel cover (port side its recessed). More parts ordered
Anyway. I oringinally purchased this Merc gimbal bearing (permalube) because of a growling sound, which I figure is very likely the messed up coupler.
Since I ordered the gimbal bearing and I'm installing a new coupler I figured I'd put the new bearing in even though the old one seems smooth.
I positioned the engine where the bar slid in like butter, and used the alignment bar with the driver drilled per spec (insert into coupler and back it out 1/4" and drill). I had a heck of a time installing the bearing probably because the coupler is off center or angled to one side or the bad rear mount. Started with a normal hammer and upped it to a 3lb one, still had a heck of a time. Too bad I don't own a dead blow hammer!
After it was installed I had to align the bearing with the coupler by pulling the alignment bar starboard, now it's smooth as butter. I know Don said not to use a tool like this, but I figured I'm replacing the coupler anyway. I can see why he says this, because of the issue I had!
Here are 4 photos bottom, starboard, port, top. You can see in the bottom one, that the cartridge looks squashed compared to the rest?
Does that mean the tolerance ring didn't crush evenly ?
Bearing is smooth and I had the correct driver so the inner race was never touched.
I'm trying to decide if I should pull it (proper tool form whoya) and replace the tolerance ring and reseat it? More damage instead of just leaving it?? Could the small amount I'm seeing in the photos cause alignment problems?
Am I worrying about nothing? I measured with a caliper and the bottom and sides are evenily pushed in (within .002") but the top seems to be .018" further out (towards the stern). Assuming the casting is even, I was measuring to the flat part as seen in the photos.
Ben
Attachments
Last edited: