1966 Starcraft Holiday Engine Repower

66Holiday924

Chief Petty Officer
Joined
Aug 21, 2017
Messages
586
I finished up with my Polyurethane last night. I ended up doing two coats on each side. I made a reservation with my dad (he's a busy man) for him to help me install the transom on the 7th of June. So, I'm just going to let everything cure for a few weeks, rough sand, slap a coat of Van Sickle Oil Based Primer on, and paint with the same exterior white paint that I used to paint the aluminum skin. So the wait is on again.
 

66Holiday924

Chief Petty Officer
Joined
Aug 21, 2017
Messages
586
Day 20:

Not much going on here, I've been letting my wood cure for the last week or so. The other day I rough sanded with 80 grit and hit the underside of my flooring with Van Sickle Oil Based Primer and two coats of the exterior white.

If you look at the bottom of a travel trailer you should see fabric. The fabric is to protect underside of the floor of the travel trailer when you're towing in the rain, but it also serves to protect it from morning dew when the trailer is sitting. So, with that in mind I'm thinking these added layers of paint to the underside of my boat deck, will protect it from moisture caused by water evaporating in the bilge. I plan to do the transom next and the topside of the deck after installation, so I can get it over the tops of the rivets.
 

Attachments

  • photo290879.jpg
    photo290879.jpg
    131 KB · Views: 0
  • photo290880.jpg
    photo290880.jpg
    135 KB · Views: 0

Watermann

Starmada Splash of the Year 2014
Joined
Jan 12, 2013
Messages
13,822
That looks good and the VS primer/paint is impressive, at least I think so.
 

66Holiday924

Chief Petty Officer
Joined
Aug 21, 2017
Messages
586
Day 21:

Primed the transom with the Van Sickel Oil Based Primer and then Painted with the exterior white. I painted the top coats on while the primer was still a little tacky. I've always found the paints bond a lot better when you do that. I actually completed this about 2 weeks ago. I plan to do my install and mount hardware later in June.
 

Attachments

  • photo291811.jpg
    photo291811.jpg
    128.1 KB · Views: 2
  • photo291812.jpg
    photo291812.jpg
    113.9 KB · Views: 2

66Holiday924

Chief Petty Officer
Joined
Aug 21, 2017
Messages
586
Another project I've been slowly chipping away at are my custom stern savers. They are 3/4" King's Starboard material. I paid about $400 to have 30 holes welded shut in my transom, so I am all for minimizing the number of holes in my new transom. I figure I'll have 6 - 1/4" bolts mounting each one of my stern savers, change the king's starboard as it becomes mutilated, and mount my different hardware options, throughout the years, to the King's Starboard. I'm going to use 5200 for the bolts, but, I am going to butter the backs of the King's Starboard with 4000. I'm using 4000 because I need to be able to remove them in the future as they become mutilated.
 

Attachments

  • photo291813.jpg
    photo291813.jpg
    104.3 KB · Views: 1
  • photo291814.jpg
    photo291814.jpg
    71.9 KB · Views: 1
  • photo291815.jpg
    photo291815.jpg
    91.8 KB · Views: 1
  • photo291816.jpg
    photo291816.jpg
    84.6 KB · Views: 1
  • photo291817.jpg
    photo291817.jpg
    72.4 KB · Views: 1
  • photo291818.jpg
    photo291818.jpg
    97.5 KB · Views: 1

66Holiday924

Chief Petty Officer
Joined
Aug 21, 2017
Messages
586
I've been thinking about the steering in my boat. I kind of wrecked the helm when I removed it, so I'm going to have to replace it. The Starcraft had Big T Rotary steering in it, but the steering in the donor boat is rack steering. I don't think it matters which one I opt for, does it? Is one set-up better than the other?
 

Watermann

Starmada Splash of the Year 2014
Joined
Jan 12, 2013
Messages
13,822
I went from an old gummed up R&P to a new Sea Star rotary NFB so I don't see why you couldn't go the other way.
 

66Holiday924

Chief Petty Officer
Joined
Aug 21, 2017
Messages
586
Watermann This? http://www.seastarsolutions.com/prod...tary-steering/


I'm just going to purchase the helm, install it, and let the mechanic purchase my cables when he installs the engine. I want to go with whatever is better. I'm not sure which system is supposed to be better though. I have to think that if you went with the rotary NFB, it must be the system to have.
 
Last edited:

Watermann

Starmada Splash of the Year 2014
Joined
Jan 12, 2013
Messages
13,822
Yes that's the one I put on my SS. If you don't have power steering the NFB helms are great. My Chief has a older rotary helm but with power steering there is no feed back ever. If your new motor has power steering then no worries about the helm being NFB.
 

66Holiday924

Chief Petty Officer
Joined
Aug 21, 2017
Messages
586
For this, I don't want power steering. I don't really see the point. From what I read, my engine was setup either way. I don't think mine has power steering.. If it does have power steering, I would have it removed and go with mechanical. I think that's an option. Right? The way I see it, why pay for the maintenance of power steering (replace pumps when they go bad, etc.) when mechanical steering will work fine. If I were putting a 6 cylinder in it, like the Chief has, I might see it different.
 

Watermann

Starmada Splash of the Year 2014
Joined
Jan 12, 2013
Messages
13,822
If no PS then I would recommend a NFB system. So on the PS issues, yeah I love having it, no feed back, always steers the same no matter the trim or throttle. Adds redundancy of another belt to turn your circulation pump as it's too old to have a serpentine. Just like cars I think all IO boats should be PS equipped, manual steering sucks after having power.
 

66Holiday924

Chief Petty Officer
Joined
Aug 21, 2017
Messages
586
Day 22:

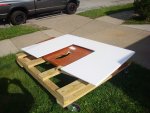
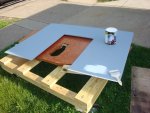
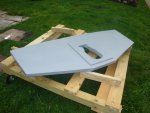
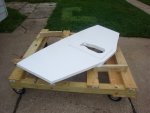
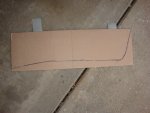
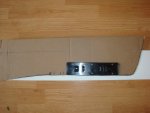
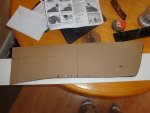
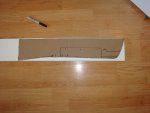
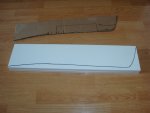
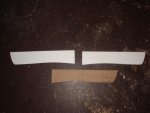
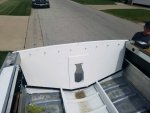
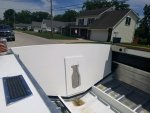
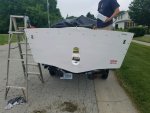
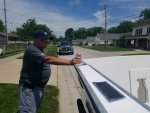
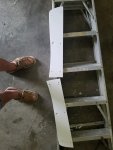
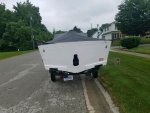
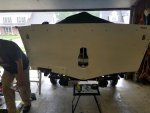
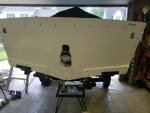
Day 22 was a pretty landmark day in getting this boat re-powered. I got to finally install my transom wood and see how all of my work to date on this has paid off. I am pretty happy with how it all turned out. The transom wood couldn't fit any more perfect than it does. I wasn't sure how it was going to work out. The keyhole wasn't cut out when I dry fit it, and it was an inch to tall on the top. Nonetheless I marked everything and drilled out the top two corner bolts so I could get it back into that exact position. From there it was removed, top trimmed, keyhole cut, treated and painted. My dad helped me with the installation, I warned him to be ready for war getting it into position. We had it in position within 2 minutes with both my corner bolts in and everything lined up beautifully with the aluminum. I think my dad was impressed! Then we drilled and installed all of the rest of the perimeter bolts in-place, using a pretty healthy amount of 5200 to seal everything. Then we installed the tow padeyes. I reinforced them with a 4x4 inch 1/4 aluminum plate and a healthy amount of 5200 to seal them. I wanted them a little higher up to be out of the way of my swim platform while pulling skiers. Awesome day, glad my dad ended up working with me on this part of this!

On a side note, just another testimonial to the Van Sickle Industrial Paint: I had a piece of my bracket (which was painted) that was bent out of shape from removal of the old transom wood, and I pounded it with a hammer to bend it back into shape, not a scratch on that paint. I couldn't believe it, I thought that paint was toast when I started hammering on it. not a scratch and the bracket bent right back into shape.
 

Attachments

  • photo294120.jpg
    photo294120.jpg
    810.4 KB · Views: 2
  • photo294121.jpg
    photo294121.jpg
    818.3 KB · Views: 2
  • photo294122.jpg
    photo294122.jpg
    755.1 KB · Views: 2
  • photo294123.jpg
    photo294123.jpg
    842.4 KB · Views: 2
Last edited:

66Holiday924

Chief Petty Officer
Joined
Aug 21, 2017
Messages
586
Day 23:

Today my dad and I installed my custom stern savers. They are cut from 3/4 king's starboard material. I paid a lot of money to have the holes in this transom welded shut in this boat. My plan is to mount my hardware to these and replace them as they become mutilated. This way I don't have to keep drilling different holes in the back of my boat. I have the stern saver holes and that's it. They were buttered with 4000 and thru-bolts got 5200. Once they were installed, I installed my smart tab mounts on them, they were also buttered with 4000 and then screwed into place. The screws for the smart tabs were nice stainless wood screws, thick with a coarse thread that bit into the king's starboard really nicely. They felt very secure.
 

Attachments

  • photo294125.jpg
    photo294125.jpg
    884.6 KB · Views: 1
  • photo294126.jpg
    photo294126.jpg
    748.8 KB · Views: 1
  • photo294128.jpg
    photo294128.jpg
    799.4 KB · Views: 1
  • photo294127.jpg
    photo294127.jpg
    411.9 KB · Views: 1

66Holiday924

Chief Petty Officer
Joined
Aug 21, 2017
Messages
586
Thanks guys, I've reached the point where I'm going to start on a new sub-project to my re-power. I bought new gauges which will involve rebuilding the dash. I am going with black mahogany to replace the existing wood dash. I am not a very big fan of wood on a boat, it's a maintenance nightmare. However I love my wood dash. So, is there a method anybody can suggest that will give me the longest last on the finish as possible? I want a nice glossy finish, and being the dash, I want maintenance to me minimized for sure. I don't want to have to take apart my dash regularly.
 

66Holiday924

Chief Petty Officer
Joined
Aug 21, 2017
Messages
586
glass it with clear surfboard resin and glass i bet you would never have to worry about it again.

That sounds like an awesome idea. It is exactly what I asked for. It is completely out of my skill set though, lol. I've never glassed anything. I don't know if it's a skill I can learn and do well enough to look great on a decorative piece. I appreciate the suggestion. I think it's over my head though. I think I'm going to do multiple layers of Helmsman with UV protection, unless I can find a marine glaze coat. Glaze coat like they do on bars is just what I have in mind, it doesn't do well outside though from what I understand. Maybe I can do Helmsman and then glaze coat it?
 
Last edited:
Top