1966 Starcraft Holiday Engine Repower

66Holiday924

Chief Petty Officer
Joined
Aug 21, 2017
Messages
586
Day 9:

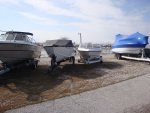
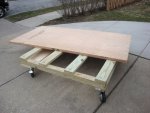
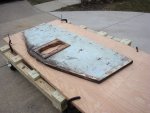
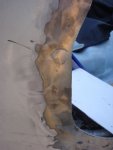
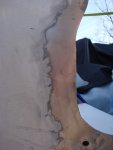
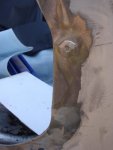
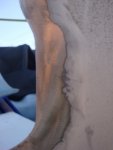
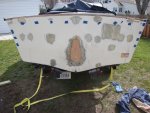
It wasn't much of a day, but since it's April and it was 30 degrees, I'm taking credit for it. I picked the Holiday up from the welder and put it back into storage. I think they did a great job. It's as good as it looks in the pictures I posted last week. They ended up charging me for about 4 hours of work for that, which isn't bad. I had quite a few 1/2" and 3/8" holes and that aluminum skin is thin. They could have went another hour or so on the sanding but they decided to ask me if I wanted to finish it up, So I will be finishing up the sanding.

I took some measurements off of my donor boat. I'm getting about 24" tall by 18" wide for the horse collar. It could probably be a little less in each direction but I'm staying on the safe side. Does that sound right?

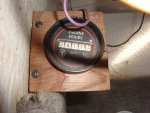
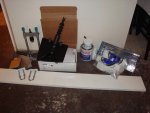
Also, I found an engine hour gauge. According to it my engine only has 411 hours on it. I don't think that's bad at all for a 25 year old boat.

Anyway, looking forward to next week. It looks like the weather is getting ready to break here in Northeast Ohio.
 

Attachments

  • photo288098.jpg
    photo288098.jpg
    126.8 KB · Views: 1
  • photo288099.jpg
    photo288099.jpg
    110.1 KB · Views: 1

SHSU

Lieutenant Junior+Starmada Splash Of The Year 2019
Joined
Mar 8, 2017
Messages
1,751
Progress no matter the weather is always good!!!

Can't help with the horse collar as I don't have any idea. As for the hours, at least you have an idea, my O/B I have no idea on.... Just hope the mostly complete rebuild will give me plenty of FUN time.
 

66Holiday924

Chief Petty Officer
Joined
Aug 21, 2017
Messages
586
Day 10:

I got my transom wood cut to rough size and I laminated my pieces. I think doing it this way and trimming it later will allow me to get an even spread of glue throughout the entire transom. I was worried if I cut it exact, glue along the edges would be pushed out and there wouldn't be adequate adhesion around the edges. The weather is going to be warm enough to allow the glue to set, but then the weather is turning to crap again. Oh well...:censored:

My project expanded to replacing my aft floor board since the aft Starboard Side kind of crumbled to pieces when removed it. So I got that cut today and the cutout (where the engine sits) was a perfect size piece of scrap to make my horse collar.

That's about it for now. I have to get my boat back out of storage, dry-fit everything, and I'll have to wait for the right weather because I'll be treating the wood with the OTF, poly, and painting.

:target: <----- doing a dance to convince the gods to send better weather.
 

Attachments

  • photo288328.jpg
    photo288328.jpg
    127.5 KB · Views: 2
  • photo288329.jpg
    photo288329.jpg
    127.3 KB · Views: 2
  • photo288330.jpg
    photo288330.jpg
    126 KB · Views: 2
  • photo288331.jpg
    photo288331.jpg
    111.3 KB · Views: 1
  • photo288332.jpg
    photo288332.jpg
    110.7 KB · Views: 1
  • photo288333.jpg
    photo288333.jpg
    126.7 KB · Views: 1
  • photo288334.jpg
    photo288334.jpg
    90.2 KB · Views: 2

SHSU

Lieutenant Junior+Starmada Splash Of The Year 2019
Joined
Mar 8, 2017
Messages
1,751
Nice progress. What grade plywood you get?
 

66Holiday924

Chief Petty Officer
Joined
Aug 21, 2017
Messages
586
Nice progress. What grade plywood you get?

Thanks guys. I'm waiting on one more visit from the brown truck and I have to pick-up my paint next Monday. From there it'll be in gods hands but I'm hoping I can get back at it on the 29th. The plywood is 3/4" Marine Grade, Douglas Fir. The floor is the same only it's 1/2".
 

66Holiday924

Chief Petty Officer
Joined
Aug 21, 2017
Messages
586
Day 11:

Not much of a day but I cut my transom in on & off snow showers. I wasn't going to do it yet but I got a little rushed because of the weather. When it rains really, really bad my garage floor floods. It happens once a year, if that. It was raining really bad, so I went out to check on my wood to find water creeping up on it from every side. It was a few feet away from laying in a puddle. So I cut it and moved it to my basement. Besides that I got the last of my brown truck deliveries. So once I pick up my paint next Thursday I will have all materials on hand to complete the transom portion and floor portions my project.


The Transom Hardware Plan:

I'm not interested in putting a bunch of holes in this transom. I'm hoping the stuff I mount will stay for 15-20 years. After my transom is installed. I'm planning on mounting:

Trailering Sterneyes - I need them for trailering, but from my experience I'd rather have these and use a bridle to pull skiers and tubers than a ski hook. You need a fixture on each side to pull two tubes, in my opinion. My boat isn't going to have a sterneye in the center.

Smart Tabs - Watermann you kind of sold me on these. I watched the videos and I think they will help out with performance when it comes to skiing and tubing, when it is important to get on plane quickly.

Stern Savers - I'm going to make two custom Stern Savers (one for each side) from 3/4" - 47" piece of King's Starboard. I can mount the stern savers and then over the years when my transducers wear out or I buy new equipment I'll mount them to it.

Watermann what do you think about mounting the Smart tabs to the stern savers? I'm going to butter the sternsavers with 5200 and then mount them with the same hardware that the transom is installed with 1/4" through bolts, washers, lock nuts.

Swim Platform - Next year after my engine is installed.

I also have 1/4" - 4"x4" Aluminum plating to back my sterneyes, swim platform, and smart tabs.
 

Attachments

  • photo288642.jpg
    photo288642.jpg
    99.9 KB · Views: 0
  • photo288643.jpg
    photo288643.jpg
    122 KB · Views: 0

Watermann

Starmada Splash of the Year 2014
Joined
Jan 12, 2013
Messages
13,822
Sounds like a solid plan to me. It should work fine to mount the tabs on the starboard, on the tab mounting surfaces also butter them with 5200, it's a powerful adhesive as well as sealant.
 

mickyryan

Rear Admiral
Joined
Apr 18, 2016
Messages
4,216
i have a 17 footer and i have to say smart tabs really keep the boat good, i will say wail tail got it on plane faster but did not keep it level as well as the smart tabs do .
 

66Holiday924

Chief Petty Officer
Joined
Aug 21, 2017
Messages
586
Not much going on here in Ohio, but here's a story. I used my chainsaw for the first time this season the other day. The muffler came loose and when I looked it later I saw it melted a hole in the bar oil reservoir... So I went chainsaw shopping on Craigslist. My budget was about $300. I just use it a few times a year to cut firewood for camping and bonfires. I just want something that will start when I need it, last, and can basically handle most of whatever a homeowner might end up having to do. So after a few hours it came down to:

Husqvarna 455 Rancher 55cc, 18" bar, for $270 which perfectly matches my purposes and budget

Makita (Dolmar) 64cc Commercial grade with a 20" bar capable of mounting up to a 28" bar, 2016 model, with a brand new chain for $350 Ridiculously exceeds purposes

Which one to go with?


Disclaimer: I understand this has nothing to do with boating, or topic of the forum, but chainsaws are cool too.
 

Watermann

Starmada Splash of the Year 2014
Joined
Jan 12, 2013
Messages
13,822
Sounds like a case of chainsaw 2 foot itis :lol:

I don't know anything about chainsaws except they're always hard to start.
 

mickyryan

Rear Admiral
Joined
Apr 18, 2016
Messages
4,216
they start first time out of box, then never again till you are almost in cardiac arrest!
 

66Holiday924

Chief Petty Officer
Joined
Aug 21, 2017
Messages
586
My Craftsman was awesome I used it few times a year and it started as it should everytime. Pull the choke, yank the cord about 5 times to prime it (sounds like it wants to fire), push the choke back in and it should start on the next pull.

I went with the Makita (it started right up from a cold start). If I ever have something come up where I needed it, I can fit it with a 28" bar, that's a lot of saw.

Anyway sorry for that outburst.:focus:
 

BWR1953

Admiral
Joined
Jan 23, 2009
Messages
6,285
I have a Makita chainsaw that I bought used from the rental department at Home Depot a decade ago. I only paid $200 for it at the time. They do still sell them.

And I have to say that it is one bad-arse saw! I have the 22" blade on it and with a sharp chain it will blast through wood like butter.

These are commercial grade saws that are rented out with a new chain every time. Great stuff! :encouragement:
 

66Holiday924

Chief Petty Officer
Joined
Aug 21, 2017
Messages
586
BWR1953 That's where I got it from! It's a year old. They got it in the store in 2017. They change the chain on them every time somebody rents it (what else would you expect). So I have a one year old, lightly used Makita/Dolmer commercial saw, with a brand new chain. Mine has a 20" bar on it, can take up to 28" bar. 64cc.
 

BWR1953

Admiral
Joined
Jan 23, 2009
Messages
6,285
BWR1953 That's where I got it from! It's a year old. They got it in the store in 2017. They change the chain on them every time somebody rents it (what else would you expect). So I have a one year old, lightly used Makita/Dolmer commercial saw, with a brand new chain. Mine has a 20" bar on it, can take up to 28" bar. 64cc.

Smart move! A commercial grade saw for less than a new consumer unit is the way to go. Congrats!
 

66Holiday924

Chief Petty Officer
Joined
Aug 21, 2017
Messages
586
Day 12:

Today I got the boat out of storage, picked up my Van Sickle Paint, and ground the welds flush. I dry fitted my transom wood but it was really tight and would not go down all the way. It wouldn't go down the last 4 inches or so. I'm going to sand the edges some more. I think it's getting caught on the rivets that stick out on at the seam on the sides. I am pretty pleased with the results. Looking forward to the next 10 days or so.

I want to get my transom wood dry fit and properly seated so I can trace the keyhole on it, since I'll be cutting that out. That's how everybody is doing that, right?
 

Attachments

  • photo289216.jpg
    photo289216.jpg
    114.5 KB · Views: 1
  • photo289217.jpg
    photo289217.jpg
    75.9 KB · Views: 1
  • photo289218.jpg
    photo289218.jpg
    77.2 KB · Views: 1
  • photo289219.jpg
    photo289219.jpg
    82.4 KB · Views: 1
  • photo289220.jpg
    photo289220.jpg
    46.1 KB · Views: 2
  • photo289221.jpg
    photo289221.jpg
    131.3 KB · Views: 2
  • photo289222.jpg
    photo289222.jpg
    7.4 KB · Views: 2
Last edited:

66Holiday924

Chief Petty Officer
Joined
Aug 21, 2017
Messages
586
Day 13:

Not very much progress. My day got cut short by rain... It was really nice and then all of the sudden, as soon as I got my transom wood dry fitted, the rain rolled in, thunder stormed and rained most of the rest of the night and this morning. My new transom wood got wet :eek: and it was resting in a puddle that basically collected in my z-bar. I got it dry fit, traced the keyhole drilled the top two corner bolt holes so I can get it back in place exactly where it was.

Sticking to tried and tested I bought the same Wolfcraft drill guide that Watermann used on his build to drill my holes into the transom. It's very important that those holes be perfectly perpendicular, or the flange on the bolt head won't seat flush to the aluminum skin. I have to admit, I wasn't totally impressed with the quality of this guide when I opened it but I have to say I am thoroughly impressed after using it. It not only shot the holes perfectly perpendicular, but I ended up going right back through the old holes in the bracket on the other side. It can't get any more perfect than that. So not the greatest quality and not the most expensive drill guide either, but does the job.:thumb:

My new transom wood was wedged in there pretty good for the dry fit. I was not looking forward to getting it out. I drilled a hole through where the keyhole will be cut anyway, pushed a pipe through, butted a 2x4 to the pipe and used my jack to pop it out. It popped right out!

Seeing my transom wood resting in the puddle in the z-bar makes me want to drill a hole in it, so it doesn't retain water. In mine there's no way for it to drain and your transom wood just rests in the water if water get in the bar...

Well on hold again, still wet outside, have to let my transom wood dry thoroughly, and I heard the word snow in the forecast again...:censored:
 

Attachments

  • photo289273.jpg
    photo289273.jpg
    76.9 KB · Views: 1
  • photo289274.jpg
    photo289274.jpg
    107.8 KB · Views: 1
  • photo289275.jpg
    photo289275.jpg
    85.4 KB · Views: 1
  • photo289276.jpg
    photo289276.jpg
    136.6 KB · Views: 1
Top