1977 Sylvan Sea Monster Side Console Rebuild

oldrem

Commander
Joined
Nov 7, 2013
Messages
2,002
Laid a good coat of Helmsman on the forward bunk wood last night and covered them with two layers of outdoor carpet today. Except for final adjustments once the boat is back on and some minor detailing I'm considering the trailer finally done. Now I can get back to work on the boat.

Trailer Before 2.jpgFinished Trailer 1.jpgTrailer Before 1.jpgFinished Trailer 2.jpg
 

kcassells

Fleet Admiral
Joined
Oct 16, 2012
Messages
8,738
Would ya... trailers are boring. Not! only kidding. Looking good there sir!
 

froggy1150

Master Chief Petty Officer
Joined
Nov 3, 2017
Messages
860
-for wog- we use these to drill metal structure. Called slugger bit or broach bit. I don't know what you are drilling but assume it's your building. 1" 11/2" 3" ....don't matter will cut like butter up to 2" thick. If you have a lot I would go rent one. They are hand held with a magnetic base. When you pop thru it shoots this little slug out that looks like a rivet. If you get good you can shoot them at the people working below you too:lol:
 

Attachments

  • photo300586.jpg
    photo300586.jpg
    979.2 KB · Views: 0

zool

Captain
Joined
Aug 19, 2012
Messages
3,432
Those before and after pics really stand out, looks like new!
 

Watermann

Starmada Splash of the Year 2014
Joined
Jan 12, 2013
Messages
13,822
Nice work, I know the feeling of having that chore behind you, what a relief!
 

oldrem

Commander
Joined
Nov 7, 2013
Messages
2,002
Thanks everyone. Your responses mean a lot to me. So glad that part is behind me.

Moved the trailer to the yard and covered it with the big tarp I had on the boat.

Back to the boat today. Started on the old helm. Any areas with loose paint I stripped down to bare metal. The rest I sanded down with a palm sander. Brushed it then washed it down with MS and wiped it with a MF rag. Hung it in the car port and SE primed it.
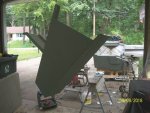
Helm.jpg

While I was at it I decided that regardless of what covering I end up putting on the gunnel tops and bow plate, I want it painted along with the rest so I thoroughly cleaned those areas and SE primed those as well.
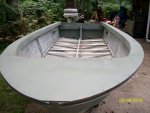
se primer4.jpg

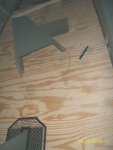
Measured and cut the SS mesh I had for the bilge cover then cut the first 2 sections of deck. After 8 hours almost non stop I decided to quit before I start screwing up big time. (had a couple minor oops but nothing I can't live with)
 

Woodonglass

Supreme Mariner
Joined
Dec 29, 2009
Messages
25,929
Just an FYI. SE primer does NOT require a heavy coat. A light sealer coat followed by a regular High Build Primer is actually the best method for getting bare metal ready to paint. It's NOT a big deal but just not necessary.
 

oldrem

Commander
Joined
Nov 7, 2013
Messages
2,002
Thx Kc

Got a 3rd piece of decking measured and cut tonight. Barely an hour and a half of daylight by the time I get home now. Laid out where I need to cut for the bilge cover and started to measure for the next deck section. I'm measuring every 2 inches off center for that one. May take a full 2 nights to get it right.

decking1.jpg
 

oldrem

Commander
Joined
Nov 7, 2013
Messages
2,002
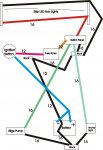
Doing some planning for the future. I THINK I may have the wiring figured out. Longest runs are 11ft and the most I might add later on would be a radio and fish finder. Does this look right?

Wiring 1.JPG
 

mickyryan

Rear Admiral
Joined
Apr 18, 2016
Messages
4,216
the bow lights , those just the right and left nav lights?
i dont see a ignition switch? but your feed to the fuse box usually comes off that you feed ignition switch from battery , then take a wire off the part of switch to the rest most of mine have been 3 prong meaning battery starter and I i is usually purple going to accessories fuse box s is for starter solenoid, and b of course is battery, some switches have 4 prongs refer to switch for correct wiring.
rest of wiring sizes and stuff look spot on since you have no real accessories to speak of .
 

AShipShow

Lieutenant Commander
Joined
Jul 8, 2016
Messages
1,803
Do you have an automatic bilge pump? If so, you want that wired directly to the battery... Other than that, looks good to me!
 

oldrem

Commander
Joined
Nov 7, 2013
Messages
2,002
the bow lights , those just the right and left nav lights?
i dont see a ignition switch? but your feed to the fuse box usually comes off that you feed ignition switch from battery , then take a wire off the part of switch to the rest most of mine have been 3 prong meaning battery starter and I i is usually purple going to accessories fuse box s is for starter solenoid, and b of course is battery, some switches have 4 prongs refer to switch for correct wiring.
rest of wiring sizes and stuff look spot on since you have no real accessories to speak of .

Thanks Micky. Dang, knew I was missing something. I have the ignition switch (round item on center left) fed from the battery, but no wires going from it anywhere else. This is my ignition switch =- the colors show the colors of the wires coming from the motor. "A" and "I" are not in use:

Ignition Switch.jpg
 

oldrem

Commander
Joined
Nov 7, 2013
Messages
2,002
Do you have an automatic bilge pump? If so, you want that wired directly to the battery... Other than that, looks good to me!

No, it's a manual. The boat never had a pump but thought it would be good to have one just in case.
 

mickyryan

Rear Admiral
Joined
Apr 18, 2016
Messages
4,216
i have come up with what i would recommend starting with fuse box :)
nice part about this fuse box is it has a switched and un switched area or you can do two battery arraignment like their diagram
sorry i had missed your switch post i believe your switched accessories comes off the a can easily check by turning switch on and doing a continuity test with no power to switch of course :)
 

Attachments

  • photo300914.jpg
    photo300914.jpg
    54 KB · Views: 0
  • photo300915.jpg
    photo300915.jpg
    253 KB · Views: 0
  • photo300917.jpg
    photo300917.jpg
    123.1 KB · Views: 0

oldrem

Commander
Joined
Nov 7, 2013
Messages
2,002
i have come up with what i would recommend starting with fuse box :)
nice part about this fuse box is it has a switched and un switched area or you can do two battery arraignment like their diagram
sorry i had missed your switch post i believe your switched accessories comes off the a can easily check by turning switch on and doing a continuity test with no power to switch of course :)

I already have separate Blue Sea 6 socket fuse block and 6 banger terminal block, so will have to make do there. To cut down on the number of wire sizes, I changed the 18's to 16's. Hopefully I have the drawing right now ??

Wiring 1.jpg
 

Watermann

Starmada Splash of the Year 2014
Joined
Jan 12, 2013
Messages
13,822
I would add an inline fuse at the battery, 20 amp since your primary is 12ga.
 
Top