Alpha 1 Gen 1 Gear lube leak?

nola mike

Vice Admiral
Joined
Apr 22, 2009
Messages
5,526
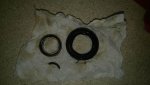
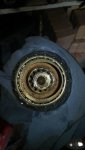
Ugh, I don't know that I'm ever getting this thing back on the water. Had planned on replacing the lower driveshaft seal tomorrow. The drive had been off and laying on its side. When I picked it up I noticed a small puddle; looks like it's coming from the upper, and leaking into the exhaust cavity. Weird thing is that when I put it on a stand, I pulled the lower plug. Initial oz or 2 looked good (but it had been laying on its side, so any water wouldn't necessarily come out first). Then I remembered that I should probably check the level before I drained it, so put the lower screw in, pulled the vent screw--and lube started pouring out the vent. Quite a bit. I don't get that.

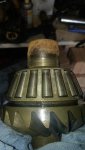
So, what's the likely source of the leak? I'm going to pressure test in the AM anyway, but would like to know where I should look. The yoke and u-joints/bellows were dry, and the input shaft seal was replaced last season (maybe 2?).

Going to annoy me to have to wait on parts to get this on the water (or worse). I have a spare drive that I replaced the input shaft seal on last year, but it whined when I put it back together, so put this one back on. Guessing I'd have to remove the input shaft on that one and recheck the preload at least.
 

achris

More fish than mountain goat
Joined
May 19, 2004
Messages
27,468
Seen my document on Alpha One drive oil leaks? Details all the places that seals can leak, and where you'll see the oil (but assumes the drive is installed on the boat). You might find it useful.

Chris...........
 

nola mike

Vice Admiral
Joined
Apr 22, 2009
Messages
5,526
No, achris , surprising I hadn't seen it before. Is this the post you're talking about? My leak was pretty clearly coming from the driveshaft housing. Doesn't look like the input shaft seal, and like I said that's fairly new anyway.

1. As I understand it, the lower driveshaft seal doesn't keep oil in, correct?

2. So that leaves me with the upper seal? You mention "seals", but I only see part # 26-32511 . And do I need the o-ring as well (25-55801)? Anything else aside from top cap o-ring?

3. The upper disassembly looks like a pain, but straightforward. No special tools except large bearing carrier nut removal tool?

4. I've also been looking for a good cut away diagram showing all the seal locations without success. Maybe someone knows of one.

5. I've done a good bit of that disassembly before--guessing I could do that and reassembly in 1-2 hours, and 1 hour for the seal replacement, assuming I'll run into at least a couple of problems. That seem realistic? If so, I can order the parts overnight for delivery on friday. I have tomorrow off, still need to replace the shift cable, can pressure test/disassemble tomorrow, return friday afternoon, MAYBE get new seal in, start reassembly, replace drive...and be boating by saturday afternoon when I have guests in town? Was hoping to get in some fishing/crabbing tomorrow, might have to wait.
 

achris

More fish than mountain goat
Joined
May 19, 2004
Messages
27,468
Yes, that's the right post... (Oil leaks)

1. Yes and no... When the lower drive shaft is in place, it would hold oil in if the upper seal leaked. The minute you dropped the gear housing away though, oil would definitely leak out.

2. There are 2 seals for the bottom of the drive shaft housing. 1 seals on the bottom of the driven gear in the drive shaft housing, the other when the lower drive shaft is inserted. That 'O' ring you mention is the seal on the upper drive shaft for the driven gear. Unless you plan to press the shaft and gear apart, you won't even see that 'o' ring.

3. Drive shaft housing disassembly.... Remove input yoke and drive gear and bearing pack as a single assembly, after releasing the cover nut... Remove 4 x 3/8" screws in the top cover. Remove top cover. Lift out upper drive shaft and driven gear assembly... That's it! Replace the top cover 'o' ring on reassembly.

4. Merc service manual (genuine)

5. I caan't see any problems you'd run into, so if you can't get that entire job done in about 45 minutes, you're slacking! :D Torque on the top cover screws is 20ft-lb,

Chris.........
 

nola mike

Vice Admiral
Joined
Apr 22, 2009
Messages
5,526
1. Yes and no... When the lower drive shaft is in place, it would hold oil in if the upper seal leaked. The minute you dropped the gear housing away though, oil would definitely leak out.

OK. The drive was together when it leaked, so that means both seals are likely bad?

2. There are 2 seals for the bottom of the drive shaft housing. 1 seals on the bottom of the driven gear in the drive shaft housing, the other when the lower drive shaft is inserted. That 'O' ring you mention is the seal on the upper drive shaft for the driven gear. Unless you plan to press the shaft and gear apart, you won't even see that 'o' ring.
The 2 seals in question are the upper seal, which requires the bearing pack removal etc, and the lower seal, which is accessible from the underside of the upper, correct? 2 total though
3. Drive shaft housing disassembly.... Remove input yoke and drive gear and bearing pack as a single assembly, after releasing the cover nut... Remove 4 x 3/8" screws in the top cover. Remove top cover. Lift out upper drive shaft and driven gear assembly... That's it! Replace the top cover 'o' ring on reassembly.

Sounds so easy.
4. Merc service manual (genuine)

I don't know that I've seen what I'm looking for (simplified, with the seals highlighted). I'll look again.
5. I caan't see any problems you'd run into, so if you can't get that entire job done in about 45 minutes, you're slacking! :D Torque on the top cover screws is 20ft-lb,

Chris.........

You overestimate me. I find a way to make every project take a long time. Keep in mind that this started as a half-day project to replace the transom cooling hose, and I'm now about 3 weeks and hundreds of $$ in...
 

achris

More fish than mountain goat
Joined
May 19, 2004
Messages
27,468
Both seals leaking in that particular location is not unusual.

Here's a diagram I found in a Merc service manual. I think it's what you're looking for, :D (the 2 seals in question are #21)

DSH.PNG
 

nola mike

Vice Admiral
Joined
Apr 22, 2009
Messages
5,526
Nice picture, shows what I need to see here, but I'm looking for the Dr. Suess version, just showing all the seals that may leak (not super obvious that there are 3 seals that could leak in that pic unless you know where to look).
I pressure tested the drive, and lost maybe 2# over 15 minutes. No bubbles in that upper seal area (or my connections) so not sure where it was leaking. I looked into that drive cavity though, and didn't like it, so I decided to replace the upper seal anyway. Pretty obvious what everything is for when you take it apart.

I got through splitting the drive and removing the seals in about 45 minutes. Replaced the shift cable in about an hour. Waiting on a seal kit to arrive tomorrow with both seals. It looks like I also have to go pick up some Loctite 731 for seal installation when I go home, and get a bigger socket (1"?) to drive in the upper seal. I see people say that that lower seal could be taken out with a long screwdriver, but it looks like it would be a pain. Took 5 seconds to pound it out from the top side. Pics of my seals, lower on the left. No rubber left. Upper looked OK, deformed when I removed it. Found a piece of the seal in the cavity, as well as a lower driveshaft O-ring (I've never put that on the shaft, so must have been in there for a while). Questions remaining before reassembly:

1. The upper driveshaft was rusted a bit where the lower seal was missing. There's a small groove where the seal rides now. Smaller than it appears in the pic, but it snags a fingernail. What's the best way to fix this? Speedi sleeve has been suggested. I was thinking about taking it to a machine shop to smooth it on a lathe. Could I just sand it down myself?
2. Just want to be sure I have my seals oriented correctly.
a) Upper seal, lip faces top of drive?
b) Lower seal lip also faces top? (I would think the lip should face down, but that doesn't seem to be the case)
 

Attachments

  • photo292498.jpg
    photo292498.jpg
    668.3 KB · Views: 7
  • photo292499.jpg
    photo292499.jpg
    482.6 KB · Views: 7
  • photo292500.jpg
    photo292500.jpg
    690.1 KB · Views: 7
  • photo292501.jpg
    photo292501.jpg
    835 KB · Views: 7

achris

More fish than mountain goat
Joined
May 19, 2004
Messages
27,468
Nice picture, shows what I need to see here, but I'm looking for the Dr. Suess version, just showing all the seals that may leak (not super obvious that there are 3 seals that could leak in that pic unless you know where to look).

Not sure what you mean by 'Dr Seuss version'. I assume you mean 'simplified'. Bear in mind, the service manual is designed to be used by trained service techs, not backyard handymen. The service manuals assume a level of skill and previous knowledge... Sorry, that's just the way it is.. ;)

I pressure tested the drive, and lost maybe 2# over 15 minutes. No bubbles in that upper seal area (or my connections) so not sure where it was leaking. I looked into that drive cavity though, and didn't like it, so I decided to replace the upper seal anyway. Pretty obvious what everything is for when you take it apart.

There ya go... :D

I got through splitting the drive and removing the seals in about 45 minutes. Replaced the shift cable in about an hour. Waiting on a seal kit to arrive tomorrow with both seals. It looks like I also have to go pick up some Loctite 731 for seal installation when I go home, and get a bigger socket (1"?) to drive in the upper seal.I see people say that that lower seal could be taken out with a long screwdriver, but it looks like it would be a pain. Took 5 seconds to pound it out from the top side.

Once you have the driven gear out yes, the seal just drives down. But if you are just replacing that seal on an annual service (as I routinely do), putting a long screwdriver in under the seal, through the exhaust cavity, a giving it a flick is dead simple (see my video on replacing the Alpha One water pump. I do it in that video.)

Pics of my seals, lower on the left. No rubber left. Upper looked OK, deformed when I removed it. Found a piece of the seal in the cavity, as well as a lower driveshaft O-ring (I've never put that on the shaft, so must have been in there for a while). Questions remaining before reassembly:

1. The upper driveshaft was rusted a bit where the lower seal was missing. There's a small groove where the seal rides now. Smaller than it appears in the pic, but it snags a fingernail. What's the best way to fix this? Speedi sleeve has been suggested. I was thinking about taking it to a machine shop to smooth it on a lathe. Could I just sand it down myself?

Speedi-sleeve or replace the gear... No other option will work properly. If the rust is light, then a bit of emery would work, but since you have a groove, speedi-sleeve. Machining will reduce the diameter to the point where the seal won't be tight enough...

2. Just want to be sure I have my seals oriented correctly.
a) Upper seal, lip faces top of drive?
b) Lower seal lip also faces top? (I would think the lip should face down, but that doesn't seem to be the case)

By the book, both seals facing up.... But I do agree with you, it seems counter-intuitive. I guess the philosophy is that should the upper seal leak, the lower seal will stop the oil running out. Better to have a bit of wet oil than no oil.

Good luck, and keep posting.

Chris.........
 

nola mike

Vice Admiral
Joined
Apr 22, 2009
Messages
5,526
OK, so *finally* got all the parts and put the upper back together. Hardest part was finding something to drive that upper seal in there. I dinged the edge of the lip using something makeshift, and had to remove the seal. Looked like it should still work though. For future reference, a 34mm socket fit perfectly, and allowed me to watch the seal as I drove it in. Lower went in no problem. Speedi sleeve seemed to fit well (that same socket was perfect to drive it on the shaft). Had a tough time removing the lip once it bottomed on the shaft. I scored the shaft a bit with a dremel getting it off, but not on a seal or bearing surface. Just pressure tested, held 18 psi for an hour. Going to put it back tomorrow if I can find that #!% shift shaft washer, and make sure I still have my quad ring, and be boating on friday!

Meant to take some pics, but only ended up with the upper seal and the ding to the outer lip visible.

IMG_20180613_151701.jpg
 

nola mike

Vice Admiral
Joined
Apr 22, 2009
Messages
5,526
...aaand, I pressure tested the lower, and have a leak at the shift shaft seal. You've got to be kidding me. Still getting on the water this weekend, damn it. Going to split the spare drive and use that lower...
 

achris

More fish than mountain goat
Joined
May 19, 2004
Messages
27,468
.... Had a tough time removing the lip once it bottomed on the shaft....

I never bother removing it... :D Doesn't interfere with anything. ;)

...aaand, I pressure tested the lower, and have a leak at the shift shaft seal. ..

What pressure did you use? Once that shift shaft seal is about 6 months old, it won't hold much more that about 6psi... If it holds that, you're good to go.

Chris...........
 

nola mike

Vice Admiral
Joined
Apr 22, 2009
Messages
5,526
I never bother removing it... :D Doesn't interfere with anything. ;)
Didn't look like it, but didn't want to find out about it after reassembly. Noted for next time (!)


What pressure did you use? Once that shift shaft seal is about 6 months old, it won't hold much more that about 6psi... If it holds that, you're good to go.

Chris...........
Hmm, usually I pressure test at 15# or so without a problem. Wouldn't think it would matter much whether the drive is split or not. Regardless, I went out and double checked, and it's leaking on the first pump of the bike pump, which =0. Ordering the seal, I've seen that the bushing is sometimes destroyed on removal as well; going to get a piston caliper tool and see if I can get that out in one piece. Anything else I need?
 

nola mike

Vice Admiral
Joined
Apr 22, 2009
Messages
5,526
Ha, what a joke. That caliper tool might work on a brand new drive, but no way it was going to be that easy. It appears the bushing and seal are usually replaced as a unit anyways. It took a BFH, 2 screwdrivers (before I found my cold chisel), and a good bit of pounding to destroy the bushing and remove it. After half of it broke off, the threads started turning. Remarkably, it appears I did no other damage. New bushing assembly coming saturday, still think I'll swap lowers tomorrow so that I can go boating.

IMG_20180614_144438.jpg
 

nola mike

Vice Admiral
Joined
Apr 22, 2009
Messages
5,526
Well, finally back on the water! Swapped lowers yesterday, swapped props and put the leg on today, adjusted the shift cable, went to start, and... some idiot left the ignition on last week:facepalm:
That killed the battery good. A couple hours of charging though, everything running great. Shifting better than it ever has, no stray noises. Trim limit and gauge working for the first time in years. Forgot to pressure test the drive once it was together,but did test each half and am positive the quad seal was in place, so just going to keep an eye on it. Still waiting on the shift shaft bushing to complete the original lower. Did notice some blowby and some water in the breather. Hoping just burning off some winter condensation, but a problem for another day.

​​​​​​
 

porscheguy

Chief Petty Officer
Joined
Jan 17, 2013
Messages
441
Ha, what a joke. That caliper tool might work on a brand new drive, but no way it was going to be that easy. It appears the bushing and seal are usually replaced as a unit anyways. It took a BFH, 2 screwdrivers (before I found my cold chisel), and a good bit of pounding to destroy the bushing and remove it. After half of it broke off, the threads started turning. Remarkably, it appears I did no other damage. New bushing assembly coming saturday, still think I'll swap lowers tomorrow so that I can go boating.

I’m convinced they installed that bushing with an impact gun. I was able to replace it with the special tool, on a socket, on a 2’ breaker bar. I’ve done this on two outdrives and on both, the metal part of the bushing was cracked when I removed it.

BTW, you’re in colonial beach?
 
Top