1981 Johnson J50BECIC not starting, stalling - suspect carb, please advice

Carmageddon

Petty Officer 3rd Class
Joined
Jul 29, 2019
Messages
82
Last time I cleaned carbs, I soaked them overnight. The next day blasted off the cleaner and made sure spray cleaner passed through. Replaced what came with the kit. If you look at the forum for Johnson. At the top of the page you see the post top secret. One of the links gives a base setting. Which could give a rough idle, but usually at least runs until you're at the linkage with a screw driver. My two carbs start, but it needs to idle higher than I'd like at the settings. It's probably around 1000rpms, but my tach isn't hooked up. Basically if I back out the lower carb ~1/4 turn I get decent smooth idle to play with.

Thanks! I think I found it.
Your point about tach reminds me - how easy is it to wire a tachometer to this engine? I currently have none - tach, fuel, speed gauge.. nothing

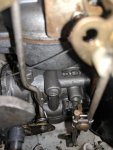
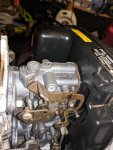
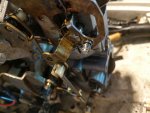
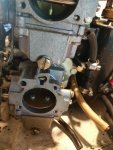
EDIT: uploaded pictures, where is the screw to adjust mine? It seems to be the one in 45 degrees angle, flat head?
 

Attachments

  • IMG_20190808_202720.jpg
    IMG_20190808_202720.jpg
    1.8 MB · Views: 0
  • IMG_20190808_202659.jpg
    IMG_20190808_202659.jpg
    1.9 MB · Views: 0
Last edited:

Carmageddon

Petty Officer 3rd Class
Joined
Jul 29, 2019
Messages
82
Last time I cleaned carbs, I soaked them overnight.

Soaked in what? I find different suggestions online, like Laquer thinner while others say formula changed and it can now erode aluminium, others say water, some more classic but hard to find materials..
 

racerone

Supreme Mariner
Joined
Dec 28, 2013
Messages
38,501
There is no " mixture " screw on those carburetors.-----What other trouble shooting has been done.------Perhaps it is NOT a carburetor problem.
 

cprodave

Petty Officer 1st Class
Joined
Jul 1, 2012
Messages
301
Re: how to soak/clean carburetors...not on Outboards but on other small engines (4 stroke lawnmowers, 2stroke trimmers, blowers, chainsaws) I have had good success removing/disassembling the Carb, soak in isopropyl alcohol (at least 70% mix, I believe 90% is also available--use highest %age you can get) overnight or for a day or so. Use small wires and/or tubing to poke/blow/suck through any holes/passages. Then dry all components thoroughly (leave in the sun for a couple hours, or in the house for a day or so if raining/snowing outside). Spray with carb cleaner and redry (sometimes I use carb cleaner spray, sometimes I don't). Reassemble Carb and reattached to engine. Except for badly-corroded Carbs (I get these sometimes on flood-damaged engines) I don't recall any Carb I have been unable to clean by this method.

Are there any downsides (for outboards or in general) to how I have been cleaning? Thanks for any input.
 

Carmageddon

Petty Officer 3rd Class
Joined
Jul 29, 2019
Messages
82
There is no " mixture " screw on those carburetors.-----What other trouble shooting has been done.------Perhaps it is NOT a carburetor problem.

Really? Wow, how do I adjust it after the rebuild then?

What was done is inspection of the fuel pump - no leaks on the side towards the engine, feedback from other experienced guys suggesting too much fuel in the water when I try to start ot, suggesting that I remove spark plugs, blow in air to dry any fuel,and try again. I didn't have the wrench with me on the water, so at home tried to start again, verified still did not start, then removed plugs, blew in compressed air, reinstalled and it started.

Conclusion- carburetor pumps too much gas into ignition chamber. Also bought the suitable champion plugs instead of random NGK ones I installed (but I had the same issue originally before I tried replacing the plugs).

Tested spark with tester with small light bulb

What do you think?
 

Paulywog0667

Petty Officer 2nd Class
Joined
Aug 5, 2017
Messages
139
The pictures you showed are the linkage. If you put both carbs to fully opened or fully closed then tightened the linkage to hold them, but needle adjustment should be behind the air cover. The carb kit will probably have new seats and seals for them. The needle adjustments are how you tune the carb. If you left an oil/gas mix sit in the engine. Chances are the bottom carburetor, behind the drain plug will have what looks like another screw. Should come out and get cleaned. The needles come out when rebuilding. Hense, the file on how to adjust them probably resolves 100 extra forum threads a year.
 
Last edited:

Carmageddon

Petty Officer 3rd Class
Joined
Jul 29, 2019
Messages
82
I am having a problem prying off the rubber ring holding the solenoid spring in the picture (service manual calls it choke retaining ring)

It seems stiff like dry! If I break it, how do I replace it? I don't have identical size in my carburetors kit...
 

Attachments

  • photo318556.jpg
    photo318556.jpg
    1.5 MB · Views: 0

Carmageddon

Petty Officer 3rd Class
Joined
Jul 29, 2019
Messages
82
, but needle adjustment should be behind the air cover.

Are those big screws, the needles to adjust idle?

If so, how can they be behind the air intake cover? Am I supposed to adjust whole its running without the cover?
 

Attachments

  • photo318557.jpg
    photo318557.jpg
    1.5 MB · Views: 0

juno pierrat

Petty Officer 1st Class
Joined
Dec 14, 2013
Messages
355
nope, bowl drain, high speed jet behind it, don,t believe carbs have idle adjusts this year motor
 

Carmageddon

Petty Officer 3rd Class
Joined
Jul 29, 2019
Messages
82
nope, bowl drain, high speed jet behind it, don,t believe carbs have idle adjusts this year motor

So this year carburetors have no adjustments at all? I also can't really see vacuum ports for syncronizer connection..

If it works just like that, why they added those adjustments in later years?
 

oldboat1

Fleet Admiral
Joined
Apr 3, 2002
Messages
9,612
Oh, you mean through the priming bulb, I can activate the pump?
I didn't realize that.

I have no manual at all unfortunately.

I found this one:
https://rover.ebay.com/rover/0/0/0?mpre=https://www.ebay.ca/ulk/itm/273892135235

The serial number is almost identical except the last C which I read is not significant. Will this be close enough to help me with this engine?

Were you the buyer? (would be a smart move). Interesting to watch, so far, but scattered approach -- always possible new methods are discovered, if unlikely. I would get off the adjustment stuff until you disassemble and clean the carbs, if that's what you get around to, with a manual in front of you.

:popcorn:
 

Carmageddon

Petty Officer 3rd Class
Joined
Jul 29, 2019
Messages
82
I bought it on eBay, seller was gracious enough to provide me with the pictures of the carburetor pages so I could do it this weekend.

I am attaching Link to the album - notice that the disassembled top carburetor looks very clean! I did not start cleaning yet.. even the float valve and arm look in decent shape except the valve' cone shape is black while the new is clear!

This is just the top carburetor, but is it possible, that the problem was not in the carburetor after all? Hmmm

https://photos.app.goo.gl/eZQRX2L6A5tUbrTb6
​​​​​​
 

Carmageddon

Petty Officer 3rd Class
Joined
Jul 29, 2019
Messages
82
Should I be opening up the core plugs for cleaning? I don't have instruction pages for that unfortunately, would have to wait for the full manual.

If I must clean it, how to get there?
 

juno pierrat

Petty Officer 1st Class
Joined
Dec 14, 2013
Messages
355
the core plug on top of carb has a couple of tiny holes under it (part of idle circuit), they can be cleaned with a small wire, can be reached through throat of carb, but plugs are no big deal to remove and install for easier access from top, ive only done the one on top on my engine not the side or one in float area, also set float , instructions in manual
 

racerone

Supreme Mariner
Joined
Dec 28, 2013
Messages
38,501
??---Well----There are no mixture adjustments on those carburetors.----There are no vacuum ports.----Have you inspected the diaphragm in the fuel pump for leakage / tear , yes or no ??
 

Carmageddon

Petty Officer 3rd Class
Joined
Jul 29, 2019
Messages
82
??---Well----There are no mixture adjustments on those carburetors.----There are no vacuum ports.----Have you inspected the diaphragm in the fuel pump for leakage / tear , yes or no ??

Yes by unmounting from the engine block and priming the pump - no leaks.
 

Carmageddon

Petty Officer 3rd Class
Joined
Jul 29, 2019
Messages
82
the core plug on top of carb has a couple of tiny holes under it (part of idle circuit), they can be cleaned with a small wire, can be reached through throat of carb, but plugs are no big deal to remove and install for easier access from top, ive only done the one on top on my engine not the side or one in float area, also set float , instructions in manual

Given my diagnosed problem seems to be flooded engine with fuel, how important is it to remove the plugs?

Service manual says that it involves drilling it! With a risk of damaging the carburetor.. and then to install the new plugs after cleaning: "apply bead of OMC Adhesive 'M'...
 

juno pierrat

Petty Officer 1st Class
Joined
Dec 14, 2013
Messages
355
may not be important, but if you have idle problems, maybe necessary

no need to drill, with a sharp small punch or screw driver and small hammer , poke a hole in plug and pry it off, re install new plug, dome up, place a 1/4" or 3/8" socket extension, square end on dome, and give a sharp light tap with hammer, if worried about sealing apply gasket compound around edges
 

Carmageddon

Petty Officer 3rd Class
Joined
Jul 29, 2019
Messages
82
may not be important, but if you have idle problems, maybe necessary

no need to drill, with a sharp small punch or screw driver and small hammer , poke a hole in plug and pry it off, re install new plug, dome up, place a 1/4" or 3/8" socket extension, square end on dome, and give a sharp light tap with hammer, if worried about sealing apply gasket compound around edges

Would this compound work?
it says Non hardening...
https://www.canadiantire.ca/en/pdp/...HyOmZe4YS-DD3Z5hW1jbOhoCagYQAvD_BwE#store=186
 

oldboat1

Fleet Admiral
Joined
Apr 3, 2002
Messages
9,612
expansion plug -- sealant not needed. Some use fingernail polish over the plug after installed to insure airtight -- don't want sealant bits and pieces in the idle passage. Object is to get it squeaky clean under there.
 
Top