Transom replacement- need glassing advice (caution - fun inside)

hanslanda

Seaman
Joined
Jul 9, 2019
Messages
56
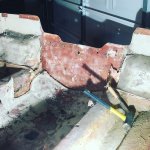
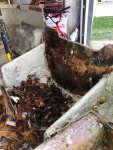
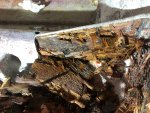
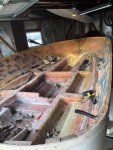
Hello all! Working on restoring my 95' Glastron. This boat was filled/sunk by the previous owner. Left the plug in over a summer he wasn't home and filled it with water. Last season i ripped out the interior and the deck. This spring i pulled bow deck off. Next i was able to see the transom. Once I split the rub rail and lifted the upper hull cover i was able to see the top of the wood. Initially it didn't look too bad... but after taking a deeper look. Its rot. And pretty bad at that. See steps below

Progress
-----------

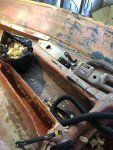
-Glass covering transom cut out
-Wood transom removed completely


Questions
--------------

-Whats the best way to prep the transom in this state? Do i glass the two pieces of wood together? Screw them together? Do i just epoxy them together?

-Will i encase the transom in chopped glass before mounting it to the boats glass or maybe just epoxy?

-My resin of choice was vinyl ester.


Plan if i don't get any input
--------------

-finish prepping the glass on the boat (sanding ridges flush)
-cut the transom from 3/4" meranti bs1088 (local supplier)
-sandwich the wood together with vinylester... staple or screw it together
-make a resin, chopped glass, silicate "peanut butter"
-liberally apply peanut butter all over mounting face of wood and boat mounting surface
-clamp into position
-let cure?
-Peanut butter fill a nice fillet around transom to boat
-chopped mat strips filleting over the peanut butter to boat from wood
-cover transom in chopped mat 1-2 layers
-cover chopped mat with woven. swarf this in about 12" on both sides of the transom and below.


Input appreciated- flying by the seat of my pants
 

Attachments

  • photo328288.jpg
    photo328288.jpg
    931.5 KB · Views: 20
  • photo328289.jpg
    photo328289.jpg
    1.1 MB · Views: 20
  • photo328290.jpg
    photo328290.jpg
    1.1 MB · Views: 19
  • photo328291.jpg
    photo328291.jpg
    1.1 MB · Views: 18

Scott Danforth

Grumpy Vintage Moderator still playing with boats
Staff member
Joined
Jul 23, 2011
Messages
50,282
if you havent done so, look at link 14 in the DIY sticky at the top of the forum. go thru every page, look at every video.

there is a reason the title of the link is "Definitive guide......"

after that, read links 15, and 18
 

hanslanda

Seaman
Joined
Jul 9, 2019
Messages
56
if you havent done so, look at link 14 in the DIY sticky at the top of the forum. go thru every page, look at every video.

there is a reason the title of the link is "Definitive guide......"

after that, read links 15, and 18

Thank you much!

Former cheese head... as in Wisconsinite?
 

hanslanda

Seaman
Joined
Jul 9, 2019
Messages
56
On the order of rotted wood.... i never have gotten a good answer around my stringers. My first thought would be water would have affected them if they are in fact wood. But are they? These look like foam filled glass castings but i am not a professional.

Any opinions?
 

Attachments

  • photo328319.jpg
    photo328319.jpg
    932.3 KB · Views: 11

Sleeper-6

Petty Officer 2nd Class
Joined
Oct 7, 2010
Messages
114
I agree, they don't look like wood. Hopefully someone with better knowledge of that particular hull will chime in soon. If, not a few small holes (1/8 - 3/16") drilled in various places should give you a better idea of what's inside them.
 

Scott Danforth

Grumpy Vintage Moderator still playing with boats
Staff member
Joined
Jul 23, 2011
Messages
50,282
I agree, they don't look like wood. Hopefully someone with better knowledge of that particular hull will chime in soon. If, not a few small holes (1/8 - 3/16") drilled in various places should give you a better idea of what's inside them.

Generally foam filled stringers (engineered stringers) are done in a mold and have a smooth surface.

I would assume that under the glass in the pic above was dimensional lumber
 

hanslanda

Seaman
Joined
Jul 9, 2019
Messages
56
Generally foam filled stringers (engineered stringers) are done in a mold and have a smooth surface.

I would assume that under the glass in the pic above was dimensional lumber

Milwaukee myself. I play around the Adams county area.


Well wood would ruin my day. I don't know if i could be confident in cutting all this out and replacing it. If it's wood I would assume the wood to be in the same condition as the transom. There are a lot of fill holes in the fiberglass where they filled in foam. They definitely are at least half foam if there is wood. The topside of the stringers looks like it does because i already took a sander to it to buff off the remnant of wood and get a clean glass surface.

I guess i'll drill some holes... ? Should i take some closer photos of the foam fills or anything before i do that?
 

kcassells

Fleet Admiral
Joined
Oct 16, 2012
Messages
8,738
Yup drill some holes like all have suggested. Good luck. If foam check that for moisture too.
 

hanslanda

Seaman
Joined
Jul 9, 2019
Messages
56
Alrighty I took 3 core samples. Two in the ski locker and one in the gas tank bay all along the stringers about 1” above the seam to the hull. We have foam in all three. However I would say the foam is wet when i squeezed it. Water isn’t dripping out but I would say wet or moist. What’s the best bet here? Is the foam displacement or structural?
 

kcassells

Fleet Admiral
Joined
Oct 16, 2012
Messages
8,738
Maybe both. If it is wet it will never dry out completely and has lost it's characteristics. I've seen repairs where guys cut off the tops of stringer/bulh,scoop out and repour nes foam. than glass over that.
 

Woodonglass

Supreme Mariner
Joined
Dec 29, 2009
Messages
25,929
How thick would you estimate the walls of the stringers are. IF they're 1/4" of more then You have NO WORRIES!!! The foam was used only as a MOLD and a bit of extra flotation. Notiing for your to do. Doesn't matter if its wet, rotten or anything else.
 

hanslanda

Seaman
Joined
Jul 9, 2019
Messages
56
I would say the walls are definitely 1/4" thick or more. The decking was merely stapled to this with some form of glue holding the deck to the stringers. It could have been a peanut butter or some form of poly marine glue. I have been debating how they built this thing as it doesn't appear to align totally with an all glass design nor a wood stringer design. I suspect you are correct. They likely had some foam mold they glued to the floor and just glassed over it liberally. Or there was a mold for the upper glass piece they swarfed into the floor and then foam poured after? I don't know. You would think if it were meant to be structural OR displacement boat makers might consider some form of CLOSED CELL foam. This old yellow crap is like a sponge made out of weak cotton.

Lets assume the foam is not structural for a quick minute... stringers aside. Even with the presence of water... won't my new floor and new transom be at risk? Or is this foam holding the water like a sponge and its not likely to go anywhere?

Since i have sanded down the tops of these stringers i did plan to add CSM to re-thicken them already.... maybe cutting the tops off isn't a terrible idea. Scooping out the foam is going to be a damn nightmare but cutting the tops of the stringers wont be that bad.

I'm not sure how i would go about recreating the tops of the stringer with no support below once the foam is gutted out.

If i do decide to do the gut-out anyone have any ideas on that?


Here is what i currently have at my disposal for fiberglass:

-18 Oz Woven Roving - 50" x 3 Yard Roll

-1.5 Oz Chopped Strand Mat Tape, 4" Wide - Full Roll (Approximately 90 Yards)

-1.5 Oz Chopped Strand Mat, 38" Wide - 5 Yard Roll

-Silica Thixotropic - 1/2 Gallon

-1/4 Chopped Glass Fibers - 1/2 Gallon

-1 Gallon of vinyl that i'm quite certain will need to be more on the order of 2-3 gallons.


The mat tape was intended for tabbing and filleting in the transom and the deck. The 38" mat was intended to be a two piece deck covering and transom base covering. The woven roving was intended to be the final covering over the transom (factory design). 1/4" chopped and Silica are fillers for filleting/tabbing and making peanut butter for the transom.
 

AShipShow

Lieutenant Commander
Joined
Jul 8, 2016
Messages
1,803
The stringers most likely are structurally okay without the foam, however, if it were me, I would probably replace the foam which unfortunately means mechanically removing it... Unfortunately you'll have to remove some of the stringers to do so... You probably have a couple options... you could remove the top of the stringers and scoop the foam out (gonna take a long time).. One other option is to actually cut the stringer system out of the boat entirely with an angle grinder along the hull.. flip it upside down out of the boat and remove all the foam.. You could then build up the thickness on the inside of the stringers and retab them back into the hull and not worry about foam for structure...
 

JASinIL2006

Vice Admiral
Joined
Feb 10, 2012
Messages
5,716
My boat had foam stringers... about 4” wide, thick fiberglass (about 3/8”), with foam cores. On mine, the outer surfaces of the stingers were smooth gelcoat, just like the outside of the hull. Mine had pretty clearly Been cast outside the boat, then tabbed (heavily) into the hull, then filled with foam.

I am not sure if it’s really worth it to tear apart fiberglass stringers just to get out a relatively small amount of wet foam. I had to cut out two of my fiberglass stringers to make way for the new transom (which had been wood, unfortunately), but I glassed them back in after the transom install. It was a lot of work and it required a lot of fiberglass to make sure the stringers were as strong as before. It would be quite a chore to clean all the foam from your stringers. I personally don’t know that it’s worth the trouble.
 

Sleeper-6

Petty Officer 2nd Class
Joined
Oct 7, 2010
Messages
114
I don't know about you, but if I were to rebuild the whole boat and know that there was wet foam buried in the hull it would drive me nuts. My suggestion would be to remove the top cap of the stringers and scoop out the wet foam. then you could refill them with 2-part closed cell pour in expanding foam. Once it's hard, trim and shape the excess to resemble the factory stringer shape and glass new caps on the stringers. Overkill maybe, but down the road you'll never wonder if you should have done it.
 

Scott Danforth

Grumpy Vintage Moderator still playing with boats
Staff member
Joined
Jul 23, 2011
Messages
50,282
could always vacuum the water out. it wont fix the fact the foam is now open cell vs closed cell, however it would remove a good portion of the moisture.
 

sphelps

Supreme Mariner
Joined
Nov 16, 2011
Messages
11,475
Vacuuming sounds interesting if it would take the water out .. My thought is that you don’t want to change the height of the stringers or will it matter ? If it matters and you want to replace the foam then I think I would do somewhat what was suggested earlier and cut down low on the stringers . Take the shell off get the foam out then reclassify the shell back on .
But would prefer to use epoxy to tab back in place .. You would need enough layers to match whatever the original thickness is but that would be on the sides not the top .
If you could add thickness to the top without problems then cutting just the top off would be good .
Thinking I would use epoxy regardless ...
 

hanslanda

Seaman
Joined
Jul 9, 2019
Messages
56
Alright i'm certainly of the argument I need to remove the moisture and/or foam somehow. So far i think id be more confident cutting off the tops than re-tabbing the entire stringer system. I could make a jig that rests on the sides of the boat to gage where the old stringer height was. I like pouring and cutting to make a support for the new glass top. If you look at some of the pics of the tops you can see little square pads of plywood they glassed into the tops of the stringers for added strength and/or screw points.

The Vacuum idea is also something to consider. It wont be new foam but it could be dry to a reasonable degree. Cut some 1"-2" holes along the bottoms of the stringers and let my shopvac go wild. Could even use a nice propane heater blast a feed hole and vac the exit hole or something crazy.


I guess i have some pondering to do around those two concepts.
 

hanslanda

Seaman
Joined
Jul 9, 2019
Messages
56
Alright gents the fun begins.

I used a 2x6 as a jig to go across the tops of the hull seam and drop measured points to each area of the current stringers. So i drew a map to the current depths of existing tops all the way to the back of the boat.

Next i figure i want to do this in segments. So i the cut out the tops of the bow-end stringers. At first they were nice and dry and hard and i really felt like i was wasting my time. But eventually i got to the wet stuff. It was probably the bottom 4" of the foam, as wet in some places so as to have standing water. I developed a pretty good scooping method with a nice short 12" crow when i was removing the deck foam so i went right away with that here. Its been reasonably successful so far. Going to keep at it until i get it out! This top is pretty thick in some places. As mentioned earlier they glassed some 2x6" pieces into the tops of this where the seats might sit. I may need to deplicate that in some way.
 

Attachments

  • photo328441.jpg
    photo328441.jpg
    947.4 KB · Views: 6
Top