havoc_squad
Senior Chief Petty Officer
- Joined
- Mar 5, 2011
- Messages
- 739
I've finally was able to get all connecting rod caps properly aligned and 100% torqued to factory spec, the crankshaft moves with no binding or weird anomalies that I could see/feel.
The delay was mostly because I got overly concerned about not doing anything to put a mild port edge chamfer on the vertical areas (600 gentle hand sanding the edge a small amount) and had to re-do everything (clean the block, re-insert crankshaft and pistons, etc). Then life got in the way to add to the delay.
The cylinders are all used with factory/std bore and might have not needed chamfering or was less of an issue than a bored/oversized cylinder.
Anyways, here are the following questions that the service manual does not address that I want to make sure are correct:
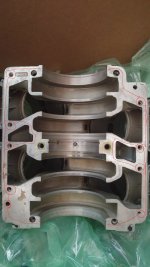
1. Is the attached photo a correct pattern for the gel-seal? (Marked in red) If not, please provide a revised image with the correct placement.
2. Just to confirm, the taper pins are tapped/pushed into place from the top of the crankcase cover down towards the block, with the fat end of the pin up and the narrow end to be driven in?
3. Is there anything extra I should keep a look out for when the cover has been properly installed per service manual? I did see a section that says when checking the crankshaft after the cover installation is done, to hit the top of the crankshaft with a soft mallet up if binding is experienced.
I think that's all the questions I have until I get the powerhead 100% sealed up properly.
The delay was mostly because I got overly concerned about not doing anything to put a mild port edge chamfer on the vertical areas (600 gentle hand sanding the edge a small amount) and had to re-do everything (clean the block, re-insert crankshaft and pistons, etc). Then life got in the way to add to the delay.
The cylinders are all used with factory/std bore and might have not needed chamfering or was less of an issue than a bored/oversized cylinder.
Anyways, here are the following questions that the service manual does not address that I want to make sure are correct:
1. Is the attached photo a correct pattern for the gel-seal? (Marked in red) If not, please provide a revised image with the correct placement.
2. Just to confirm, the taper pins are tapped/pushed into place from the top of the crankcase cover down towards the block, with the fat end of the pin up and the narrow end to be driven in?
3. Is there anything extra I should keep a look out for when the cover has been properly installed per service manual? I did see a section that says when checking the crankshaft after the cover installation is done, to hit the top of the crankshaft with a soft mallet up if binding is experienced.
I think that's all the questions I have until I get the powerhead 100% sealed up properly.