ShoestringMariner
Lieutenant Commander
- Joined
- Apr 18, 2015
- Messages
- 1,605
Excellent thanksIt's look exactly like mine....
Saltwater boater.... not to mention battery acid attacks on metal.
10+ years of running in the rough. No problem whatsoever


Excellent thanksIt's look exactly like mine....
Saltwater boater.... not to mention battery acid attacks on metal.
10+ years of running in the rough. No problem whatsoever

Thanks, I’m definitely putting 5200 on the cut edges especially where there may be any voids.I did the 5200 route with SS staples. Haven't had any issues thus far.
SHSU
Thanks for this. Some good info there especially on the bow. I’ll make sure I leave extra material there. I left the original vinyl liner In it. It’s a similar colour blue to my flooring. The very edge of it has rolled up. I was thinking about trying to glue down the nautolex, then using a heat gun to soften the existing and see if I can’t glue that down so it will totally shed water.I was worried about the same issue, and I ran a thick bead of sealant between the edge of the deck board and that flap of flooring. Tooled with a finger, it made a good connection with the underside of the Nautolex, and the edge of the ply. The sealant used was a tube of some exterior polyurethane sealant that I had in the shop, and it bonded quite well. I trimmed the 'flap' size so it sits back in the groove of the splashrail (or is it 'chine'?) but not so far that it's binding up against the back of that groove. I'm happy with how that's worked out, and has already saved some random hardware from falling below deck during the restoration effort.
On the bow 'triangle' deck piece, I wish I had left a much bigger overhanging flap, as the flap could be run up the side of the hull, finishing off insides of the storage area under the bow seats. On my hull there's a couple of rib ends that run up above deck level, giving easy passage for random contaminants to make their way below deck. I only had 2-3" flap overhanging, which wasn't enough to close these off as I'd have liked.
Leave the overthinking to me! Sounds like you're sorting out a plan. I think I recall seeing pics of your vinyl liner in the past. Makes sense. My hull had nothing of the sort - just a couple layers of runny paint down the inside of the hull. I rolled the new Rustoleum blue right overtop, to honour the efforts of painters past! And hopefully once cushions and all are in place it won't be really visible either.
Thanks for that well written tutorial R! I really appreciate those tips. Anything to keep this thing moving is a very welcome thing. The light is fading fast on my deadline. And I don’t think I’m going to make it. I had a few setbacks with the rod locker. However I think it is now done, Save for a drain hole at either end, and I can finally move on with the floors.You mentioned you'd picked up that aluminum T trim like I'd used for the deck panels. I have a couple of thoughts that might be of value:
1.) I cut the trim in my miter saw with very slow feed rate. That left a very smooth cut.
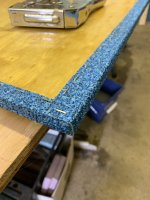
2.) The vertical leg of the 'T' is sort of barbed to grab on to the mortar in the original application. This requires a bit of a gap (~ 3/32") in the deck boards to fit that T in place, and once pushed into a snug gap might yank up on or damage the vinyl if you try to re-lift the trim for adjustment purposes. On one section I experimented with trimming away the lower section of the vertical leg of the 'T' in a jig in the table saw. That worked fine to eliminate the barb, but resulted in a much flimsier profile. I'd recommend leaving it alone and a fitting the deck panel gap to suit if you can. used the table saw and a jig, and it trimmed away fine but was quite a bit flimsier. I'd not recommend doing that unless you plan to use numerous fasteners.
3.) When drilling into the middle of the top of the 'T' for the rivet you'll end up breaking through right into the vertical leg of the 'T'. That tends to shove the drill bit one way or the other, resulting in an oval hole. A sharp bit, and very gentle advance when breaking through the far side seemed to eliminate that issue. I drilled and riveted at each stringer, and also in the lateral stringer ties that bridge the deck board seams. The outer edges in my application are pinched under the aluminum angle I used for the side panels.
4.) After finding that 'Goop' bonding so well to the Nautolex, I used a thick bead of that down the seam of each panel before I pushed the trim piece in place. Then I set a few weights on the trim in the areas where I wouldn't be riveting.
5.) Save the off-cuts, and they can be modified and used for a dressy cap over any seams in the Nautolex on the gunnel tops if you're going that route.
Based on the beautiful craftsmanship on that rod locker, I doubt I had anything particularly profound to offer! Good to see more progress, and yes, the sun is warm and birds are singing. Our lake is still locked up with hard water, but south facing shorelines, and sections with current are sketchy or opening. Won't be long now!Thanks for that well written tutorial R! I really appreciate those tips. Anything to keep this thing moving is a very welcome thing.
")
Oh that sucks. I really appreciate this piece of advice. I do have rigid Styrofoam directly underneath these seat blocks however I never considered vibrations knocking them loose. It is possible in my case that they could drop out enough and fall out of alignment if I ever change seat bases making rethreading bolts impossible. The blocks are glued and screwed and can’t be taken apart however I think I have a fairly easy fix in mind.I can't help with the Nautolex, but I have some experience with the t-nuts.
I mounted mine the exact same way as yours. And that turned out to be a mistake.
Months later, while installing the seat bolts, several of the t-nuts pulled free of the plywood underdeck backing plate and fell into the nether lands below the completed deck. Even though they were glued in place. I ended up having to find a way to fix the issue, which I did. Took me a long time and plenty of research. I also had to pay for some expensive bolts, but I got it done.
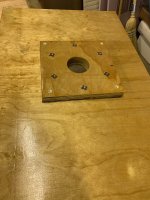
In your case, if you can, I'd remove the t-nuts from their current location. Then I'd pull the backing plate and sandwich the t-nuts between the main deck section and the backing plate, then reinstall the backing plate. That way, the t-nuts can't ever fall out.
Just a thought. Gained from painful experience.


Thanks Renns, Just finishing up the last panel this morning. And I am helping my son with his brakes later today. So the boat will get shoehorned back into the garage. I’m hoping to fasten them in by the end of the day but we’ll see. And they will be riveted down like you did yours. I picked up the all aluminum wide flange rivets this week. I ordered the longer ones from the link you provided me so the outer perimeter may have to wait to be pinned down.Nice craftsmanship at work here! When do the panels go in for good? Rivets or screws?