Gipsy - 1996 Sea Ray 210 Bowrider restomod

biasbilt

Seaman
Joined
Aug 13, 2010
Messages
53
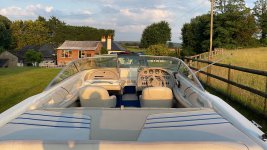
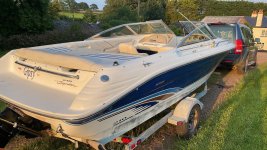
Hi folks, I’m just getting started on a new project - a 1996 Sea Ray 210 bowrider. Before you all ask why am I doing this, it’s pretty simple:
1. My wife and I both really like the lines of boats from this era.
2. We already have an 1988 18’ Seville which I rebuilt from rotten so it’s good to keep our boats from the same family. The 18’ just isn’t quite big enough as all our friends have 2 or 3 children and I wanted a slightly bigger boat for runs down the coast to a great restaurant
3. Boats from this era are all built down to a cost and it designed for a 30+ year life. Unless we bought something brand new or just a few years old, there’ll be problems, especially as we keep our boat on a swinging mooring for 4 months of the year.
4. I like a project! Cars, boats, anything really.
5. We want to keep her for 15+ years so better to do this properly first time!

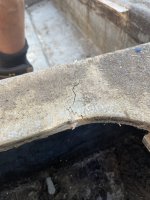
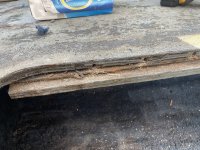
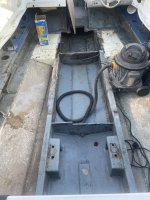
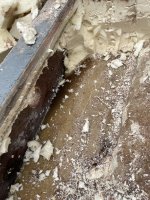
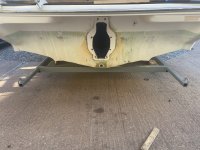
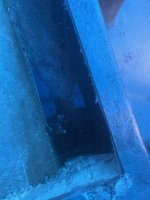
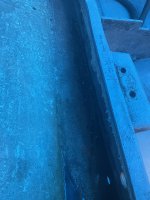
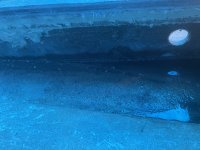
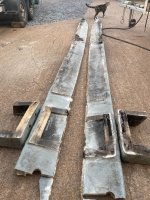
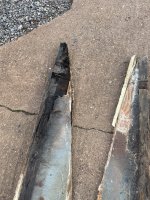
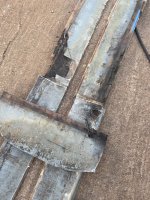
When we got her, looking pretty good from far, but far from good. Problems I already knew about were rot around the ski locker, some water in the foam near the transom where some some had drilled a 2“ hole in the deck, a few rusty screws in the transom running but rusty engine, no down on the trim so she was bought at a price I was happy with expecting that I’d need to do a full rebuild and possibly re-engine.

More to follow.
 

Attachments

  • 551A8399-C3CA-4DCD-B2B5-0FB692101FAE.jpeg
    551A8399-C3CA-4DCD-B2B5-0FB692101FAE.jpeg
    1.1 MB · Views: 13
  • 534B8C5F-588A-4679-8F30-33E115629796.jpeg
    534B8C5F-588A-4679-8F30-33E115629796.jpeg
    1.4 MB · Views: 13
  • BC5BDBC4-0A45-471D-80F2-D7424F667617.jpeg
    BC5BDBC4-0A45-471D-80F2-D7424F667617.jpeg
    1.5 MB · Views: 13
Last edited:

biasbilt

Seaman
Joined
Aug 13, 2010
Messages
53
Forgot to add - 2 barrel 5.7 with an Alpha q gen 2 so good to step up from the gen 1 on the old boat.
Progress to date:
Picked her up on Tue 13 June and started stripping everything out straight away. The interior will be redone with a few tweaks so that’s all in storage till winter when the upholsters are less busy and a bit cheaper. Engine came out last Thursday and there was a lot of good news. New Quicksilver recon engine in 2014, transom shield was replaced at some point, and the drive is really tidy.

The transom also had no signs of rot around the keyhole and very little (local repair) in the rusty screw holes - was this going to be too good to be true?

I finished pulling the carpet today and the damage around the ski locker wasn’t great - cracks in the floor, plus drilled core samples in the stringers next to the transom and one had water draining instantly. Totally rotten stringers in the middle of the boat and damp elsewhere so I made the decision to go all in and started the demo.
 

Attachments

  • IMG_5791.jpeg
    IMG_5791.jpeg
    2.1 MB · Views: 8
  • IMG_5792.jpeg
    IMG_5792.jpeg
    2.5 MB · Views: 8
  • IMG_5794.jpeg
    IMG_5794.jpeg
    2.6 MB · Views: 8
  • IMG_5807.jpeg
    IMG_5807.jpeg
    2.7 MB · Views: 8

biasbilt

Seaman
Joined
Aug 13, 2010
Messages
53
So by the end of today I’d got to this stage. I really don’t want to lift the cap if I can help it and I know it’ll make life harder to sort the bow but I think I can work around things.

I’m going to do things slightly differently to keep plenty of stiffness in the hull knowing that I’d need to splice plywood to make stringers anyway so I’ll be doing the transom and back half stringers and then front half stringers with a scarf joint at the mid point.

A few thoughts on the build:
1. No wood to wood joint for moisture to migrate. The transom, stringers and bulkheads will all be separated by glass
2. Epoxy will be used for glue joints (and excess cleaned off so the poly can bond direct to the wood) and poly for laminating. Typically epoxy for joining strings, 2 x pieces of transom, deck cleats, butt blocks etc
3. Cloth will be 1708 equivalent laid wet on wet where possible
4. All compartments will be gel coated to seal then before foaming
5. Under side of the floor will glassed before laying , probably with epoxy on the cleats and poly at the hull joint.
6. Stringer design and wood thickness will be as per original design but stringers being 3/4” thick rather than 1/2” and bulkheads carried all the way out the hull sides
7. Leaving the current lip from the old floor in place until the new stringers are in the help support the floor and give a reference height/position for all bulkheads, seat mount locations

Let me know if you have better suggestions/disagree with any of that - always happy to listen the experts.

As things are now:
 

Attachments

  • IMG_5820.jpeg
    IMG_5820.jpeg
    2.2 MB · Views: 7

biasbilt

Seaman
Joined
Aug 13, 2010
Messages
53
A few observations on the build method. Looks like the floor and strings were made as a single assembly out of the boat and it was fairly well glassed underneath but this meant the outer edge of the stringers has not been laminated to the hull and moisture which has got into the foam has been able to get straight into the stringers. This can be seen by them looking dark and seeing water flowing as the foam came out. It will make it much easier to get them out though as I only need to cut the glass on one side. When I grind, I’ll leave a small lip to align the stringers in the right place.

Other thoughts:
1. Dry foam is really easy to remove when you cut it into blocks and pop each one out one at a time!
2. I’m going to feel fairly stiff tomorrow 😂
 

Attachments

  • IMG_5807.jpeg
    IMG_5807.jpeg
    2.7 MB · Views: 6
Last edited:

biasbilt

Seaman
Joined
Aug 13, 2010
Messages
53
Ready to move forward again. I’m really conscious of the hull moving once the stingers get cut out. The trailer needed extending anyway as it wasn’t big enough, so that’s been done including tie down points so that I can block under the trailer and then between the trailer and the hull so it’s fully supported. Axle will get moved back once the engines back in so it’s correctly balanced
 

Attachments

  • IMG_5826.jpeg
    IMG_5826.jpeg
    4.2 MB · Views: 8
  • IMG_5827.jpeg
    IMG_5827.jpeg
    4.1 MB · Views: 8

biasbilt

Seaman
Joined
Aug 13, 2010
Messages
53
Still got water weeping out of the stringers so I know I’m doing the right things as the wood will already have started degrading. You can also see there’s no glass on the inside of the transom under the floor in the last picture.
IMG_5832.jpeg
Plan is to get the transom and rear 9’ of stringers out this weekend
 

Attachments

  • IMG_5828.jpeg
    IMG_5828.jpeg
    1.7 MB · Views: 3
  • IMG_5829.jpeg
    IMG_5829.jpeg
    2.1 MB · Views: 3
  • IMG_5830.jpeg
    IMG_5830.jpeg
    2.6 MB · Views: 2

Scott Danforth

Grumpy Vintage Moderator still playing with boats
Staff member
Joined
Jul 23, 2011
Messages
50,233
First, boats are designed with only a 15 year life in mind

You have the right attitude knowing it will need work

96 is a toss up between 1996 vortec motor (8 bolts on the intake) and left over 1995 motors (12 bolts on intake)

I would verify the motor, and swap to a 4-barrel. However if it's a 1995, heads and 4-barrel
 

biasbilt

Seaman
Joined
Aug 13, 2010
Messages
53
First, boats are designed with only a 15 year life in mind

You have the right attitude knowing it will need work

96 is a toss up between 1996 vortec motor (8 bolts on the intake) and left over 1995 motors (12 bolts on intake)

I would verify the motor, and swap to a 4-barrel. However if it's a 1995, heads and 4-barrel
Agreed on the design life so it’s done pretty well. Our 1988 Searay was rotten as a pear at this age so this ones done well.

It’s a quicksilver reman 12 bolt motor with a 2 barrel carb, dated from 2014. I split the risers from the manifolds and they’re in great condition for a raw sea water cooled boat and genuine Mercruiser manifolds too. Got 627 hours on the clock so probably less than 200 hours. I’ll compression test, check oil pressure etc before making a decision on it.

In a couple of years, I’d like to drop a 5.7 vortec in for 300hp which is enough for an alpha and staying reliable - costs £6720 ($8500) for a new long block with ignition and carb here in the UK
 

Scott Danforth

Grumpy Vintage Moderator still playing with boats
Staff member
Joined
Jul 23, 2011
Messages
50,233
Just swap heads, cam and intake and you have easy 320hp.

Heads are $800 new, or $400 used
Cam kit is $600
Gaskets are $100
Intake and carb - $700 new, or $200 used
 

biasbilt

Seaman
Joined
Aug 13, 2010
Messages
53
Agreed on the design life so it’s done pretty well. Our 1988 Searay was rotten as a pear at this age so this ones done well.

It’s a quicksilver reman 12 bolt motor with a 2 barrel carb, dated from 2014. I split the risers from the manifolds and they’re in great condition for a raw sea water cooled boat and genuine Mercruiser manifolds too. Got 627 hours on the clock so probably less than 200 hours. I’ll compression test, check oil pressure etc before making a decision on it.

In a couple of years, I’d like to drop a 5.7 vortec in for 300hp which is enough for an alpha and staying reliable - costs £6720 ($8500) for a new long block with ignition and carb here in the UK
 

biasbilt

Seaman
Joined
Aug 13, 2010
Messages
53
Just swap heads, cam and intake and you have easy 320hp.

Heads are $800 new, or $400 used
Cam kit is $600
Gaskets are $100
Intake and carb - $700 new, or $200 used
Not over here they’re not…. Like rocking horse as no fresh water boating so it all just corrodes away
 
Last edited by a moderator:

biasbilt

Seaman
Joined
Aug 13, 2010
Messages
53
Setting records for boat destruction here with a transom out in about 2.5 hours. Started at 4.30 with a photo and a few measurements for the book so I’d remember exactly how to put it back together. Got the first layer of wood off to find this. Starting to rot, next to no glass at the bottom and lots of voids around the edge
IMG_5837.jpeg

IMG_5838.jpeg

By 7pm, I was being told to be quiet by my wife as she was worried about the neighbours. Just the outer surface of the ply that’s still bonded to the hull to come out on the starboard side and then it ready to sand

IMG_5839.jpeg
Tools used - started with circular saw, hammer and cold chiesel, angle grinder for the fibre glass and pry bars and then upgraded to mini circular saw, air chiesel, and multi tool.
Technique - strip off the fibre glass skin, cut the wood in a grid approx 3”x3” to its own thickness and just bust out all the blocks. Just be cautious on the sheet near the transom as you don’t want to cut through it!
 

biasbilt

Seaman
Joined
Aug 13, 2010
Messages
53
Made some good progress over the last week or so, transom completely out, the whole floor including under the bowrider out and the stringers out. Will drill the pieces in the floor tomorrow and make a decision whether they come out or not. Will also take up most of the floor round the edge except for a few pieces to use as datum points
IMG_5860.jpeg

IMG_5861.jpeg
Managed to get both stringers out in one piece to use as templates, both rotten in the middle around the seat bases, port was rotten at the front end (near to check the bulkhead where I think the water got in) and the starboard engine mount as very soft inside. Lots of other signs of water in the wood and not yet rotten but certainly on its way
IMG_5866.jpeg
 

Attachments

  • IMG_5863.jpeg
    IMG_5863.jpeg
    3.3 MB · Views: 7
  • IMG_5868.jpeg
    IMG_5868.jpeg
    3.8 MB · Views: 6
  • IMG_5869.jpeg
    IMG_5869.jpeg
    3.9 MB · Views: 8

biasbilt

Seaman
Joined
Aug 13, 2010
Messages
53
The most noticeable thing has been the variation in thickness of fibreglass which is the biggest problem with the chopper gun - it’s very difficult to get a consistent thickness. By using cloth you know exactly how much glass is going down and where so you get a much higher quality product. Look at this engine mount for example comparing the top to the underside of the mount… Had exactly the same with the topside of the floor So not surprising water gets through.
IMG_5866.jpeg
 

biasbilt

Seaman
Joined
Aug 13, 2010
Messages
53
Last bits of wood below the floor are out!
IMG_5925.jpeg
A bit of rot in the bulkhead behind the bow but there’s enough good(ish) wood to tie into and I’ll make sure the new wood is completely separated so it can’t be contaminated. Antifreeze inject to stop further rot in the existing wood? Plan is to put a new bit of wood in and glass over it to make a water barrier and then bed in a new bit of thin wood in a thick layer of PB and then glassed to form the new bulkhead which is easy to make a smooth faired finish ( whole boat will be gel coated inside every where that’s visible).
IMG_5924.jpeg
Got my cyclonic filter arriving tomorrow and then grinding starts. Will cut as much off the lips as possible out with a long blade in a recip saw and then grind from there. Reckon I can get it done in a good day! I’ll bet you a beer!
 

biasbilt

Seaman
Joined
Aug 13, 2010
Messages
53
So I owe you all a beer - grinding has taken about 10 hours total. Works been mega busy and I didn’t get much done last weekend we were away for some of it, honeyxdos, and a mate’s boat sunk so we spent Saturday afternoon getting the engine cleaned and running again. Still a bit to do but it’ll live to fight another day. Moral of the story - make sure the wiring for your bilge pump is in good condition…!
73102c98-9da6-4b94-a068-520512d61756.jpeg

Sunday and a few evenings has got the hull finished less anything that needs doing when wood starts being fitted. So satisfying to hose out the hull on Friday evening 👍💪👌

Pissing with rain today so I made the transom. 2 layers of e/4 marine ply. All edges rounded over for laying down the glass, key hole and drain plug cut out bonded the 2 layers of 19mm together with thickened epoxy.
Test fit
IMG_5968.jpeg
Drilling jig for when the holesaw hangs over the edge
IMG_5969.jpeg
Keyhole cut and bevelled
IMG_5971.jpeg
Gluing the 2 layers together
IMG_5973.jpeg
Plan for tomorrow is to get the transom bonded in and stringers cut.

Question for the experts - is is it okay to go with a butt block or should it be a scarf joint? TIA
 

biasbilt

Seaman
Joined
Aug 13, 2010
Messages
53

biasbilt

Seaman
Joined
Aug 13, 2010
Messages
53
Another question - I don’t a moisture path with bits of wood touching each other. What’s best?
A. Each piece of ply fully glassed in on its own
B. A single layer of glass between each piece and then the 2nd/3rd over the whole transom/stringer/bulkhead structure

A gets more wet on wet chemical bonding but B is more manageable as I’m not trying to do a couple of layers on a 14’ stringer in one go on my own….
 
Top