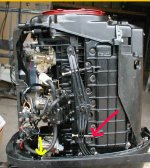
Thanks everyone! ‘84 115 TOP rebuild going!

ianmoore

Petty Officer 1st Class
Thread starter
Joined
Jun 5, 2014
Messages
254
Man!! I remember when I was prepping the boat for the season and found the dead C3. I told my wife that I was gonna try to fix the engine and there was a good chance it wasn’t gonna work…

I have never worked on an engine before, outside of simple rebuild of carbs and such. Opening up the block was a big deal to me.

I ended up getting all new pistons. New rings. Replaced a couple of reeds. Seals and such. I redid the fuel pump, carbs and water pump.

The motor is in the salt so there were some frozen parts. I ended up having to buy a midsection piece when too many of the bolts were frozen in them.

Almost all new bolts, and obviously new gaskets.

I am a touring musician so was busy quite a bit of the summer.. i would have a few days to work and then be gone for 3 weeks.. over and over. It was frustrating when I would have to order a part and wait, knowing I was gonna be gone again. And even with good notes, it was hard to keep everything together.

But I got her all back together, did a prep on muffs, and then put her in the water. I did the reccomended 6 atdc and 20btdc(18). I had the throttle linkage set to the mark, but ended up with idle stop in a bit, so idle now is slightly to right.
My bottom carb is showing a little fuel in the throat. Rechecked needle seats and floats. Everything is in spec. Not sure what that is yet, but keeping an eye on it.

But, here is the cool thing. The engine idles at 650-700 now. Before I had to keep it about 1000 or it would die in gear.
Smoother transition into rpm, but still keeping it low to break motor in.. so, havent tried WOT and/or make sure I am at proper rpm top end.

And, super happy to have the engine back together and wanted to say thanks to everyone who helped talk me through itIMG_7724.jpeg
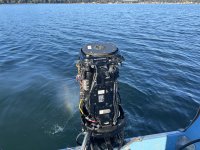
 

ianmoore

Petty Officer 1st Class
Thread starter
Joined
Jun 5, 2014
Messages
254
-Had an interesting thing with bottom carb. I took off the bowl, thinking something with the float had to be allowing some fuel in the throat. I couldn't find anything. I went ahead and took it apart. When i removed the needle seat, the crush washer was crushed at an angle. I tried reinserting a new one, and the same thing happened. There is something weird with the threads. I had a spare bowl, and replaced it. I'll report back if that solves the issue.

Question on timing- So, i timed to 6ATDC and 20(18BTDC). I was watching some vids on timing these old Mercs and a couple of people timed the first to around 0.
Obviously when I change the idle stop screw, i'm altering the throttle/butterfly relationship. There is some travel with the throttle before the butterflies open. Is this travel to account for possible variation in the idle screw adjustment? So, users could finetune their idle without going to deep into the engine?

Or would i be better off timing closer to 0 and keeping my throttle linkage mark lined up?
 

jimmbo

Supreme Mariner
Joined
May 24, 2004
Messages
14,688
This is the Idle Stop Screw. The Carbs should be fully closed as the timing advances to the 6 degrees ATDC.
b2_13.jpg
 

Chris1956

Honorary Supreme Mariner
Joined
Mar 25, 2004
Messages
29,276
There are multiple carb inlet needles, seats and washers, that are close in size and fit different engines. These inlet needles are the correct diameter but can be longer or shorter than what your engine should use. Also, not all inlet seats use washers under them.

I once had a Mercury dealer sell me the wrong inlet needles and seats for my 1500 by accident, so it can happen.

I would match up all the inlet needles seats and washers and make sure they are all the same. Usually, the inlet needles are SS with neoprene tips. Make sure there are no nicks in the neoprene, nor nicks in the seats. Replace anything that looks like it could be an issue.

The floats need that small spring on the top to be in good working order. And of course, check floats for cracks if they are hard plastic. If they are foam floats, just replace them, as they tend to dissolve in gasoline-alcohol fuel.
 

ianmoore

Petty Officer 1st Class
Thread starter
Joined
Jun 5, 2014
Messages
254
This is the Idle Stop Screw. The Carbs should be fully closed as the timing advances to the 6 degrees ATDC.
View attachment 420512
Yes! I am familiar with all the parts. I guess I wasn't clear in my listing of what was happening. It was more tech philosophy. On my motor, there is no way to keep it running in idle if it is exactly set up to the spec in the Mercury manual. This was the same before the rebuild and after the rebuild.

I have to put in the idle stop screw some to get the motor stable. This pulls the linkage set up marks on the throttle arm off, with the throttle side slightly to the right of the mark above.

At this setting the engine idles well and the carbs are still closed.

I asked the question because when you change the idle stop screw, you change the relationship between the throttle and the carbs opening. My question was if that initial move on the throttle-cam, where it moves for a bit before butterflies open is important to maintain? Or, is that for exactly what I ran into- where you can adjust idle stop and get it to needed RPMs, and that play before butterflies open is made for that
 

ianmoore

Petty Officer 1st Class
Thread starter
Joined
Jun 5, 2014
Messages
254
There are multiple carb inlet needles, seats and washers, that are close in size and fit different engines. These inlet needles are the correct diameter but can be longer or shorter than what your engine should use. Also, not all inlet seats use washers under them.

I once had a Mercury dealer sell me the wrong inlet needles and seats for my 1500 by accident, so it can happen.

I would match up all the inlet needles seats and washers and make sure they are all the same. Usually, the inlet needles are SS with neoprene tips. Make sure there are no nicks in the neoprene, nor nicks in the seats. Replace anything that looks like it could be an issue.

The floats need that small spring on the top to be in good working order. And of course, check floats for cracks if they are hard plastic. If they are foam floats, just replace them, as they tend to dissolve in gasoline-alcohol fuel.
That is one of the many confusing things about these older motors. I have most of my original needle seats and needles, so i was able to compare.

The issue i was having was in the threads of where the needle seat screwed. Perhaps from 30+ years of removing the copper washers with picks and such, the threads were weird at the bottom and i couldn't get the washer to go down flush. I had the exact same top from another carb, and i was able to use that instead.

The needles ive had recently had not had neoprene tips. They have been all metal. I'll have to look at the rebuild kit i got, but i only use Merc or Sierra for this stuff.
 

racerone

Honorary Supreme Mariner
Joined
Dec 28, 2013
Messages
39,997
Throttle plates MUST be closed at idle.----Idle timing is the point where throttle plates open.----Actual idle timing does not matter.
 

Chris1956

Honorary Supreme Mariner
Joined
Mar 25, 2004
Messages
29,276
Yes! I am familiar with all the parts. I guess I wasn't clear in my listing of what was happening. It was more tech philosophy. On my motor, there is no way to keep it running in idle if it is exactly set up to the spec in the Mercury manual. This was the same before the rebuild and after the rebuild.

I have to put in the idle stop screw some to get the motor stable. This pulls the linkage set up marks on the throttle arm off, with the throttle side slightly to the right of the mark above.

At this setting the engine idles well and the carbs are still closed.

I asked the question because when you change the idle stop screw, you change the relationship between the throttle and the carbs opening. My question was if that initial move on the throttle-cam, where it moves for a bit before butterflies open is important to maintain? Or, is that for exactly what I ran into- where you can adjust idle stop and get it to needed RPMs, and that play before butterflies open is made for that
The idle stop screw only changes the idle RPM, by changing the idle timing. It should not change relationship between the throttle and the carbs. The carbs should always start to open when the timing is 6*ATDC.
 

Chris1956

Honorary Supreme Mariner
Joined
Mar 25, 2004
Messages
29,276
That is one of the many confusing things about these older motors. I have most of my original needle seats and needles, so i was able to compare.

The issue i was having was in the threads of where the needle seat screwed. Perhaps from 30+ years of removing the copper washers with picks and such, the threads were weird at the bottom and i couldn't get the washer to go down flush. I had the exact same top from another carb, and i was able to use that instead.

The needles ive had recently had not had neoprene tips. They have been all metal. I'll have to look at the rebuild kit i got, but i only use Merc or Sierra for this stuff.
Gee, I would think the neoprene tip would be necessary to make a good seal against the brass seat. My original '77 Merc 1500 inlet needles were nylon and the seats were brass with rubber inserts to make a seal. The replacements always were ss with neoprene tips and the seats were solid brass. My motor did not use the brass washers, if memory serves.
 

ianmoore

Petty Officer 1st Class
Thread starter
Joined
Jun 5, 2014
Messages
254
Gee, I would think the neoprene tip would be necessary to make a good seal against the brass seat. My original '77 Merc 1500 inlet needles were nylon and the seats were brass with rubber inserts to make a seal. The replacements always were ss with neoprene tips and the seats were solid brass. My motor did not use the brass washers, if memory serves.
I’ll post a picture tomorrow when I get out to the shop. I have some of the older ones, but my new needles don’t have the neoprene!
 

Mc Tool

Commander
Joined
Aug 7, 2024
Messages
2,043
I have seen many solid stainless needles sitting in brass seats ....motorbikes and saws mostly . I do like the rubber tipped jobbies better tho ....just seems to make more sense
 

ianmoore

Petty Officer 1st Class
Thread starter
Joined
Jun 5, 2014
Messages
254
I have seen many solid stainless needles sitting in brass seats ....motorbikes and saws mostly . I do like the rubber tipped jobbies better tho ....just seems to make more sense
Im gonna go back through the carbs this winter and use the neoprene tips. I keep seeing fuel in the throats of the carbs and my floats and tangs are both in spec
 

ianmoore

Petty Officer 1st Class
Thread starter
Joined
Jun 5, 2014
Messages
254
Quick question- I was looking at my exhaust side as I was worried about some water intrusion. I noticed the exhaust baffle plate has a slight warp to it. I found one on ebay, and have asked if they can measure it on a straight edge, but what are options? I am reading a lot of threads on these old Mercs and it does seem that most people use gaskets and gasketmaker of appropriate type to deal with the mild deformities of an older motor.

Mine has a slight rock at the bottom from left to right, but is straight at the top and along both sides. This is present whether the water jacket is below or not(it has the ribs in the middle that have created issue for some folks)
 

Chris1956

Honorary Supreme Mariner
Joined
Mar 25, 2004
Messages
29,276
You might price a new one, if they are available. A machine shop might be able to flatten it as well.
 

Mc Tool

Commander
Joined
Aug 7, 2024
Messages
2,043
Quick question- I was looking at my exhaust side as I was worried about some water intrusion. I noticed the exhaust baffle plate has a slight warp to it. I found one on ebay, and have asked if they can measure it on a straight edge, but what are options? I am reading a lot of threads on these old Mercs and it does seem that most people use gaskets and gasketmaker of appropriate type to deal with the mild deformities of an older motor.

Mine has a slight rock at the bottom from left to right, but is straight at the top and along both sides. This is present whether the water jacket is below or not(it has the ribs in the middle that have created issue for some folks)
Is this the large side cover looking thing with all the ribs on it in jimmbo's image above ( under his red arrow ) ? Im thinking that maybe if its just for the water jacket you may be able to use a thicker gasket with a bit of give ....like maybe rubberised cork . If its not to bad sometimes just torquing up the bolts will pull it down even......as long as it seals :)
 

ianmoore

Petty Officer 1st Class
Thread starter
Joined
Jun 5, 2014
Messages
254
Hey yall. Thanks for the responses. Ive been trying to learn as much about this as possible. I found an old thread talking about exactly my issue.
The piece I am talking about is the 'exhaust baffle'. I think this is where water was entering my engine, and for some reason, it was mostly on C4. Ive looked, and there is no obvious path im finding.

I found another one. I messaged the guy and he measured it on a straightedge. I bought it for $60.

My plan is to generally follow the guidance in the attached thread.
He goes pretty in depth on the typical issues with old inline 6's. This is what happened to mine.

Hopefully the baffle i bought is straight.

 
Top