Resurrecting my post... Had to step away from my project for a bit but I'm back to it now.
For the life of me I can't figure out a consistent way to post photos. I tried to get these to show up in the post, or above it. oh well. See below for what they are.
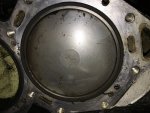
Post cleaning...


I fixed a tilt/trim issue this week that had sidelined me from working on the motor issues. (See my Tilt/Trim thread in this section)
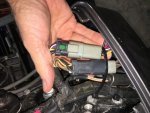
Thanks Oldboat, I will try taking a look at the primer solenoid.
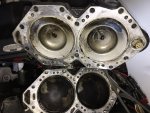
When I last looked at the engine, some of the plugs looked like there was maybe some water intruding into the cylinders. I pulled the heads and it looked to me that maybe there was some evidence of water making past the head o-rings. I replaced those, cleaned the carbon off of the piston heads, and resealed the water passages. I had spoken to a local mechanic about the issue and told him that I was going to use RTV to seal around the passages (per the service manual). He told me not to use RTV and to use anaerobic gasket maker instead. He said that it was difficult to get 1/16" bead the manual says to use and that the RTV squishes into the water passages, and sets up there, plugging them up. (This appears to be true as the pictures above show... notice the black RTV in most of the water passages.) He said the anaerobic gasket maker could be put on a bit thicker and would set where air couldn't get to it, and any extra that squished into the water jacket would not set, due to air being in them. That extra would be flushed out when the motor was run. In theory that made sense to me, and since I had some in the shop, I used it. I let it sit for 30+ hours so hopefully, it set up properly.
I dropped the boat in the pond and tried to start it for the first time in 6 months. (The fuel I put in it back in December was ethanol free and treated with Seafood or Stabil. (I forget which I had used.) It immediately fired up and then stalled. I spent the next 15 minutes trying to get it to stay running without stalling. I had to keep pushing the primer to keep it going, which it eventually did, albeit very roughly.
A new issue cropped up during this... when revving while not in gear, the transmission would suddenly grind and jump into gear. It did this in both forward and reverse. Is this an issue with my throttle/gear lever?! Scary as all get out when the boat slams into gear like that!
It still seemed to be running on two cylinders, though strangely, unless I typed it wrong when I began this thread, the working side of the engine seems to have switched from port to starboard. :ambivalence:
While it was running, I pulled individual plug wires. On the starboard side, on both cylinders, it tried to stop running immediately. On the port side, pulling the top plug made a little difference in how it was running, and the lower plug made almost no difference at all. All four plugs were sparking as the spark was jumping from the boot to the plug from a good 1/4" to 1/2" away.
I also tried covering up individual carburetor bores while it was running and got similar results to pulling the the plugs; Starboard side both began to stall immediately and them would stumble and smoke until the excess fuel cleared out. The port side top also seemed to stumble, smoke, and recover. The port side bottom took a bit but eventually flooded out. Not like the others though.
I checked the compression while the engine was still warm and got:
Port side top-127
Port side bottom-123
SB side top-133
SB side bottom-135
I forgot to look closely but I didn't see any obvious water leaks from the heads.
Could the issues be cause by the low speed needles not being set correctly? In my opening post, I said that the low speed needles were set to 11-12 turns out before I rebuilt the carbs. I had reset them to the manuals recommended 4.5 out.
I will check that solenoid ASAP...
I'm trying to get this thing running before my vacation at the end of the month!
Thanks all!


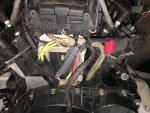
 Are you talking about these wires?

 Thanks Fazt... Good info... I'll pull the heads and redo them. It will be interesting to see if the stuff set properly. OK to use the Blue RTV?