14' Starcraft Falcon restore project

sgebbie

Cadet
Joined
Aug 27, 2011
Messages
29
Re: 14' Starcraft Falcon restore project

More pictures to go with the ones above...

A picture of where the two rivets were removed, one of what I could get by lifting up the top after taking out those two rivets(not a great picture lol), before and after of the rub rail, and the last is a shot of the back right corner where the rub rail and its bracket start where you can see one of the screws holding it in.

2011-12-30_17-56-04_11.jpg2011-12-30_17-56-23_702.jpg2011-12-30_17-10-25_211.jpg2011-12-30_17-23-37_730.jpg2011-12-30_17-23-16_839.jpg
 

sgebbie

Cadet
Joined
Aug 27, 2011
Messages
29
Re: 14' Starcraft Falcon restore project

Rub rail and bracket are both off! I went ahead and removed the whole top cover since there was only a total of about 6 or 7 more rivets that needed removed to free it. This will make the dash removal MUCH easier and also free up the other areas of the boat for better cleaning / repairs if needed. I'll have to rivet anyway to put the first couple back anyway so might as well just add a few more and make life easier. Dash will come out tonight or tomorrow morning. More pictures soon!
 

sgebbie

Cadet
Joined
Aug 27, 2011
Messages
29
Re: 14' Starcraft Falcon restore project

Ok so everything is done and ready for the rest of winter! It wasn't as bad as I thought it was going to be, and it actually makes a little sense about how it was done originally. I hope my thread will help anyone else with a boat similar to this one in gutting it entirely.

I'm leaving it in the garage for a couple of days to dry out since I got it all power washed today (likely last decent weather day of the year). It looks pretty good minus some marks on the bottom left from that spray foam crap that someone used before I bought it.

One thing that I'm really not too sure about though is leaks. I'm not sure I have the means to fill it up or even transport it to somewhere I could test it in the water. I don't believe it has any leaks and I'm positive it has no major leaks as it had a good bit of water collected in the bottom from power washing before i dumped it and was still pretty much dry on the bottom. If there are any leaks they would be small.

Any suggestions of something I could seal it with to ensure there won't be any problems? Should I find a way to test it anyway, or could I seal the whole bottom with something on the inside and then build the deck? I'm a little leary of not testing it first, just hate to drag it back out again and put it back on the trailer. That and I'm not sure I could "legally" take it anywhere around where I live. They are pretty hardcore in my area about checking paperwork and all that. I haven't registerd the boat or the trailer or anything yet. Just have a valid title and that's about it. I could maybe get by on not having the boat registered yet but not being legal to even transport it yet could be a problem.

Any help would be greatly appreciated! More pictures of the rest of the tear down to come soon!
 

sgebbie

Cadet
Joined
Aug 27, 2011
Messages
29
Re: 14' Starcraft Falcon restore project

Most all the Tin boat guys use products like Gluvit or Coat-It to seal the inside of their hulls. 1 qt of the stuff is plenty to do the whole boat. This is great insurance since you have it all the way down to the hull, I'd recommend looking into these products.

http://www.marinetex.com/gluvit.html

http://www.tapplastics.com/shop/product.php?pid=30

Thanks for the links and the suggestions. I had heard a bit about Gluvit and was going to get some but wasn't aware that 1 qt would be enough for the whole inside. That's awesome. I think I will go that route and then build the new deck from there when I can get some good foam and board.

Here's a few more pictures from today getting it prepped for the heated garage! Well.. sort of heated lol. Shot of the boat without the top, the stubborn screw that I had a hell of a time getting out, further back shot of the dashboard showing the metal brackets holding it in there, and finally one of the boat gutted and ready to be washed.

2011-12-31_13-27-13_880.jpg2011-12-31_13-27-42_93.jpg2011-12-31_13-27-31_682.jpg2011-12-31_14-59-09_991.jpg
 

Attachments

  • 2011-12-31_15-42-56_645.jpg
    2011-12-31_15-42-56_645.jpg
    143.5 KB · Views: 3

sgebbie

Cadet
Joined
Aug 27, 2011
Messages
29
Re: 14' Starcraft Falcon restore project

Here's the rest of the pictures from yesterday. I guess I somehow squeezed another pic of the boat before washing in the above pictures.

These are a picture of the top sitting in the garage, boat all clean (even though it doesn't look clean lol), another shot of my cardboard covered garage where the boat will live until March / April :p 
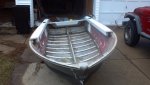
and two shots of the shoddy trailer that needs some work too.

Going to let it sit for a little while and dry out pretty good. Then it's on to getting some Gluvit for coating the inside.

2011-12-31_14-59-44_9.jpg2011-12-31_16-27-41_94.jpg2011-12-31_16-27-54_913.jpg2011-12-31_16-28-11_921.jpg2011-12-31_16-28-29_860.jpg
 

rheagler

Senior Chief Petty Officer
Joined
Jul 14, 2007
Messages
662
Re: 14' Starcraft Falcon restore project

Nice looking project there! Keep up the good work!
 

ezmobee

Supreme Mariner
Joined
Mar 26, 2007
Messages
23,767
Re: 14' Starcraft Falcon restore project

You're only hitting the rivets and seams with the Gluvit. 1 quart just did my 18' so it will be plenty for yours.
 

TruckDrivingFool

Lieutenant Commander
Joined
Jul 30, 2007
Messages
1,818
Re: 14' Starcraft Falcon restore project

Nice progress so and good lord that's a lot of work getting that dashboard out. I might have to refine my plan for mine. I'll definitely be watching to see how it goes back together.
 

sgebbie

Cadet
Joined
Aug 27, 2011
Messages
29
Re: 14' Starcraft Falcon restore project

Nice progress so and good lord that's a lot of work getting that dashboard out. I might have to refine my plan for mine. I'll definitely be watching to see how it goes back together.

The worst part are those 2 screws on each side that I have a picture of the one I had trouble with on the right side. I'm left handed so not quite as coordinated with my right hand reaching up underneath there trying to get out a super tight screw with a flathead screwdriver. When i put them back in, I may put them back in the other direction so they could come out easier if ever needed.

It was a ton of work getting that thing out, but I think it will be worth it in the end. Only part I'm not real thrilled about is the whole rub rail thing. That seems like it may end up being an extra fairly good expense I wasn't counting on and I'm not real sure how putting one of those back on is going to go. It sure was hell getting it off LOL
 
Top