16' Marvac floor/stringer repair

100333624

Petty Officer 1st Class
Joined
Apr 24, 2012
Messages
205
Hi all,

First off I want to say that this is my first post here, finally! There's lots of great people with fantastic advice on here and I'm thankful for iboats as I've got a lot of help from searching the forums!

On to my post!

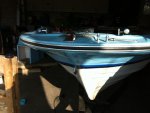
So I traded my old 12' aluminum that was fully customized for a 16' Marvac center console with a 78' mercury 800 that runs fantastic! It did just about 40mph when I took it out last week! And I got to keep my mint 69' mercury 9.8 and my bluetop optima battery also, now thats what I call a trade!!! Or is it....?

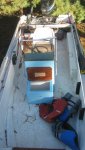
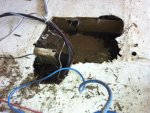
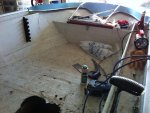
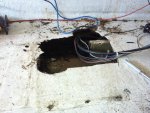
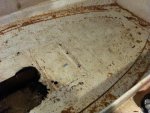
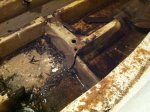
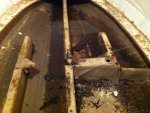
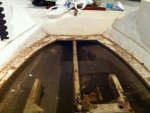
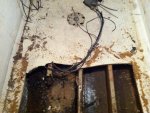
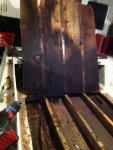
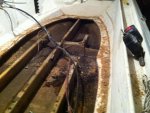
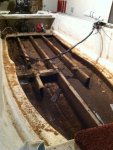
After close inspection of this boat, there was a large hole by the console that was neglected for many years... Unfortunately, it has taken in a lot of water over the years and I decided to rip the floor off in 2 pieces... So I cut about 3 or 4 inches from the edge all around and about 20 inches from the transom. So I removed about 80% of the floor and let me tell you these 2 pieces weighed in at 108 pounds soaking wet! And some water and rotted wood floating in the hull, nasty stuff...

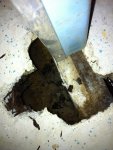
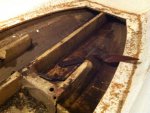
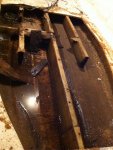
So here is the thing, I've read up on replacing stringers and floors and after reading a bunch on here and seeing some videos on YouTube, I decided that it's too much of a job for me to handle, well at least the stringers are because I've never attempted them before, the floor on the other hand I can handle..

Well after taking a closer look it doesn't really seem that hard at all to replace the stringers. My question is, can I just cut the stringers to about 1/2" from the bottom where they're joined to the hull, clean them out and just replace the rotted wood with laminated PT ply soaked in resin?? That way I can just use the same tracks again? Or do I just grind the whole thing off and do it from scratch?? There are 3 stringers and 1 or 2 bulk heads, not sure because it's all worn out and glass is cut funny.. There also isn't any foam in the hull?? I thought there was suppose to be? Don't know if this is from the factory or if the stringers have been replaced before? I'd love to post pictures but I surf from my phone and can't seem to add photos from my phone. Also, the boat is resting on a trailer with rollers and the rollers under the bow area are pushing the hull up, so I'd have to suspend the boat on blocks I take it so the hull sinks to its natural depth/shape? Any help would be appreciated as I plan to completely restore this boat, she'll make a real nice and quick fishing boat! Thanks!!!
 

GT1000000

Rear Admiral
Joined
Jul 13, 2011
Messages
4,916
Re: 16' Marvac floor/stringer repair

Welcome to the dry dock, 100333624...

You have come to the right place to get all the knowledge and support you will need to tackle this restoration.

The first thing I recommend is to post pictures, lots of them...they help us see what you see and try and give you the best possible advice...here is a link on just how to do that, plus there is a ton of other helpful information in there as well... http://forums.iboats.com/boat-resto...r/how-tos-other-great-information-288451.html
pics posting... Image hosting, free photo sharing & video sharing at Photobucket

Keep reading and asking and posting pics, the gurus will be along to help you through this...

Have fun!
GT1M
 

100333624

Petty Officer 1st Class
Joined
Apr 24, 2012
Messages
205
Re: 16' Marvac floor/stringer repair

Hey GT1M, thanks for the reply with those links, they are very helpful indeed! So I managed to get a bunch of pictures together, they were taken with my phone camera so the quality isn't the greatest so bare with me fellas... Here you go, hope it worked! By the way, I'm also debating punching a few holes into the side walls there (gunwales?) because I pulled off the compartment that was on the side and water started leaking out of the bottom screws! Great...... Oh well, maybe there is foam in there? I think I'm going to cut a few rectangular holes around 6"x10" or something, maybe 4 per side so I can clean out any nastiness...
 

Attachments

  • 001.jpg
    001.jpg
    147.7 KB · Views: 5
  • 002.jpg
    002.jpg
    133.6 KB · Views: 4
  • 003.jpg
    003.jpg
    149.2 KB · Views: 5
  • 013.jpg
    013.jpg
    140 KB · Views: 3
  • 014.jpg
    014.jpg
    144.8 KB · Views: 5

100333624

Petty Officer 1st Class
Joined
Apr 24, 2012
Messages
205
Re: 16' Marvac floor/stringer repair

more pics
 

Attachments

  • 017.jpg
    017.jpg
    146 KB · Views: 3
  • 019.jpg
    019.jpg
    146.5 KB · Views: 3
  • 021.jpg
    021.jpg
    150 KB · Views: 3
  • 022.jpg
    022.jpg
    146.3 KB · Views: 4
  • 023.jpg
    023.jpg
    146.8 KB · Views: 4

100333624

Petty Officer 1st Class
Joined
Apr 24, 2012
Messages
205
Re: 16' Marvac floor/stringer repair

and more....
 

Attachments

  • 024.jpg
    024.jpg
    145.1 KB · Views: 2
  • 026.jpg
    026.jpg
    146.7 KB · Views: 2
  • 027.jpg
    027.jpg
    147.4 KB · Views: 2
  • 028.jpg
    028.jpg
    145.1 KB · Views: 2
  • 031.jpg
    031.jpg
    148 KB · Views: 2

100333624

Petty Officer 1st Class
Joined
Apr 24, 2012
Messages
205
Re: 16' Marvac floor/stringer repair

last of the bunch...
 

Attachments

  • 033.jpg
    033.jpg
    147.7 KB · Views: 2
  • 034.jpg
    034.jpg
    144.7 KB · Views: 3
  • 035.jpg
    035.jpg
    145.5 KB · Views: 3
  • 036.jpg
    036.jpg
    145.3 KB · Views: 3

100333624

Petty Officer 1st Class
Joined
Apr 24, 2012
Messages
205
Re: 16' Marvac floor/stringer repair

that big piece you see in the last 4 pictures weighed 57 pounds itself, and that was only half of what I pulled out...
 

GT1000000

Rear Admiral
Joined
Jul 13, 2011
Messages
4,916
Re: 16' Marvac floor/stringer repair

Just think, if it did 40 mph with all that water logged wood, its gonna go like stink with some new structure all nice and dry...

More than likely there used to be wood inside those stringer shells, but has long ago turned to mulch...you can cut them down to point of leaving a shadow of a line for guidance in replacing them, but its not a good idea to leave a lip/channel because it would be near impossible to grind down to good glass inside there in order to get good adhesion with the new resin...

You will definitely be wanting to take a real close look at the transom, as it more than likely is soft or going to be...in which case you will want to address that, too.

You are basically on the right track, but don't get too far ahead of yourself...before you finish gutting the interior structure, make sure you have taken lots of measurements throughout the hull and properly support the hull to keep it from sagging or warping out of shape while you gut and rebuild...it is fairly strong now, but becomes flimsy when you start to remove structure...

You have several choices on how to support it...some guys build cradles, others use ratchet straps, or build some sort of skeleton or braces...here are a couple of the things I did to help keep mine in shape...

http://forums.iboats.com/boat-resto...ve-necessity-pride-521706-52.html#post3542062

http://forums.iboats.com/boat-resto...ve-necessity-pride-521706-25.html#post3789621

You might also want to look into the possibility of de-cap-itating the boat to make it easier to reconstruct...maybe...

Keep up the great progress...
 

100333624

Petty Officer 1st Class
Joined
Apr 24, 2012
Messages
205
Re: 16' Marvac floor/stringer repair

I see, so better to just grind them right down then. I ripped off the remainder today and man there is so much nasty crap under the floor! About another 20 pounds of water and rotted wood chips, I still got the bow to do... There must be a good 150+ pounds of weight I ripped off so far, about 100 of it I'd say is useless excess weight...

I'm gonna post up some pics later tonight.. Those brackets you built look cool but complicated hahah... I think I'm gonna set mine down on blocks as I have a 4 inch lip around the bottom... That way the hull can just hang down. It feels pretty solid at the moment, and the transom doesn't even budge! Surprisingly it looks like they glasse the transom in first, then they put the stringers in and glasses them after... Transom feels very hard and sounds good when I knock on it..

Sorry I don't understand what you mean by decapitating it? Do you mean taking the top mold off the bottom mold? I don't want to create much more work than I can handle and plus I kinda like the way it is now, I'm just gonna fix it up a bit :) and yes just imagine how fast it's gonna be when it's all done with!
 

100333624

Petty Officer 1st Class
Joined
Apr 24, 2012
Messages
205
Re: 16' Marvac floor/stringer repair

047.jpg048.jpg

The only thing really holding the floor together is the fiberglass, all the wood has completely rotted, the stringers still have some left inside but that'll be another day when I take proper measurements while they're still intact before I cut em up. So for today I got 2 buckets full of nasty boat shiz... :p enough for today.... tomorrow I gotta throw that motor on a stand I built, before I start butchering any more... GT1M can you explain what you mean by de-cap-itating the boat? Thanks again, great to be on iboats forum! :)
 

jbcurt00

Moderator
Staff member
Joined
Oct 25, 2011
Messages
25,261
Re: 16' Marvac floor/stringer repair

The upper mold you described is often referred to as the cap. GT was suggesting that for some work, it is often more work, but ultimately easier to work on some boats with the cap removed: de-cap-itated ;)

And that makes it lighter to flip the hull over & work on the hull bottom.
 

100333624

Petty Officer 1st Class
Joined
Apr 24, 2012
Messages
205
Re: 16' Marvac floor/stringer repair

jbcurt00: it doesn't seem like too bad of an idea actually... I'm gonna be pulling the rub rails off anyway so would that make it easier to split the cap from the bottom hull? My only concern is if they (the factory) glued the cap to the bottom? Because I can't see it being easily removed, just because it seems like there is no cap mold lol.. This boat seems like its just a bottom hull with everything else glassed ontop of that.. How can I be sure I could remove it because it would help since I'll be replacing the rub rails and I got a lot of scratches and scuffs to fill on the hull bottom and I'd have to flip it over to do those!
 

jbcurt00

Moderator
Staff member
Joined
Oct 25, 2011
Messages
25,261
Re: 16' Marvac floor/stringer repair

Unfortunately, it's hard to be specific, since I've never seen your boat or a Marvac of any kind, let alone gotten my hands on 1

Based on the limited info I see in your pix, your boat's shell (upper & lower mold) is constructed similar to this:
chainSawWhaler585x389.jpg


But instead of the lower hull being foam filled, your's has the more typical stringers:
attachment.php

Then the upper was lowered onto the lower & attached (in several places) to one another.

Can you see up into the vertical gunwale area? Is it foam filled like the Whaler I posted, or open/empty?

After you pull the vinyl insert in the rub rail, the aluminum channel will be fastened to the hull (screws, bolts or rivets). And in some cases, the rubrail fits over the top lip of the lower hull, and the upper 'cap' sits down in a channel on the top of the rubrail. It's not clear, but that's how the Glasspar G3's rubrail was attached:
What1.jpg


My Glastron FireFlight's rubrail was blind bolted thru the hull & the nuts were buried in fiberglass around the interior:

Starboardrubrailbolts.jpg

So to keep the bolts intact, I had to uncover the nuts, remove them, pull the rubrail off and the seperate the 2 halves of the hull. To do that I had to cut/grind the seam that is buried along & between all those rubrail nuts....

Once you pull the actual rubrail channel off the hull, there will be a fasteners holding the 2 halves together temporarily, unless it's like the G3 I posted above. Remove those temporary fasteners (screws, bolts, rivets). My FireFlite had drywall screws holding the 2 halves together, and were factory original as the rubrail had never been removed from the boat. Your hull may have some means of holding the 2 halves together beyond fasteners. May be a Marvac specific PB, fiberglass over the seam on the inside, or some sort of adhesive caulking (3M 4200/5200 is often used during the put back stage).

Once you pull the vinyl & the rubrail, it may be easier to determine how much work it will be to separate the 2 halves.

BTW: Rubrail & the vinyl insert are not inexpensive or easy to find, depending on exactly what you're looking for. So take care when removing it, and keep it somewhere safe. You may need to re-use it or send a piece to a supplier so that they can match it's profile.

Clear as Mississippi river mud now, right?

Post up some pix as you move alone & we'll see if anyone has any more helpful advice...
 

100333624

Petty Officer 1st Class
Joined
Apr 24, 2012
Messages
205
Re: 16' Marvac floor/stringer repair

Is it possible they made these boats without top and bottom molds? I mean, is it possible that it's just a bottom mold with glasses in compartments and stuff? It is a fairly light boat, and is no comparison to my brother in laws 15' Sunray with a 50hp merc that can't even be lifted a cm off the trailer with 4 people... This thing feels much lighter.. I'm gonna take a closer look between the floor hull and gunwales where I ripped the floor apart and see how it is.... Gotta pull that motor off first! I'll keep y'all posted, thanks guys!
 

jbcurt00

Moderator
Staff member
Joined
Oct 25, 2011
Messages
25,261
Re: 16' Marvac floor/stringer repair

There is very little info available online about Marvac boats. So unfortunately I can't answer how your boat was constructed, exactly.

If it's fiberglass, and it can likely be taken apart & accurate records & pix kept, it can likely be put back together.

Sometimes, it is extremely challenging to put back together, like a rebuilding a balsa cored boat w/ vacuum bagging & forming the balsa, a foamed shell like the Whaler, or a foam cored hull.
 

100333624

Petty Officer 1st Class
Joined
Apr 24, 2012
Messages
205
Re: 16' Marvac floor/stringer repair

055.jpg056.jpg057.jpg054.jpg
 

Attachments

  • 053.jpg
    053.jpg
    135.6 KB · Views: 2

100333624

Petty Officer 1st Class
Joined
Apr 24, 2012
Messages
205
Re: 16' Marvac floor/stringer repair

058.jpg
forgot to add this one...

Ok so I didn't get to pull the motor off because I need another 3 guys to lift that thing, it is HEAVY! But I did manage to cut a hole in the gunwale and guess what, if it filled with soaking wet foam! Where ever I put my finger and pressed water just poured out....

Now I think I am really screwed because the guys at Marvac used 3/8" ply and laid glass on top of that. Unfortunately all the ply is soaked too, not as bad as the floor and stringers, but still soaked quite enough! I don't wanna go through replacing all that now because I might as well make my own mold and throw it on.... or chop it in pieces and put it on the curb for the garbage man.. I am completely lost right now and my mind is going 129293521435 miles a minute!!! Any helpful tips PLEASE?!?!?
 

jbcurt00

Moderator
Staff member
Joined
Oct 25, 2011
Messages
25,261
Re: 16' Marvac floor/stringer repair

Carp,
I hate to hear that it's also wet up the gunwale too...

Right now I don't have any helpful advice, except to look for a good comfortable chair & pour yourself a stiff drink...

You might try a PM to Yacht Dr or Oops... They will be your best bet for great advice and to suggest a course of action.........


My only other suggestion would be to throw a tarp over the boat & don't give it another thought until after the holiday weekend is over. Help may be sparse over the long holiday weekend......

It doesn't seem like a good place to leave this, but just the same:

From the Admiral & I to you & yours:
thanksgiving-8-07.gif


May you have a great weekend & enjoy the company of friends & family....

John
 

100333624

Petty Officer 1st Class
Joined
Apr 24, 2012
Messages
205
Re: 16' Marvac floor/stringer repair

Thanks for the kind wishes! I celebrated thanks giving about a month ago though :) I'm Canadian... So you go and enjoy yours and stuff up on that good ol' turkey!

I'm so regretting what I traded now and what I got... Or more like what I don't have... Maybe I can just remove the foam and replace it, but I'd like to dry out all the wet wood in there too, is it possible? I'll also seal all the screw holes where water came in from to begin with so it won't have any future problems with water.. But is it possible to fully dry that wood? Any ideas on this would be greatly appreciated!

Or if I removed the cap, would I be able to replace that wood from behind the cap where I can access it if that makes any sense?? Maybe this seems like the impossible? I'd really hate to get rid of it now as I was planning to completely restore this boat but didn't realize it had problems far worse than I imagined... And I'd definitely hate to restore it and leave all that foam soaked shiz in there and the wet wood around it... Any helpful suggestions fellas? Looks like I'll have to wait till after your holiday has passed...

Happy Thankagiving to you all and God bless!!
 
Top