1953 25hp Evinrude Big Twin

JoeFromAkron

Petty Officer 2nd Class
Joined
Jul 30, 2012
Messages
144
No Title

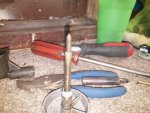
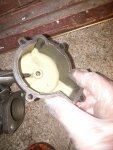
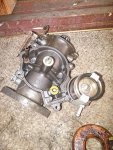
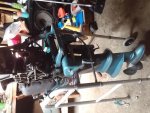
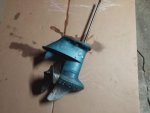
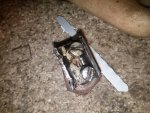
I was able to get back to the shift coupler tonight and victory is mine! I bent it out with away from the shift rod with a punch and took a small pry bar to it. It sounds easy but it was quite an operation. It's up inside the leg with no access panel.

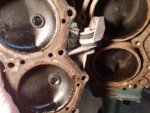
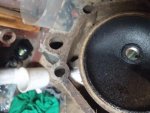
When I finally got the LU off I still couldn't get the screws out and I bent the coupler off the upper rod with channel locks. I had to put the thing in a bench vise to back the screws out. I just had to see.... I think someone put some locktite on em and the screws were bent. Maybe I bent them....The threads on the lock nut on the back of the coupler were pink! Im happy now and it looks like there is no reason I can't use a newer style one if I can't find one like this.
 

Attachments

  • photo232323.jpg
    photo232323.jpg
    43.3 KB · Views: 0
  • photo232324.jpg
    photo232324.jpg
    51.1 KB · Views: 0
  • photo232325.jpg
    photo232325.jpg
    48.8 KB · Views: 0

JoeFromAkron

Petty Officer 2nd Class
Joined
Jul 30, 2012
Messages
144
I got the new tuneup kit and spark plug wires installed yesterday. Racerone, any pointers on a good way to get the throttle control wires back on? Its giving me trouble. The manual says to remove the pulley assembly but mine does not seem to have room to come off.
 

JoeFromAkron

Petty Officer 2nd Class
Joined
Jul 30, 2012
Messages
144
I haven't had much time to work on this but I was able to track down a fuel connector. I keep trying to find a shift rod connector like the one on mine, just because, but I can't even find a picture. I'm just going to get a new one and it should work? I'll find out. I also found a tank hose connector under the rim of the fuel tank. The on I got is the old, old style upright ones. It is a pressure tank, but they had it permanently installed in the boat. Someone removed the primer from the tank and had a squeeze bulb on the fuel line that was ran straight to the carb and the air hose back to the tank. I wish I could have seen that setup.
 

JoeFromAkron

Petty Officer 2nd Class
Joined
Jul 30, 2012
Messages
144
I finally got the throttle wires hooked up last night. The Johnson manual was confusing for me and I couldn't find much info online about doing it. If anyone reads this and is wondering how to do it.... You have to loosen the pulley with two screws. One is on the outside that hold is on and the other is on the inside of the pulley. They both come loose and the pulley comes loose from the tiller shaft. The manual had me thinking is was supposed to come off but mine didn't. There is a spring connecting the two lengths of wire that I couldn't get connected. With the pulley loose I had to stretch the spring a bit to connect the two wires. I used a piece of weed trimmer line strung through the hook on the spring. I connected the spring to bottom half and stretched it just a bit to connect it to the top part.

I'm sure that's not the "correct" way to do it :D 
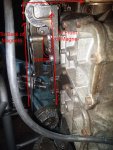
but it worked. I don't have to much more to do to it. I am going to try and find a shift rod connector tomorrow locally. I also have to put the boots on the new spark plugs and set the points. I haven't taken the carb apart yet. The gaskets are recent (not the old ones that fall apart due to ethanol fuel) so it might just need cleaned out. If not, carb kit it is! I should have her going soon.
 

JoeFromAkron

Petty Officer 2nd Class
Joined
Jul 30, 2012
Messages
144
No Title

I got into the carb last night. It was pretty bad. There was a yellow crust in the bowl and varnish chunks all over. The low speed gas tube had crap growing off it and the high speed needle was coated in crusted on black dirt/varnish. The float is in good shape surprisingly and the gaskets look recent to. I cleaned it with the spray carb cleaner but I'm going to try and find someone around here with a can of cleaner I can dip it in (or buy my own). I have to believe there is build up in the passages that I can't see. I had to scrub the yellow stuff and some of the varnish/dirt off because the cleaner wouldn't touch it.

Carb kit on the way. Also, I ordered a thread file to fix the crankshaft and a new head gasket. I figured why not? I bought a inch-pound torque wrench and used it for 5 minutes on my smaller motor. I will decarb it also with the head off, so it's getting a pretty good tune up at this point.
 

Attachments

  • photo233235.jpg
    photo233235.jpg
    82.7 KB · Views: 0
  • photo233236.jpg
    photo233236.jpg
    82.4 KB · Views: 0
  • photo233237.jpg
    photo233237.jpg
    71.9 KB · Views: 0

oldboat1

Fleet Admiral
Joined
Apr 3, 2002
Messages
9,612
good of you to keep posting as you go. Didn't quite follow the throttle connection discussion -- would like to look at a pic of what you describe, also one of the tank and fittings. I know, just entertainment on this end. On that primer bulb -- wonder if that would work with any dual hose set up, although with fuel line left attached to fuel side of connector at engine (modern bulb inserted in fuel line). Wonder if somebody found that works (bypass -- or really supplement -- a failed tank pump).

On the carb, I usually soak metal parts in lacquer thinner -- works on a badly varnished carb. That coating at the bottom of the bowl, though -- think that might be a feature. May not want to remove it. Somebody might be able to verify (kind of a rule of thumb caution among restorers about soaking carb bowls.) I've never been sure -- always seemed it was still preferable to get any trace of varnish out of there. But I haven't seen the yellow coating you show. That looks like it was intended.
 

racerone

Supreme Mariner
Joined
Dec 28, 2013
Messages
38,438
On that motor the magneto plate was rotated by a cable set up with a spring to look after wear and tear.--Elegantly simple and easy to repair.---Much simpler and cheaper than some systems found on the latest greatest new motors.
 

JoeFromAkron

Petty Officer 2nd Class
Joined
Jul 30, 2012
Messages
144
No Title

Here is a photo after I got mine back together. The gear on the bottom is turned my the tiller handle. There is also a connection for remote control that I cant really explain. It just is kinda held in by itself... Anyway there is a small steel cable with balls connected on either end attached to the gear-pulley on the bottom. These balls go in little slots on the bottom of the magneto. The cable has a spring in one side to keep tension on the cable. There are two pulleys in a bracket mounted to the crankcase that the cable goes through. I have to say I like it, once I figured out how to put it back together. Its super smooth and drag free. There is almost nothing to break. Its kinda hard to describe.

As far as the yellow stuff, it wasnt like a finish or anything and came off with light wiping withh a towel. It was kinda powdery. You can see in the picture where I smeared it a bit with my finger. In any event, it's gone now
 

Attachments

  • photo233243.jpg
    photo233243.jpg
    79.3 KB · Views: 0

oldboat1

Fleet Admiral
Joined
Apr 3, 2002
Messages
9,612
Thanks, Joe. You're right -- hard to describe (pic helpful). Does seem elegant, I think, like Racerone says. Maybe more straightforward than the system of gears/ tower/ lever that replaced it.
 

HighTrim

Supreme Mariner
Joined
Jun 21, 2007
Messages
10,486
I do ALOT of carbs, so for health reasons, I have switched to soaking mine in Pine Sol. Works great./
 

oldboat1

Fleet Admiral
Joined
Apr 3, 2002
Messages
9,612
yeah, smells good and doesn't take off fingerprints while you are wearing them. But change is hard....
 

JoeFromAkron

Petty Officer 2nd Class
Joined
Jul 30, 2012
Messages
144
yeah, smells good and doesn't take off fingerprints while you are wearing them. But change is hard....

That really works? I never heard it and kinda thought it was a joke. I'd rather not have the dip stuff around due to my 2 YO kid if possible so thanks for that tip
 

oldboat1

Fleet Admiral
Joined
Apr 3, 2002
Messages
9,612
really works. But not as aggressive in getting at parts that are really varnished up, IMO. It's water clean up, blowing with compressed air. High Trim has the technique perfected, so may have more to add (or correct). In terms of danger to kids or pets (or the user), harsh solvents obviously a problem. But on the other hand, sweet smelling but still toxic stuff is in some ways more dangerous (attractive hazard). Antifreeze is a prime example, if you have dogs. I might do two or three carbs a year, and in a detached shop/work area. If doing a lot of cleaning, might be different -- particularly if around the house (basement workshop, or similar). Find spray painting scarier, thinners and hardeners, etc -- all airborne (but do that too, isolated with protections).
 

HighTrim

Supreme Mariner
Joined
Jun 21, 2007
Messages
10,486
No not a joke. Buy the name brand Pine Sol. Some guys dilute it, but I use it straight up! I have a plastic type tote I fill, then dunk the carbs and associated parts overnight. Wash off in the laundry tub with hot water, then I blow dry/out with my compressed air.

As I said, I do ALOT of carbs, and do this on all of them. My wife likes the smell better than the bucket of carb cleaner I used to use!
 

JoeFromAkron

Petty Officer 2nd Class
Joined
Jul 30, 2012
Messages
144
That's awesome to know. Other than the kid I also have two dogs and a pig. The pig will get into everything. He once ate a box of powdered miracle grow and likes to lick up any oil residue on my smaller motor. Because he seeks out nasty stuff and is really smart I try to keep corrosive chemicals to a minimum. I'm going to give this a try. Thanks a ton for telling me this.
 

JoeFromAkron

Petty Officer 2nd Class
Joined
Jul 30, 2012
Messages
144
No Title

Got the thread file to fix the crankshaft threads. I have never used one of these before but it seems pretty easy. I also got a gauge to measure the thread size. It's 20 threads per inch I think but someone correct me if I'm wrong.
The file basically rides in the threads and is sized to the TPI count. Its going to take a while but seems safe.
 

Attachments

  • photo233349.jpg
    photo233349.jpg
    42 KB · Views: 0

JoeFromAkron

Petty Officer 2nd Class
Joined
Jul 30, 2012
Messages
144
No Title

I got the LU connected back tonight. I know it's normally a trivial task but not for this one considering I had to replace it with a newer style one and have no access panel and about 1/2 inch of space. The old one you just loosen the screw not take it all the way out. I actually had to duct tape the screw to a screwdriver and lay the motor face down. Then I bent the coupler open a wee bit wider on the bottom. I balanced the LU on my legs so I could get the screw in.... I'm pretty happy with myself and I wish I had someway of documenting this on video.

I also took the head off because I got a new head gasket. I'm glad I did because its pretty carbed up and the gasket was shot. There was a little spider nest in the head also. At least the cylinder walls are in good shape.
 

Attachments

  • photo233589.jpg
    photo233589.jpg
    68.5 KB · Views: 0
  • photo233590.jpg
    photo233590.jpg
    44.8 KB · Views: 0
  • photo233591.jpg
    photo233591.jpg
    58.4 KB · Views: 0

oldboat1

Fleet Admiral
Joined
Apr 3, 2002
Messages
9,612
have a Chrysler that presents the same problem with the shift rod link -- have done the duct tape thing too. Also find a little stemmed magnet can work, to get the screw or bolt started if it's steel**. Think I would use some carb cleaner spray on that carbon build up when resurfacing the head. (Keep the pig away -- great post!) :)

**and for finding small screws and washers dropped under the bench or in the sawdust.
 
Last edited:

JoeFromAkron

Petty Officer 2nd Class
Joined
Jul 30, 2012
Messages
144
So I was just messing around tonight and tried to set the points. I may be wrong, but are you supposed to have the flywheel on it to be able to set the points? The cam rides up the crankshaft when I turn it by turning the prop. The manual only describes setting them through the flywheel so that's why I think this.

Also I am missing the wave washer that should be under the armature plate. How big of an issue is that?
 
Top