1963 Evinrude Sportwin 10hp Ignition coil replacement

Chadbud

Petty Officer 3rd Class
Joined
Aug 13, 2016
Messages
80
Hey there guys!

So I had another thread going about this motor.. trying to diagnose why it was suddenly losing power and sometimes stalling altogether. With the wonderful help of the community here at iboats we narrowed the problem down to the ignition coils. But I wanted to start a fresh thread since this is now only about replacing these coils.

I started the process of replacing them today (first time doing this kind of job). I removed the pull starter/bracket thing that was above the flywheel/ignition plate. Here's a link to a few pictures of before removing it and then after:

https://imgur.com/gallery/OpfZT

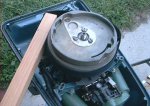
I then removed the thin oblong/gourd shaped plate you see on top. It was attached my 3 screws in each corner around the center and one on the end. Once that little plate is off, there's a small viewing hole where I can see inside. I slowly turned the ignition plate and I could inspect the coils a little. They are totally cracked, but the rest of the system looks clean and new. I'll try uploading a video of this and adding a link at the bottom.

Now I'm at the point to remove the large nut in the top center. However, I'm having a hard time getting it off since the whole ignition plate moves when I try to turn. Obviously, a strap wrench would be perfect here.. however I do not own one, is there any other way to get it off? Or do I just gotta bite the bullet and buy one?

Also, I've been told I'll need a harmonic balance puller to remove the ignition plate after I get the large nut in the center off. Is this true or can I manage without one? If I need it, think I can rent it at a local autozone.

So that's where I'm at guys! I appreciate any help answering the questions I posed.. or any advice on doing this job in general! I have a few tutorial videos I plan to follow once I get in there and start removing the coils. THANK YOU!


Video viewing coils through that little peep hole: https://youtu.be/xOPN8p-oM6U
 

Canoe2

Petty Officer 2nd Class
Joined
Jul 22, 2012
Messages
136
If you don't have a strap wrench put a socket on the nut then hit it with a rubber mallet. The weight of the flywheel wants to hold it back so it should loosen off that nut for you after a few whacks
 

flyingscott

Fleet Admiral
Joined
Apr 8, 2014
Messages
8,171
Electric or hand impact gun is the easiest way to get the nut off of the flywheel. DO NOT put the nut back on with the impact gun. You HAVE to use the puller with 3 bolts to get the flywheel off. DO NOT USE the puller with the 3 arms to pull it.
 

oldboat1

Fleet Admiral
Joined
Apr 3, 2002
Messages
9,612
+++on using an impact wrench to remove the flywheel bolt. Sometimes saves some grief and skinned knuckles.

I usually replace points, condensers and wires if doing coils, but may not need to. If using the existing points, clean and regap them. If you replace both points and coils, it's a good idea to do one side at a time so you can check assembly.

(BTW, flywheel is always turned clockwise.) Good motors.
 

F_R

Supreme Mariner
Joined
Jul 7, 2006
Messages
28,226
No Title

You can make your own strap wrench for little or no $$. A piece of nylon strap and a piece of wood and a few nails, and you have a strap wrench that will work as well or better than any you can buy.

You must use the proper puller with 3 bolts. Yes, a harmonic balancer puller will suffice. You also must use a torque wrench to tighten the nut to 40-45 foot pounds when you put the flywheel back on. Think you can do without it?? OK, but you probably will be back asking what to do about a sheared key and destroyed flywheel and crankshaft. You can rent/borrow a torque wrench.
 

Attachments

  • photo6038.jpg
    photo6038.jpg
    58.4 KB · Views: 6
  • photo6039.jpg
    photo6039.jpg
    75.9 KB · Views: 5

Chadbud

Petty Officer 3rd Class
Joined
Aug 13, 2016
Messages
80
Okay guys so I've gotten the bolt off in the center. I used an manual impact driver and it did the job nicely!

Here's the new issue I've run into. I rented a harmonic balance puller at autozone. However, the three bolts it uses are not small enough to screw into the 3 holes on my flywheel.

I'm thinking maybe buy 3 bolts at Home Depot and try it? They need to be pretty long too. What do you guys think?
 

tomhath

Master Chief Petty Officer
Joined
Dec 5, 2007
Messages
814
I'm thinking maybe buy 3 bolts at Home Depot and try it? They need to be pretty long too. What do you guys think?

Yup. Get some heavy washers too. You probably won't be able to just pull the flywheel off by tightening the bolts though. I always just snug them down until you see the flywheel lift up about 1/64" then give the main screw on the puller a couple of good whacks with a heavy hammer. The shock releases the taper lock holding the flywheel on.
 

F_R

Supreme Mariner
Joined
Jul 7, 2006
Messages
28,226
The cheapo bolts in the bins at HD are not strong enough and probably will break. But they also have Grade 5 and/or Grade 8 bolts if you look in the right place. Those are the high strength bolts, 8 being stronger than 5.
 

gm280

Supreme Mariner
Joined
Jun 26, 2011
Messages
14,605
All great advice offer thus far. Just DON'T thread in the bolts too far and damage things underneath the flywheel.

I will say your engine looks amazingly clean and nice. And the little inspection hole is a good idea as well. I think you will be able to accomplish this without any problems. JMHO
 

oldboat1

Fleet Admiral
Joined
Apr 3, 2002
Messages
9,612
useful to disassemble/reassemble one side at at time, just to make sure reassembly is right.
 

Chadbud

Petty Officer 3rd Class
Joined
Aug 13, 2016
Messages
80
Alright guys! Good call on all the advice, can't tell you how much it helped.

I got 3 grade 8 zinc bolts and washers from Home Depot and they did the job (they did start to bend slightly though). Man that friggin' flywheel was on there TIGHT. Took multiple hammer swings to the wrench and even some impact wrench smacks before it finally popped loose.

So I got in there and man oh man were the coils a mess! Here you can see some of the photos I took while going through the job:

Pictures: https://imgur.com/gallery/7xNh7


So here's my issue now. I successfully replaced everything (coils/points/condensers) on both sides. However, I have not yet set the points to .020.

From what I've seen and read.. I just need to go get a .020 gap shim (maybe autozone or HD). Then turn the whole flywheel until the points open and then try sliding the shim in between the points. Then adjust so there's only a little bit of resistance when using shim, right?

I think I can handle that part.. but here's where I'm a little nervous: What about setting the timing? I heard someone say that once you set your points you might have to set your timing too? This involves a voltometer and then turning flywheel? Is this necessary? How would I set up a voltometer if I have the flywheel put back on?

Also, is the throttle linkage supposed to turn/move when I try turning the flywheel? I threw it back on before adjusting gap just to make sure my points move when you turn the flywheel and I'm met with a preyyy hefty amount of pressure and can see the throttle linkage moving. Probably dumb question haha.
Thanks guys!!
 

racerone

Supreme Mariner
Joined
Dec 28, 2013
Messages
38,654
The coils must be adjusted properly !-------You can not just tighten the screws.----Rotate crankshaft till points are fully open and the gap should then be set at 0.020"---When you get it running you can verify timing with a light pointed at the 2 vertical marks on the magplate.
 

lindy46

Captain
Joined
Nov 27, 2008
Messages
3,886
If the throtlle moves when you turn the flywheel, the coils are mounted too far out and are rubbing the flywheel. Adjust coils so the laminations are flush with the mounting bosses. You can see one of the mounting bosses right by the number "2" on your mag plate. If the coil is mounted properly, you should be able to run a thumbnail vertically across the coil/mounting boss without the nail catching. Make sure all 4 mounting points are that way. Set the points to .020" when the rubbing block of the point-set is even with the flywheel key. You are very close in the last pic for setting the points attached to the black coil - just back-up a hair. Adjust the gap with the eccentric screw, which is under the condenser wire on the black coil - you'll have to reposition the wire so you can get to the screw. When both sets of points are adjusted, make sure the mounting screws are tightened down. Then CLEAN the point contacts with a business card strip soaked in acetone. New points have a film on them which must be cleaned off. Another note: tuck the green wire for the green coil away from the shaft and cam - you don't want to short out that wire by the spinning shaft. The only timing adjustment needed is the timing of the mag plate to the carburetor. That can be done after you have the flywheel back on. As you advance the throttle, when the cam follower roller hits the mark on the cam, the carb butterfly should just start to open. The cam can be adjusted by loosening the two screws which hold the cam in place (underneath). A little tricky, but once once adjusted, tighten the cam screws and you're done.
 

Chadbud

Petty Officer 3rd Class
Joined
Aug 13, 2016
Messages
80
Excellent advice guys! Especially you Lindy46, you explained it very well! My coils were definitely hitting the flywheel. After moving them in a bit, the flywheel now spins nicely. I think I just set the points to .020 successfully too!

Here's my current issue: adjusting the mag plate/throttle roller...

Not sure when it happened but the roller isn't moving very much and feels kinda stiff. It's sitting near the line and is not moving very much forward or backward when I twist the throttle. Like it moves no more than 3/4 of an inch when fully twisted. Shouldn't the roller start at the thinnest part of the cam when there is 0 throttle? Also, when you say carb butterfly, do you mean the little linkage attached to the roller? Here's a short video of what happens when I turn the throttle:

https://youtu.be/t6eARBF5fWo

Also, I watched the videos where guys tune the timing by lining up the notches on the mag plate with the notch/line on the flywheel.. however, my mag plate has 1 line on the left and 2 on the right (you can see in the picture). There are NO lines/marks/notches on my flywheel though.. maybe it got rubbed off?? Or perhaps like lindy42 said, the only timing I have to do is the roller cam to the carb?

Picture of mag plate line/notches: https://imgur.com/gallery/2MC1d

Working on this as we speak so hopefully you guys are online today! Not gonna do anything till I get some advice. Thanks again guys.. I couldn't do this without ya!
 

gm280

Supreme Mariner
Joined
Jun 26, 2011
Messages
14,605
What gear is it in, forward, neutral, or reverse? I ask because if it is in neutral, the throttle will only move so far. If you put it in forward, then if should move a lot further. But I am not sure with reverse. I think is has a shortened range as well. JMHO
 

lindy46

Captain
Joined
Nov 27, 2008
Messages
3,886
Looks like it's close, but hard to tell from the video. Start with the throttle all the way down to the "stop" position, then SLOWLY open the throttle. When the roller hits the mark on the cam, the linkage to the carb should just start to move which opens the butterfly in the back of the carb. Watch for movement of the horizontal rod going into the carb. The butterfly is connected to that rod. Adjust as previously described to make it so. When the throttle is fully advanced, the butterfly should be wide open. Disregard the 2 lines on the mag plate - they have nothing to do with timing the magneto to the carb. They are for fine tuning the opening and closing of the points with an ohm-meter, which is probably not necessary if you set the points correctly with a feeler gauge. I seldom use an ohm-meter, and rely on the feeler gauge with good results. If the motor fails to idle well, you can fine tune at that point.
 
Last edited:

racerone

Supreme Mariner
Joined
Dec 28, 2013
Messages
38,654
The notches / timing marks are on your flywheel look carefully for them.-----And you use the 2 raised vertical lines for the timing of the points on this motor.
 

Chadbud

Petty Officer 3rd Class
Joined
Aug 13, 2016
Messages
80
lindy46 Okay that makes sense. Are the two bolts underneath the roller cam the ones I need to loosen to adjust its position? It looks like they just hold it to the mag plate so I'm wondering how I can adjust its position anyway. Also, should I be doing all this while it is in forward Drive? Because in the video I have it in neutral. I can try taking another video too if you need a better angle! This dang throttle has always bothered me with how stiff it is haha.. makes me think something's off but it probably isn't.

racerone Like lindy said, I'll try getting away without using them for now.. but I'm still positive there's not a timing mark on the flywheel, I've looked very very carefully. I'm thinking maybe it got worn down? I think I might take a video of it and see if you can spot it.

Thanks again guys! Can't wait to have this finally done.
 
Top