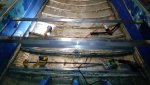
So where'd I leave off? Been putting some hours in since last post. Anyway, in the spirit of not taking any shortcuts, I peeled back that aluminum strip that ran the length of the bottom at the center of the ribs.

Sure enough, there were rivets under there that didn't get sealed. I cleaned the area under that strip & wire wheeled every rivet and seam to shiny aluminum. I've been mixing up my Gluvit as needed from the quart I bought, and had enough to put a HEAVY coat on those and a 2nd thinner coat on all the others previously coated. I should be good to go below the waterline.

Then I got the back structure of my back casting deck finished with the 1/8" aluminum angle.
 BIG DECISION
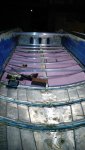
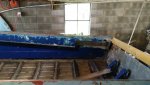
 I have been contemplating all along. Finally just went for it. Cut my gunnel caps down to about 2" at their most narrow. Measured from the inside (towards the inside of the hull) of each gunnel cap, struck a chalk line, and ripped away with a circular saw.
DEFINITELY wear eye protection when doing this! I was wearing the old school full goggles like we wore in Middle School woodshop, and I coulda/shoulda had a full face shield. Felt like getting hit with bird shot. You know, these frickin' Millenials 'round here didn't have wood or metal shop, or sewing class, or home economics in school - I know - I've raised one. They can't do anything for themselves. I told my boy he better make A LOT of money, 'cause he's gonna have to pay someone to do everything for him. But I digress, I calculated I picked up 5 to 6 sq. ft. of space just in the cockpit area. Definitely worth it on a boat this size where space is at a premium. Before & After:


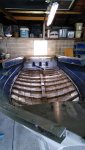
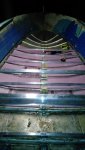
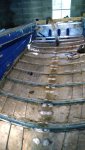
On to the main cockpit flooring supports. I picked up some 1" aluminum square tubing, cut to length and I used stainless 1 1/2" self tappers to secure on each end into the top of the ribs. Then I cut, fit, and spot glued my 1" foam between each rib, leaving a channel for water to find it's way to the bilge. The brick is holding down an uncooperative piece of foam 'til the adhesive sets. Had to do that to a few pieces.


I knew I'd have to support the floor supports at least in the center. So I took the pieces of gunnel cap I had sawed off and cut 2" strips to make L brackets. I thought that would be enough, but when I tested it, you can see the result - bent supporting my body weight:

So I measured and cut a piece of the 1" square tube for each floor support, fit it snugly between the support and rib, then riveted it securely through the brackets I made. Strong like bull now. Once I get the plywood installed, it should make it even more solid and distribute the loads evenly across all the supports.

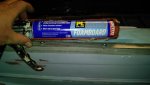
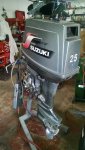
Finally, I got the transom blank cut and fitted. It took a few adjustments, but she fits like a glove! The 25 HP Suzuki motor I got IS a short shaft like the one it replaced. I wanted to keep the transom as tall as possible for as far as possible, so I measured the engine mounting bracket and the swing area of the steering arm connector, then cut my transom notch to that dimension. then got my first coat of 2 part Epoxy on it. I shot 4 screws into the top of my saw horses to support the wet side of the transom so I could flip it and do both sides. For the edges of the plywood, I mixed in some Cabosil into the Epoxy 'til it was a Vaseline consistency. That filled in any small voids and kept it from simply dripping off. I'll get my 2nd coat on one night this week.


I'm beat, my right hand is constantly numb, my feet hurt, and I groan every time I get up from my chair. But I keep going back. Promised the boy. One bright spot: the boating weather has sucked for the most part here in NE Ohio. Transom installed permanently, wiring, and plumbing next before floor boards go in. Oh....and I gotta get the front casting deck structure built.