I figure yinz all have been calling police stations, jails, hospitals, and checking milk cartons trying to figuring out what happened to me. Well.......I've been working on it. It is taking a LOT longer than I thought it would. But, I have cut down the hours per day I work........If I work too long, I'm worthless at work the next day or two, and with this heat we've had, you start making mistakes, having to do it over, and ruining material if you don't hang up the tools when you "hit the wall". Any way, here's my progress - slow and steady progress be it may.......
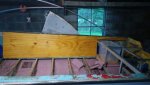
I finished the rear deck framing. I had to do that before starting the cockpit floor. The larger top opening on right is for 6 Gallon fuel tank, the left back corner opening is for battery, the front left opening is for storage, and the center face opening will hold Plano boxes that you can slide out individually:

For the front left storage opening, you can see I found a plastic storage container that fit just about perfect to slip in the opening. It is a standard size container, so if need be, I can replace it if it cracks or breaks. You can see the plywood floor underneath it I put foam underneath the plwood:

The battery and fuel compartment plywood floors got 1/2" neoprene pads glued on top of floor. And of course foam underneath:


Next I got my 1/2" 5 ply ACX cockpit floors cut. The width is like 52", and it is 6' long. So I had to do it in 2 pieces as plywood is only 4' X 8'. Underneath where my cockpit seats will go, I glued a 3/4" piece of ACX plywood the full width of floor that fits snuggly between the floor joists to support my seat mounts.

I also got my 3/4" ACX bow piece cut:

After dry fitting floors, I cut and assembled my plywood gunnel supports and side panels. The sides are 1/4" ACX, and the gunnel supports that will fit underneath the aluminum existing gunnel tops are 1/2" ACX. It took quite a bit of fitting, trimming, sanding, refitting, etc., but they fit PERFECT - NO gaps between the bottom of side panels and floor, and they sit flush and tight underneath the aluminum gunnel tops:

Of course EVERY piece of plywood got 2 coats of 2 part epoxy, paying extra attention to the edges:

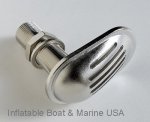
Next I ran my plumbing for the live well that will be under the front casting deck. And I used the GOOD hose. I also bit the bullet and drilled the hole through the bottom of the boat for my water pickup using 3M 5200 of course. Oh, one more thing......Remember I put center supports underneath my 1" aluminum square tube floor "joists"? After much consternation, I added 2 more supports to each "joist" midway between center and sides as seen in picture. It's REALLY solid now. Also, you'll see I fabricated some L bracket out of leftover gunnel I trimmed and ran it along the sides with rivets for more stability. My floor is rock solid :


Next I put the Nautolex Sharkskin on my flooring. I used 3M 90 spray adhesive. After reading some posts about bubbles and other difficulties, I was a bit nervous with this. I used to be a professional wall paper hanger back in the day, so I thought the skills would transfer. I laid the plywood and Nautolex side by side, sprayed 2 coats of 3M 90 on both, and with the 90 degree temps it was ready immediately. I picked up the plywood, lined it up on the Nautolex, and did a controlled flop down onto the Nautolex. Turned it over, smoothed it from the center out, then used a plastic spreader for epoxy to scrape it flat (I went to a piece of wood later, 'cause the friction from the Nautolex actually melted and deformed the scraper). Flipped it over again, cut and trimmed my corners, and stainless steel stapled the hell out of the bottom side edges.
NOT ONE BUBBLE!!:


Then foamed my floor and dry fitted flooring again. IT IS ROCK SOLID. I picked up a pvc divider trim to go in the seam between the 2 pieces of plywood flooring. There's a lot of foam. I was gonna have some in floor storage originally, but after measuring, by the time I framed it out I would only have barely 2" of space to work with underneath and not much width when you factor in seat positions. But I got A LOT of foam. You can see I took a pool noodle, cut it in sections, slit it, and wiggled it over my live well hose to protect it from rubbing against my floor supports. It also suspends it off the bottom of the boat:


That's about it for now. I do have my back casting deck flooring and hatches cut, fit, and sealed. That's next on my list. Stay tuned, and sorry for the lapse in posting.


.jpg")