1963 Starcraft Jet restoration

Watermann

Starmada Splash of the Year 2014
Joined
Jan 12, 2013
Messages
13,822
I had some room along the starboard side of my SS between the side panel and the hatch insert so I put in 3 holes to put rods through and the butts go in a regular holder on the outside below the helm chair. I can put my ultra light in one piece but my 7' rods have to be 2 piece and broken down to fit.Maybe you could find some place to add something like that?

y4mihqj0ECa4_3Ud8NxTMckXk-_5sS9DE61KLxPYnbc3SWVIZpwb92DnPu-l40fCAClMP-a_FA4QHrPCWPJqRv072Coa5nS7DR5pbnGGNLLx51X86Yu8v0Drljv6qXrDF59Xd7kaTIO3HVpMjJn7C5vIZpycqDK_loL38tkevj5hPD9KfGffRvkCVBXqBtNK-EOqsxlB6qrd0ccAD6HGr_S8A
 

Coach Dave

Petty Officer 2nd Class
Joined
Apr 3, 2014
Messages
117
I keep looking at it and pondering what to do. That might work. I should have enough width in my fuel tank compartment to add those vertically stacked along the port side and still be able to yank out my tank. My rear casting deck is 14" tall. I know that's a tall step, but I will be taking a cooler with me, and I plan on using that as a step if needed. Might be able to fit 5 - 7 rod tubes vertically. I like the idea of the tips going in the tubes for protection. The aft deck is also 24" deep, so I'd only need 5' in cockpit area to hold my 7 footers. Interesting. I plan on having 4 trolling rods with line counter reels (already bought), 4 heavy duty catfish rods, and 4 Crappie/jigging/bass multi purpose rods. We're only allowed 2 poles/person here in Ohio. I plan on having rocket launchers on the side of my steering console that should hold at least 4 rods while underway. I can just lay those on floor when parked.
 
Last edited:

Coach Dave

Petty Officer 2nd Class
Joined
Apr 3, 2014
Messages
117
I'd like to introduce my restoration buddy. He comes by, follows me around, and keeps me company. Oh....and he poops enough for both of us.... IMG_20170730_104058_zpsqlbwvzga.jpgI'd never seen a black swan before, thought it was just a movie.

Anyway, I got my rear casting deck covered with Nautolex. Thought I'd show you my method - It's kinda like covering a switch plate with wallpaper when I did that for a living, just on a much larger scale.

Tools of the trade:
IMG_20170729_205655_zpsypb6ts6a.jpg The hammer is to finish driving staples that didn't sink all the way in. 3M 90 spray adhesive, large razor knife, electric staple gun, 1/2" stainless staples, and a plastic scraper to smooth everything out.

First, I lay the plywood and piece of Nautolex beside each other and spray 2 coats of 3M 90 on each, 1 coat horizontally, & 1 coat vertically. I coated all my plywood with 2 coats of 2 part epoxy resin. So I discovered that it helps greatly with adhesion if you rough up the faces, edges, and a strip around the perimeter on the backside where you'll fold over your Nautolex. I used 120 grit on a sanding pad & just sanded it really quick. Then wait for it to tack up.

Then I flop the plywood over gently on the flat piece of Nautolex. Flip it over right side up and smooth from the center out with the plastic scraper.
IMG_20170729_203327_zpstcktmsfi.jpg

First cuts at corners - I didn't cut right at the corner, but maybe a 1/16 - 1/8" up each side. Then made angled cuts on side flaps away from corner. Like this:
IMG_20170729_203621_zpsvbxaskuf.jpg

Then I folded the corner triangles up over corner, being careful to cover the corner of the plywood. Then stretch tight (don't rip it!) and staple.
IMG_20170729_204303_zpssd5e53nd.jpg You can see I first sprayed the 3M 90 along edges to be glued.

Then the side flaps got folded over and stapled. I started at a corner, pulled tight and stapled, and worked my way to the other corner.
IMG_20170729_204853_zpsj1blljl2.jpg I actually used the head of the hammer to smooth the edges down after driving staples flush.

And this is my corners:

IMG_20170729_205317%201_zpsdlu04jec.jpg

Here's the dry fit of my rear casting deck:
IMG_20170730_111431_zps4ubzf9e3.jpg The large hatch on left is for 6 gal fuel tank, rear hatch on right is battery compartment, and front hatch on right is storage. Entire center section is fixed. Underneath that on the face will be slide out Plano box storage rack.
One issue I did have, and I was thinking about this as I was building it, was that after covering everything with Nautolex, the whole assembly was too wide. So, I took the 2 strips against the freeboards, and unwrapped the outer edges to expose the plywood. I taped off all areas that had adhesive on them so sawdust wouldn't get stuck on them, measured carefully, and ripped 1/4" off each piece on my table saw. Un-taped, re-wrapped, and everything fits perfect now.

IMG_20170730_110007_zps8j63tpsr.jpg You can see the fresh cut along the edge. The counter sinks are for the rivet heads on my framing. Yes, I did seal the edges before re-wrapping.

I also fabricated a bilge pump bracket out of some scrap gunnel aluminum I cut off. the PO had screwed his bilge pump through the bottom of the boat :facepalm:
IMG_20170730_113216_zpswojbmubo.jpg Yes, I'm gonna paint my transom braces. I shoulda stripped them way back when.:doh:

The rest of the day was spent doing some badly needed clean up and organizing. I also drilled out and filled with JB Waterweld several/many unnecessary rivets that previous POs had installed. It'll make for a much nicer exterior paint job getting rid of those drip collectors. They were all above waterline, as my bottom is DONE.

I gotta question - maybe this is the wrong forum, but.......I have 3 cut wires coming from my Suzuki control box. My motor is a 2000 Suzuki DT25C - 2000 model 25 HP 2 stroke with oil injection. The yellow one I'm presuming (more like hoping) is for the tachometer. What could the other 2 be for?


IMG_20170730_183306_zpsmzffbvke.jpg You can see the yellow wire in the center with the butt connector on it. There's a black one, and a taupe colored one PO spliced a purple wire onto.

I think I figured this out. Yellow goes to tach, black is a ground, and taupe is key on power to wire up things I only want available with the key on - am I correct?


I'm seeing the light at the end of the tunnel!
 

Attachments

  • IMG_20170729_204303_zpssd5e53nd.jpg
    IMG_20170729_204303_zpssd5e53nd.jpg
    119.2 KB · Views: 2
  • IMG_20170729_204303_zpssd5e53nd.jpg
    IMG_20170729_204303_zpssd5e53nd.jpg
    119.2 KB · Views: 3
Last edited:

Coach Dave

Petty Officer 2nd Class
Joined
Apr 3, 2014
Messages
117
I found this Engine Wire Color Code Chart online. Looks like a reliable source also. It appears my yellow wire is for tach, grey/taupe/beige is 12V switch power, and black is ground. Maybe someone else will find this chart helpful.
outboard_wiring_diagram_zpsec6hrhx2.jpg
 

Attachments

  • outboard_wiring_diagram_zpsec6hrhx2.jpg
    outboard_wiring_diagram_zpsec6hrhx2.jpg
    111.3 KB · Views: 1

Watermann

Starmada Splash of the Year 2014
Joined
Jan 12, 2013
Messages
13,822
Lookin good Dave, I made a video on my vinyl corners method.


Coach Dave

Petty Officer 2nd Class
Joined
Apr 3, 2014
Messages
117
Thanks WM - Hey - that works too! Always more than one way to skin a cat. How do you finish the underside of your hatches? Or do you just leave them be? I've been pondering my options.
 

Watermann

Starmada Splash of the Year 2014
Joined
Jan 12, 2013
Messages
13,822
I have the Tempress hatches. If I were to make my own, I think I would use AL channel to trim them rather than wrapping and I would probably paint the underside a matching color.
 

TruckDrivingFool

Lieutenant Commander
Joined
Jul 30, 2007
Messages
1,818
Finally had time to read through the entire thread and while these are great little boats but they are just that, a little boat. Hopefully I can comment on this

Dave said:
I don't need to go 50 MPH+ on these lakes to hit any fishing spot. I just wanna get on plane quick, up to speed quick, and no listing with me driving on the starboard side.

and give you an idea of what to expect performance wise.

For reference I'm 240 - With just me in the boat it lists to my side, not as bad once on plane obviously and not enough to make me concerned. I do find myself telling people to switch seats to flatten her out when I have more than the Mrs. and I in the boat. It's the nature of the beast but it's easy to deal with. The only place it really annoys me is putting it on the trailer but I've learned to operate from the middle when I drive it on to keep it too a minimum.

From remembering how my first ride in mine went with a dead cylinder, I think left factory with just you and your son the 25 may push you onto plane but will take some time doing it. With the additional weight of decks and the side panels I fear it's not going to do the job. Not to say that propping the motor might make it happen but will kill your top speed.

For more perspective on this let me say that the (usable) boat I had before the Jet was a 15' Spectrum (essentially a BassTracker) that was 15hp max. That wasn't enough to push it up onto plane but since many of the lakes I fished at the time are "no wake" it didn't bother me. I could pick my put in spot by where I wanted to fish and enjoy the day fishing as I did really like the fishability and features of the boat.

FWIW - with my 50 my top speed is about 30 +/-2 either way depending on the prop I'm using. LakeLover's Jet is the same year as yours (I believe), has a newer 50, and if I remember right tops out at about 35.
 

Coach Dave

Petty Officer 2nd Class
Joined
Apr 3, 2014
Messages
117
Thanks for the personal experience info TDF. Yeah, I'm more than curious how the 25 HP Suzuki will push her. I'm about 225 lbs, and my 11 yr old boy's about 120 lbs and growing fast - he's gonna be a big boy. Honestly I was looking for a deal on a 35 - 50 HP - The Jet is rated up to 50 HP as I'm sure you know - But I couldn't pass up the deal on this 25 HP. I basically traded up 26 model years and 10 HP from the '79 15 HP Johnson that came with her for $150. The 25 HP may end up just being a good "starter" motor for me, and maybe it will perform adequately for how I'm gonna use my boat. But I'm certainly in better shape to trade up to a larger motor if it ends up being a dog. Having said all that, losing 25 - 30 lbs would help also :lol:

The listing issue is one that I have been thinking about all along, especially when I'm by myself on boat. Does any one think that a set of automatic trim tabs would help with the listing that TDF describes? They get great customer reviews on every site I see them.
trimtab_zpsvulnrorh.jpg
 

Coach Dave

Petty Officer 2nd Class
Joined
Apr 3, 2014
Messages
117
I did get out to the Jet this weekend. It's funny, It seems like I go out with a plan to get one thing done, then realize I better do something else before I do what was planned. Yesterday, I wanted to get the rear deck installed, then realized once I got there, that I better get all my plumbing done underneath said deck - the sea **** and livewell hose all hooked up and bilge pump installed and plumbed. The "U" shaped cut-out at the back of the rear casting deck for my controls and steering cables to pass through will leave enough room to reach in and maintain my bilge pump, turn my sea **** on and off, and otherwise service my bilge area. But installation would be a major pain:
IMG_20170730_111431_zps4ubzf9e3.jpg

I also figured I better get the transom cap installed. The transom cap I took off was a bit mangled and a different shape than my new transom.. The old transom curved down from almost each corner to achieve the 16" height:
63jetjohnson_zpsjqyfyyis.jpg

My new transom has straight 45 degree angles further from the corner to achieve the 16" height:
IMG_20170521_193331_zpskfmmb0vr.jpg

I wanted to keep the new transom as high as possible for as far as possible to keep water out since I removed the splashwell. After cleaning and removing paint and carefully bending and pounding into it's new shape, the old transom cap was clamped on and ready to be attached:
IMG_20170806_125756%201_zpsp7ar53fx.jpg

Dry fitting the aluminum corner caps found that they needed some trimming also:
IMG_20170806_124531_zpsvxayo42c.jpg

Off to the table saw:
IMG_20170806_124636_zps9df9nwba.jpg IMG_20170806_124917_zpsladiw6ur.jpgThey fit the new transom now.

The new transom cap installed with 5200 and aluminum nails to replace the brads originally installed:
IMG_20170806_143637_zpscbbjq1ma.jpg IMG_20170806_143624_zpsh5olekjc.jpg

Oh.......And I got the transom braces painted. Just kept adding coats while I fiddled around with the transom cap and corners:
IMG_20170806_143637_zpscbbjq1ma.jpg

Once I finish polishing it up, it's gonna look pretty good. I really took my time and it fits real tight. I got about 3+ hours in this, but it is highly visible. Now I can do the aforementioned plumbing of the bilge pump, sea ****, and livewell hose, and install the rear deck. Next visit. Or two.
 

Attachments

  • IMG_20170730_111431_zps4ubzf9e3.jpg
    IMG_20170730_111431_zps4ubzf9e3.jpg
    204.5 KB · Views: 4
  • IMG_20170806_143637_zpscbbjq1ma.jpg
    IMG_20170806_143637_zpscbbjq1ma.jpg
    227.3 KB · Views: 5
  • IMG_20170806_143624_zpsh5olekjc.jpg
    IMG_20170806_143624_zpsh5olekjc.jpg
    198.8 KB · Views: 5
  • IMG_20170806_143624_zpsh5olekjc.jpg
    IMG_20170806_143624_zpsh5olekjc.jpg
    198.8 KB · Views: 5

Coach Dave

Petty Officer 2nd Class
Joined
Apr 3, 2014
Messages
117
Spent boat money to take my 11 yr old to Myrtle Beach for a week.:D We did catch 6 of these:
IMG_20170816_083933_zpskllm3xcv.jpg

The boy was STOKED! He had never been to the ocean before, and it was a trip that he'll always remember. I still can't believe he held the shark by it's tail. I showed him how first, and then how to revive them before releasing them. He looked like he was running across hot coals back to the beach when he finally let go of it!:lol: You really draw a crowd when you pull in a shark at the beach - I don't think the boy's ever been more proud of himself. I know they ain't HUGE, but remember, he's an 11 yr old boy from Ohio.

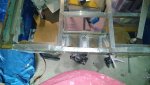
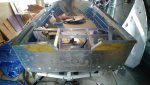
Anyway - back to the boat. I did get my bilge and livewell plumbing done in the stern. I'm not ecstatic on how I had to route the hoses, but I tried every configuration, and with the positions of the knee braces especially, this was the best route. For the livewell, I had to pay attention to positioning of the sea **** lever to the knee brace and the hose's position to allow the lever to operate freely. I'm really glad I added the sea ****. With my plumbing running to the front of the boat especially, if I ever have a catastrophic OH S**T failure anywhere in the boat, I can simply close the sea ****. That, and if I ever leave her in the water for any extended period, closing the sea **** is just smart. For the bilge pump, I didn't want to drill a hole through the knee brace, so up and around the brace was my best route. I do need to add my stainless hose clamps, as I bought 1 size too small. That Shields hose is tough stuff to slip on to the barbed fittings, even with dish soap as a lube. I took my heat gun and warmed it up a bit and it slipped on fairly easy. I found once it cooled back down it kinda tightened down nice on the fitting. That heat gun is one of the handier things I've bought for this project:
IMG_20170809_164455%201_zps0qb8bvwc.jpg IMG_20170809_164502%201_zpstqvzqmux.jpg

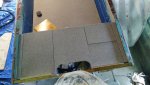
Next to my Plano sliding storage box. It's gonna be installed in the face of the middle compartment of my rear casting deck:
IMG_20170725_200823_zps13n8zlhi.jpg

If you've never used a Kreg jig before, and make any type of wood joints, you need to get one of these. I built a whole kitchen with one. Anyway, I got my box cut and put together, and it will hold 4 Plano 3700s - Walleye, Bass, Catfish, and Crappie. It will have a door, and on the backside of door will be snelled hook and/or rig storage, etc. It may just be screwing a few of these on the back - I'll figure it out when I get her built:
2PCS-New-Arrival-Plastic-Carp-Fishing-Snelled-Hook-Holder-For-Holding-Hair-Rigs-Free-Shipping-...jpg

Drilling the pocket holes:
IMG_20170822_184716_zpsgaayhyob.jpg

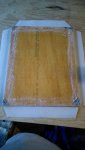
Cut the slots for the 1" X 1/8" Aluminum dividers. The table saw blade cuts a PERFECT slot for the 1/8" aluminum. You can see I test fitted a piece:
IMG_20170822_191257_zpsghzidrao.jpg

What's great about the Kreg system is that you can assemble and disassemble very quickly and accurately every time. This box needs to be assembled in place, as the assembled box will not fit through the opening. 1 coat of epoxy is on the pieces with 1 to go, and I can install it:
IMG_20170823_102258_zpsu3rqv6wg.jpg Looks like a tiny kitchen cabinet box!

More to come this weekend. Thanks for looking, and stay tuned.
 

Watermann

Starmada Splash of the Year 2014
Joined
Jan 12, 2013
Messages
13,822
Hey that'd be fun to catch sharks, I bet it was a good time.

Bilge looks nice and tidy. Don't get too far before you get that pump wired up and manual wire ran to the helm panel.
 

Coach Dave

Petty Officer 2nd Class
Joined
Apr 3, 2014
Messages
117
Yeah, he had a blast - so did I. Just when you started getting slightly frustrated pole watching - BOOM - SHARK! We went to the Apache Pier also and caught some smaller stuff. The Apache Pier is advertised as the longest Pier on the East Coast at 1206 feet.

And I REALLY want to get that rear cast deck installed. But I figure I best just wait 'til I get my battery installed and wiring routed up front. I have 15' of red and 15' of black 6 AWG tinned wire and lugs to run upfront to the console if I want to install my 12 circuit fuse panel there. Or I may install my fuse panel in the battery compartment - but that would mean a plethora of wires running back and forth to the battery compartment. I think it'll be an easier and cleaner install to run the 2 6 AWG wires up front to the fuse block installed up front. Most switches and devices will be in the front half of the boat. I did get a 30 amp circuit breaker to install between the battery and fuse panel. That will probably be installed in the battery compartment.

71fqP2lwo2L._SX425__zps8i2693ja.jpg 5026_zpsbwu7wjpg.jpg 418hvMN5VdL._SY90__zpsglfnzduz.jpg
 

Attachments

  • 418hvMN5VdL._SY90__zpsglfnzduz.jpg
    418hvMN5VdL._SY90__zpsglfnzduz.jpg
    3 KB · Views: 2

Watermann

Starmada Splash of the Year 2014
Joined
Jan 12, 2013
Messages
13,822
That's some serious overkill on the wire, on my SS I used 12 ga wire which is 20 amp for my boat and there's nothing I have that will use that much juice all turned on at the same time while honking the horn. :lol:
 

Coach Dave

Petty Officer 2nd Class
Joined
Apr 3, 2014
Messages
117
Yep WM......That's me - Mr. Overkill :D I was shopping for the wiring, and the 6 AWG was just a few bucks total more than the 10 AWG I was figuring I needed. I figured what the hell, the more the better :noidea: I read through your SS build - Great stuff - and I think I may have more circuits than you. Maybe. This thing's gonna light up like a Christmas tree for night fishing plus a bunch of electronics. You gotta admit - I'll have plenty of capacity for future add-ons.:encouragement:
 

Watermann

Starmada Splash of the Year 2014
Joined
Jan 12, 2013
Messages
13,822
Yep WM......That's me - Mr. Overkill :D I was shopping for the wiring, and the 6 AWG was just a few bucks total more than the 10 AWG I was figuring I needed. I figured what the hell, the more the better :noidea: I read through your SS build - Great stuff - and I think I may have more circuits than you. Maybe. This thing's gonna light up like a Christmas tree for night fishing plus a bunch of electronics. You gotta admit - I'll have plenty of capacity for future add-ons.:encouragement:

Yes indeed more power Mr Scott! :heh:

Well I have a run of power and ground to the nav side too just in case and have it tucked away in the gunnel for future possibilities.
 

EddyMoney

Cadet
Joined
Mar 24, 2016
Messages
24
Just hoppin in here to say that you're doing an incredible job with this vessel. It's given me some good ideas. Keep at it!
 

Coach Dave

Petty Officer 2nd Class
Joined
Apr 3, 2014
Messages
117
Gimme Some Water EddieMoney! Gradiated High Skool in '82 over here - seen Eddie Money in concert several/many times!:rockon: Thanks for the kind words! Reading and studying tips and methods on these forums has been a HUGE help. That and fighting off the temptation to take shortcuts. I'm also trying to fit a lot of stuff into a 15' boat. It's taking a lot longer than I envisioned, but that's always the case with any project I take on. And probably most importantly, I keep going back.
 

Watermann

Starmada Splash of the Year 2014
Joined
Jan 12, 2013
Messages
13,822
That and fighting off the temptation to take shortcuts.

This is the best quote of the year! I give a big hearty amen to that and then some, short cuts never work out... trust me I know first hand. :lol:
 

Coach Dave

Petty Officer 2nd Class
Joined
Apr 3, 2014
Messages
117
Gotta few updates. It's amazing how much time the "little" jobs take.

I got the Plano storage box all sealed and installed. Here's the front view. I did manage to fit room for 5 boxes now instead of 4. The bottom box juuuuuuuuust clears the floor. You'll see I set the Plano boxes inside the box about 2". I had plenty of room behind the box, plus I want to store stuff on the back of the door and wanted to leave enough clearance. It's no issue reaching in to grab a Plano box that little bit:
View attachment 3lC1yWEB0S4G2KICb1nCB8oUWeG2JPM1pGEmjZ6lASwKoOZ7hR6Oid7YpfEmKsixYl4ficTgdTFif_mAPnyiho9HEel9KXW1jJpW

Here's a rear view of the setup. Notice I took my 1/8" X 1" aluminum stock dividers and bent the back end up to catch the boxes from falling/sliding all the way through. I left the back open for air flow:
View attachment 8lfD9y_soDS_l_euXg1nrkpoaF7tozlcHIJ4BaASpM3EvlpRfmtSIenwcfXnd73u3xtyqZG0pZQZPCc28K7H2TtUKPXddFxNv1aj

I FINALLY got my cockpit floor screwed down! But before I did that I added a properly sealed plywood reinforcement block carefully measured to fit between my "joists" and smack dab in the middle width-wise of the floor towards the stern to install a seat base if I decide to add one in the future. Used Gorilla Glue and the battery as a clamp:
View attachment NlODTz3wnJ2GVhnZ3LywcR5QT0xP4OKK_khoV0KIyo51P8zYKvw_uqNG6fr10krUxrvevCyJAgYV7HoY9LtHN5sm9dJH8Juq5OwV

And the floor screwed down with SS screws with 5200 applied in screw holes:
View attachment 7L92p0BMjKL9uFSggqZKWs55SkKYJesymLu3FIm9VugeRBTWypZe3fwq_pFxeljKEGuTXJTj2qdTVEEXW4I95fgheXC156HKbtKF

I got to thinking that I coulda tried to scarf joint and glass the 2 pieces of plywood into one piece needed to make the floor. You can see I used a PVC T-shaped divider between the 2 pieces using 5200 in the gap. It fits TIGHT, and will stop any nasty sludgy lake grimy fish gutsy stuff from catching in the seam. The T-Divider really does make a nice tight smooth transition, and it ain't going anywhere:
View attachment B_DMme0JP8Fu8AMtLuC9g9UMhI7VpMdhTUS2o67NFzHcw-d9lauk6tOPFLM7_s-amFTk-FAZbkqhKulwRC-Fuc8t7oap9WhBtgAx View attachment hkg8-Lzseln73aP23QIIGId_fBrOaIh-xhWHjSZD_Nhmr1J1Pp0r8x_jO-MQWAEAphYdtjkDZhtss_xam2QAVqUzDpVFhmlNWX_z

You can see I put masking tape up the sides and marked the center line of each joist to make life easier. I have only screwed along the side edges, both sides of the seam under the T-divider, and across the front and back edges. I'm gonna test that, as I'd like to avoid exposed screw heads in the field of the floor. Does any one see an issue with that? Remember I have a full width 3/4 plywood support piece firmly attached underneath the floor where the driver and passenger seats will be, and that support block in back for a future seat that fit snuggly between the joists.

I also cut the wood block to support my bow eye bolt. Grandad always told me "NEVER throw away wood boy - You never know when you'll need that piece." I used the scrap from my "notch" I cut out of my transom and fashioned me a solid block. You'll see the original one had seen better days. Traced, cut, sanded, and sealed, and ready to go:
View attachment C5kT-13aPI7yTDmTeYK90ukvbhMUwXlZp9zxUwKylQbilSjnyYulfTVR2s32zQOxM3H1cIJr0UIxr6Ik3_pwhFtrZBjr6_zT8LcF View attachment Kk8uqnG89SKbgrsWO-HhlNGO1ANv0YvS9kaTnXYb8NUzqyhNaKPwb487mgHvpZ6Ktng9tOiECJKiuLCNkSs66DHbFVITWUq6TnYM View attachment cciMApj7vCb_Xsiw9fUICRQLSjWGoYGK-mdNwduTdtbmJhScw-wuDjRW8yk7l8QU3J_7bPRlvj0fA5WMLp-2UyAeK4iYIr4ru5Yi

I got a few other things started, but I'll post those when further along. Thanks for looking and Stay Tuned!
 
Top