


hello all this is my first post.
i have a 1965 sea king cuddy cabin 18 foot fiberglass, it was designed and built by starcraft. in 1965 this boat was decked out with all the features but over the years no one took care of the boat and simple fixes turn to major ones.
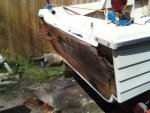
so this is what i am doing, we (my girlfriend and I) have striped the boat of all the hardware, removed the center wall that closes in the cabin, and i have pretty much tore out all of the transom. about 1/4 of the transom was rotted, yes i could have used some products to do a much faster repair but when doing something way not make it how you want it.
the old sea king 80hp outboard is off and waiting to be taken apart to be sold for parts to recoup some of our money, tip to all dont just trash everything cause someone else may need parts. the new motor is a 85hp evinrude.
the budget.
the budget is no more then 3000 bucks for everything, the boat was 450 and the new motor was 400 and the legal side was 175. we have already spent 800 on supplies.
the plan.
i will be adding a full transom swim platform and outboard motor bracket with the new transom being a full one instead of having a cut out for an outboard. it will move the motor back 20 inchs. it will be 14 inchs high 20 inchs deep and 70 inchs wide. it will be made for plywood,(15/32,4ply sheathing grade and 1/4 hardwood plywood) and fiberglass. the fiberglass is 2 oz cloth 72 inchs wide .004 thick. the resain is ployester not epoxy due to the cost.
the thinest section will be 2 layers.
the new transom will have 2 hollow sections to the right and left of the center section,the hollow sections will be to reduce weight. 1 soild 15/32,then 2 layers of 6 inch wide 15/32 strips, and then 1 soild piece of 1/4 hardwood plywood. the 1/4 inch side will face the inside of the boat. all will be screwed and glued together and then sealed.
the swim platform and motor bracket will be one piece and will be fixed to the transom with screws, bolts and glue.
once the swim platform/bracket and transom are built they will be fibegrassed. then the whole piece will mounted to the boat.
this mounting will be done with adhesive with screw to hold while the adhesive sets, then it will be fibergassed over from the deck up and over the transom to the swim platform with 3 layers. 4 half inch bolts then will ran through the the transom.
the roof of the cabin will also get some added fiberglass support as my girlfriend and sister both wish to sit on top of it and 47 year old fiberglass may not hold up to the two of them on it as it wasnt designed for this to start.
repairs need else where.
on the inside of the boat cracks are starting on the sides near the floor, they are not bad boat sea king boats had this problem and it can get really bad. my father and his bother in high school had a sea king runabout and on one trip a small crack split wide open and the boat was almost lost. so as you all can figure i do not wish to have that trip in my boat i will be fixing these now. the repair will be done by craving out the crack section a little, then 9 oz 2 inch wide cloth will be pressed in using small pieces with the 2 oz cloth going over top of it all with a 3 inch overlap of each side of the crack section and then a 6 inch wide stip of the 2 oz cloth with run down the whole side tying into the new fiberglass of the transom.
well that is a fast rundown of the project. i will update and post pictures along the way. its the start of may and i want the project sea ready come the middle of june.


i have a 1965 sea king cuddy cabin 18 foot fiberglass, it was designed and built by starcraft. in 1965 this boat was decked out with all the features but over the years no one took care of the boat and simple fixes turn to major ones.
so this is what i am doing, we (my girlfriend and I) have striped the boat of all the hardware, removed the center wall that closes in the cabin, and i have pretty much tore out all of the transom. about 1/4 of the transom was rotted, yes i could have used some products to do a much faster repair but when doing something way not make it how you want it.
the old sea king 80hp outboard is off and waiting to be taken apart to be sold for parts to recoup some of our money, tip to all dont just trash everything cause someone else may need parts. the new motor is a 85hp evinrude.
the budget.
the budget is no more then 3000 bucks for everything, the boat was 450 and the new motor was 400 and the legal side was 175. we have already spent 800 on supplies.
the plan.
i will be adding a full transom swim platform and outboard motor bracket with the new transom being a full one instead of having a cut out for an outboard. it will move the motor back 20 inchs. it will be 14 inchs high 20 inchs deep and 70 inchs wide. it will be made for plywood,(15/32,4ply sheathing grade and 1/4 hardwood plywood) and fiberglass. the fiberglass is 2 oz cloth 72 inchs wide .004 thick. the resain is ployester not epoxy due to the cost.
the thinest section will be 2 layers.
the new transom will have 2 hollow sections to the right and left of the center section,the hollow sections will be to reduce weight. 1 soild 15/32,then 2 layers of 6 inch wide 15/32 strips, and then 1 soild piece of 1/4 hardwood plywood. the 1/4 inch side will face the inside of the boat. all will be screwed and glued together and then sealed.
the swim platform and motor bracket will be one piece and will be fixed to the transom with screws, bolts and glue.
once the swim platform/bracket and transom are built they will be fibegrassed. then the whole piece will mounted to the boat.
this mounting will be done with adhesive with screw to hold while the adhesive sets, then it will be fibergassed over from the deck up and over the transom to the swim platform with 3 layers. 4 half inch bolts then will ran through the the transom.
the roof of the cabin will also get some added fiberglass support as my girlfriend and sister both wish to sit on top of it and 47 year old fiberglass may not hold up to the two of them on it as it wasnt designed for this to start.
repairs need else where.
on the inside of the boat cracks are starting on the sides near the floor, they are not bad boat sea king boats had this problem and it can get really bad. my father and his bother in high school had a sea king runabout and on one trip a small crack split wide open and the boat was almost lost. so as you all can figure i do not wish to have that trip in my boat i will be fixing these now. the repair will be done by craving out the crack section a little, then 9 oz 2 inch wide cloth will be pressed in using small pieces with the 2 oz cloth going over top of it all with a 3 inch overlap of each side of the crack section and then a 6 inch wide stip of the 2 oz cloth with run down the whole side tying into the new fiberglass of the transom.
well that is a fast rundown of the project. i will update and post pictures along the way. its the start of may and i want the project sea ready come the middle of june.


.jpg")

