1966 Searay restoration

patpel

Seaman Apprentice
Joined
Nov 8, 2008
Messages
43
Hi all

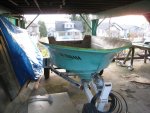
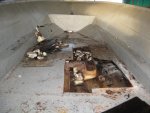
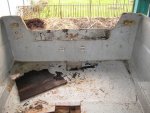
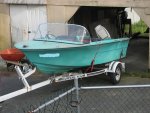
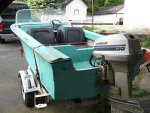
Well, I am finally biting the bullet and starting the work on my old boat. Transom, stringers and floor, plus some hull repairs, new upholstery and wiring.

I stripped her up today and got the top off (quite a chore all by myself).

I will post pics as the work progresses and I am sure I will be here picking you guys's brains whenever I'm not sure about the next step.

6 months to go before it's warm enough to put her back in the water. Let's see if I can be finished before then.

cheers
Patpel
 

Attachments

  • iboat front.jpg
    iboat front.jpg
    78.6 KB · Views: 0
  • iboat back.jpg
    iboat back.jpg
    84.4 KB · Views: 0
Last edited:

Woodonglass

Supreme Mariner
Joined
Dec 29, 2009
Messages
25,929
Re: 1966 Searay restoration

Welcome to iBoats!!
She's a lot like My Flamingo.
I'll be watching this one.

I'm just sayin...:D
 

ezmobee

Supreme Mariner
Joined
Mar 26, 2007
Messages
23,767
Re: 1966 Searay restoration

Nice looking boat. It's unusually high-sided for a little runabout. I'm sure it's a nice dry sturdy ride. Good luck with your project!
 

jetskier16

Petty Officer 2nd Class
Joined
Sep 26, 2010
Messages
197
Re: 1966 Searay restoration

Basically same boat and at the same point.
 

patpel

Seaman Apprentice
Joined
Nov 8, 2008
Messages
43
Re: 1966 Searay restoration

Hi all
I finally managed to find some time for the boat today; what with the X-mass lights and the shopping and it gets dark so fast lately.

Anyway, I cut a hole in the floor ( I should say I enlarged the already existing hole). She is soaked!!!. The floor is mostly rotted, it just crumbles in places. The centre stringer is so far gone that I sqeezed a piece of it and it was like a sponge. The flotation foam is saturated, and parts of it is just chunks of styrofoam that some jerk just dumped in there before closing her up.

Here are some pics.
attachment.php

attachment.php

attachment.php

attachment.php

attachment.php

Cheers
Patpel
 

Attachments

  • IMG_0469.jpg
    IMG_0469.jpg
    144.4 KB · Views: 0
  • IMG_0471.jpg
    IMG_0471.jpg
    147.2 KB · Views: 0
  • IMG_0472.jpg
    IMG_0472.jpg
    142 KB · Views: 0
  • IMG_0473.jpg
    IMG_0473.jpg
    148.6 KB · Views: 0
  • IMG_0474.jpg
    IMG_0474.jpg
    151.7 KB · Views: 0
Last edited:

jetskier16

Petty Officer 2nd Class
Joined
Sep 26, 2010
Messages
197
Re: 1966 Searay restoration

Lookin good (your progress, not the boat, haha) I opened up my core yesterday too. We didnt find any foam but we did find 5 stringers.
 

jetskier16

Petty Officer 2nd Class
Joined
Sep 26, 2010
Messages
197
Re: 1966 Searay restoration

Any updates? I've already started grinding, you need to keep up! haha
 

patpel

Seaman Apprentice
Joined
Nov 8, 2008
Messages
43
Re: 1966 Searay restoration

Hello everyone. I apologize to anyone who was following this thread; I kinda just suddenly disappeared at the end of 2010. Turns out I have not touched the boat since then. You wouldnt beleive how much time and money house renos can gobble up. Anywho, my wife and I got the boating bug back and I have been "authorized" to start up the restoration again. Married life's a ***** on a man's priorities. LOL. I cleaned up around the boat this weekend and took some pics. I will post them with comments and questions in a bit. Just wanted to say Hi right now.

Cheers
Patpel
ps. hope to have her on the water by summer.
 

patpel

Seaman Apprentice
Joined
Nov 8, 2008
Messages
43
Re: 1966 Searay restoration

Took her off the trailer today. Aint she a beaute.
IMG_0751.jpg
Ready to start building a cradle.
IMG_0752.jpg
The transom wood was almost all delaminated. Only a few patches were attached to the glass. Oh well, less grinding for me.
IMG_0754.jpg
Do you guys think that I should cut out this front bulkhead and start fresh?
IMG_0755.jpg
These chine logs are coming off. I am considering raising the floor to the top level of these. Any concerns I should consider?
IMG_0756.jpg

I want to put her on a cradle to prevent distortion and to make turning over easier. I have to strip and refinish the underside too.

Cheers
Patpel
 
Last edited:

Woodonglass

Supreme Mariner
Joined
Dec 29, 2009
Messages
25,929
Re: 1966 Searay restoration

Glad you're Back!!! I'd leave the bulkhead if she's solid. Chine logs too! Floor level should stay the same as it was from the factory. It could affect the overall center of gravity of the boat and how she handles. Best to leave her the way the engineers designed her.
 

jbcurt00

Moderator
Staff member
Joined
Oct 25, 2011
Messages
25,116
Re: 1966 Searay restoration

A cradle is a great idea, look for WoodOnGlass & Andgott's threads, they built great dual purpose mobile cradles. Easy to work on right side up & with the keel up.

It looks like the front bulkhead could have been in direct contact with the deck, as a relatively small portion of the total, I'd probably remove it in 1 piece for use as a template for a new piece.

Might consider the purpose of those chine logs before you eliminate them. Structural rigidity, minimize deflection of the hull crossing wakes/waves, reduce transmission of vibrations while running, I don't know, but they were included & served a purpose.

Why do you want to raise the deck height to the top of those chine logs?

If you plan to raise the floor that much, why remove the chine logs at all. Might consider just scuffing the tops & treating them as really wide stringers. If you remove them & raise the deck height, you'd still have to create a support of some sort along the deck's edge.
 

patpel

Seaman Apprentice
Joined
Nov 8, 2008
Messages
43
Re: 1966 Searay restoration

Thanks for the feedback Wood and jb, much appreciated. As for the chine logs, I should have said that I was planning on rebuilding them. I agree that they are needed. They keep the whole thing stiff. I just dont like how they dont extend to transom ( more leg room aft i guess). Anyways, they are solid and I think I will leave them alone.

The reason I wanted to raise the floor was to increase useable floor space and allow me to build in storage underneath.
This little boat offers very little storage and useable floor; but I guess I can build upholstered side wall from the top of the chine logs to the underside of the coaming and have access hatches. I do realize that raising the floor would change the center of gravity and may make her a bit tippy.

I am also considering replacing the spashwell with a rear bench and storage box. I would attach a floatation swimplatform/motor mount on her back end. Might have to put a gas tank and the batteries forward to trim her back up a bit.


cheer
Patpel
 

andgott

Master Chief Petty Officer
Joined
Sep 2, 2009
Messages
801
Re: 1966 Searay restoration

Looks like progress- Glad you didn't give up!

I've found that a key part of the whole 'process' is keeping the wife involved somehow- If not directly, at least as assistance in choosing colors, etc... Keep her happy, and the boat stays happy! Of course, you MIGHT end up with a pink boat, like mine :)

I'd leave the floor alone- you aren't going to gain a whole lot of usable space for the trouble involved. I'd look elsewhere for storage- You can make a compartment under the forward deck, under seats, or under the gunwales...

-Andrew
 

patpel

Seaman Apprentice
Joined
Nov 8, 2008
Messages
43
Re: 1966 Searay restoration

Ok, so I've been reading posts around the site in the last few days and I have to agree with what i read.
I am giving up on any airbrained modification ideas. I will not raise my floor or try to attach a swimplatform/motormount behind the boat.
I will redo the floor, stringers, and stern; restore the hull finish; rewire and reupholster and generally make her pretty, but no mods.
Here is a before and after picture set. The after is not mine of course, but it is what I am shooting for.

Before, ugly duckling in serious need of TLC.
iboat front.jpg
After, aint she pretty. This is a 1966 Searay just like mine but a few feet longer. Please disregard the fact that she is I/O.
3711512_0_160720090629_2.jpg

cheers
Patpel
 

jbcurt00

Moderator
Staff member
Joined
Oct 25, 2011
Messages
25,116
Re: 1966 Searay restoration

Look forward to seeing it progress. If the minty blue is too much on everything, might consider the hull white or off white & keep the bluish cap.

I'd say it might resemble teal, but, yeah, well, color isn't my forte :facepalm:
 

patpel

Seaman Apprentice
Joined
Nov 8, 2008
Messages
43
Re: 1966 Searay restoration

Hello all
Haven't been here for a while.
The wife says house renos come before boat renos.
Anyway, finally got to grinding the old fiberglass tabs on the inside of the hull. Been at it for hours. What a mess.
Some people do this for a living? Are they nuts?
Then again, I'm doing it for free. I guess that makes me nuts.
Getting pretty good with the grinder. Bet I could put a decent point on a fish hook with it. LOL

I had to take out the chine logs that were glassed in there. The cheap bastards never even put any foam in there.

Well, lunch break is over. Going back out there. I will post some pics at the end of the day.

Cheers
Pat
 

patpel

Seaman Apprentice
Joined
Nov 8, 2008
Messages
43
Re: 1966 Searay restoration

Has anyone ever heard of "resin pooling" boatbuilding?
I swear my boat was built with that system. Every place where plywood meets fiberglass, the builders pooled resin up to 1/2 inch thick on top of the fiberglass. Even on vertical surfaces!
I swear by the time i finish grinding I will have taken 100 pounds of resin off the weight of the boat.

Anyway, I've wined enough for now. Sorry I dont have pics of the progress, I ran out of daylight. Will take some tomorrow.

Cheers
Pat
 

jbcurt00

Moderator
Staff member
Joined
Oct 25, 2011
Messages
25,116
Re: 1966 Searay restoration

Sounds like a production boat builder's low tech solution to a PB fillet, and instead of having fiberglass wrapping up onto the stringer from the hull...
 

patpel

Seaman Apprentice
Joined
Nov 8, 2008
Messages
43
Re: 1966 Searay restoration

Hi everybody. I'm still kicking.
Finally finished grinding the inside of the hull today. What a chore. If I never have to do that again it would be too soon.
Anyway, she looks great.
IMG_0781.jpg
Sweet lines arent they?
I should be able to get her back in the water this spring. Finally
 
Top