1966 Starcraft Holiday Engine Repower

66Holiday924

Chief Petty Officer
Joined
Aug 21, 2017
Messages
586
Day 24:

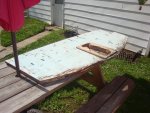
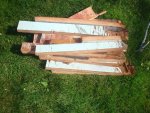
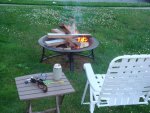
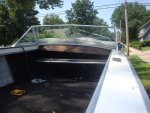
Today was a pretty light day. I ceremoniously retired the old transom wood. 52 years in the making, it made for a nice fire :target:. I can only pray mine burns as well in 52 years and pray even harder I'm still around to be the one burning it. :laugh:


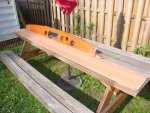
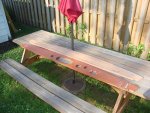
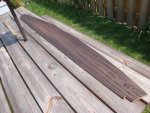
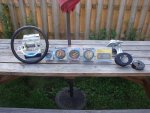
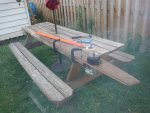
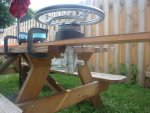
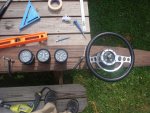
Other than that I started work on my dash. I went with Black African Mahogany for the wood and Spanish Oak colored stain. It was a little darker than I wanted but I lightened it up with mineral spirits and I got it to the color that the Admiral picked.
 

Attachments

  • photo294648.jpg
    photo294648.jpg
    141.3 KB · Views: 3
  • photo294649.jpg
    photo294649.jpg
    197.8 KB · Views: 3
  • photo294650.jpg
    photo294650.jpg
    163.5 KB · Views: 2
  • photo294651.jpg
    photo294651.jpg
    159.9 KB · Views: 2
  • photo294652.jpg
    photo294652.jpg
    155.8 KB · Views: 2
  • photo294653.jpg
    photo294653.jpg
    157.7 KB · Views: 3

SHSU

Lieutenant Junior+Starmada Splash Of The Year 2019
Joined
Mar 8, 2017
Messages
1,751
Really like the wood choice for your dash!!! My old floor and transom made a nice fire too. :D
 

66Holiday924

Chief Petty Officer
Joined
Aug 21, 2017
Messages
586
:help: I'm planning on doing as much of the wiring on this thing as possible, before it goes to Wisconsin for the engine installation. I'd like to give it to them with the gauges daisy chained and navigation lights wired. Ideally, I want the bilge, blower, and all the sender wires zip tied into coils hanging from the dash ready to go.

This is all completely new to me. My first step is going to be daisy chaining the gauges. As far as I can tell, somebody please correct me if I'm wrong but I need Purple, Blue, & Black wire to do everything that gets daisy chained.

Purple Wire: Goes from the ignition to every gauge (this is the + feed)
Blue Wire: Goes from switch to Gauge lights (why do some people say it goes to the ignition?)
Black Wire: Goes to all the grounds, and grounds out at a fore bus, which I plan to ground to the battery

I'm going to go with 14 gauge wires for this.
 
Last edited:

Watermann

Starmada Splash of the Year 2014
Joined
Jan 12, 2013
Messages
13,822
Personally I don't match the wire color coming from the motor harness so nothing gets mixed up rather just used red and black primary wire for the daisy chain and runs. All your colored sender leads will then connect to the gauges.
 

Watermann

Starmada Splash of the Year 2014
Joined
Jan 12, 2013
Messages
13,822
Sealing the dash, sand it super smooth and I would use the clear gloss Helmsman Spar as well, sanding with fine grit in between dried coats until you have the look you want. Also it will make the wood a bit darker too as it does have the tinting solids needed to UV protect.

Of course do this after all of the cutouts are made and the gauges are in so you can do the daisy chain and then pull them before you start sealing. This will keep your chances lower of marring up your new finish and allow for the cut outs to be sealed as well.
 

mickyryan

Rear Admiral
Joined
Apr 18, 2016
Messages
4,216
:help: I'm planning on doing as much of the wiring on this thing as possible, before it goes to Wisconsin for the engine installation. I'd like to give it to them with the gauges daisy chained and navigation lights wired. Ideally, I want the bilge, blower, and all the sender wires zip tied into coils hanging from the dash ready to go.

This is all completely new to me. My first step is going to be daisy chaining the gauges. As far as I can tell, somebody please correct me if I'm wrong but I need Purple, Blue, & Black wire to do everything that gets daisy chained.

Purple Wire: Goes from the ignition to every gauge (this is the + feed)
Blue Wire: Goes from switch to Gauge lights (why do some people say it goes to the ignition?)
Black Wire: Goes to all the grounds, and grounds out at a fore bus, which I plan to ground to the battery

I'm going to go with 14 gauge wires for this.

yep and that purple /blue always confuses folks:) the guages i have done both ways mercruiser original and the other way too
 

66Holiday924

Chief Petty Officer
Joined
Aug 21, 2017
Messages
586
I'm glad to hear that I'm at least on the right track with the wiring. I think I'm going to stick to the ABYC color codes though. Watermann, you make a good point but I anticipate the possibility of a mechanic having to work on my boat and they're used to seeing the different colors for all the wires. They can look at any wire in a bird's nest and know exactly what each one is doing without tracing it. So, since I anticipate my boat seeing different mechanics over the years I'm going to stick with the established color scheme.

Blue should go to my Navigation lights switch, so the gauge lights come on with the nav lights, right?

What do you guys think about this?

https://promarinesupplies.com/produc...-wood-tabletop


I talked to the manufacturer on the phone. There's a spray I use, then use their glaze coat, then spray it again with the spray, then my helmsman polyurethane. The result is a thick plastic sheet covers the wood like a bar (if you've ever seen bars with coins glazed into them) and both the glaze and the poly are both resistant to UV. They say they have cruise liners using it on their outdoor bars with good results.
 

SHSU

Lieutenant Junior+Starmada Splash Of The Year 2019
Joined
Mar 8, 2017
Messages
1,751
I talked to the manufacturer on the phone. There's a spray I use, then use their glaze coat, then spray it again with the spray, then my helmsman polyurethane. The result is a thick plastic sheet covers the wood like a bar (if you've ever seen bars with coins glazed into them) and both the glaze and the poly are both resistant to UV. They say they have cruise liners using it on their outdoor bars with good results.

If the manufacture says it should work, why not... I have tried many a new product on my project and posted my results. If you do it, make sure you let us know what you think so we can decide for our projects too :D:D:D​​​​​​​
 

mickyryan

Rear Admiral
Joined
Apr 18, 2016
Messages
4,216
Blue should go to my Navigation lights switch, so the gauge lights come on with the nav lights, right?
no you should have a seperate switch that says panel lights, however if you want i dont see why you cant but say you wanted to run dash lights and not navigation lights ... or vice versa
 

Watermann

Starmada Splash of the Year 2014
Joined
Jan 12, 2013
Messages
13,822
I used the same circuit for my gauge lights as the nav lights, it only stands to reason.
 

mickyryan

Rear Admiral
Joined
Apr 18, 2016
Messages
4,216
i guess if you were driving at night and having a hard time seeing , would be the only time you might shut them down for a bit , i will be changing mine all over to red anyways so it shouldn't effect night vision much.
 

66Holiday924

Chief Petty Officer
Joined
Aug 21, 2017
Messages
586
My boat didn't have a switch that was exclusively for panel lights. It had a 2 position pull type switch for the nav. lights (which I plan to re-use). I don't see the harm in wiring my gauge lights to it. That's how it must have been. I don't foresee this boat being used in the dark very often. I suppose I could get a 3 position pull switch.

Position #1: Off
Position #2: Anchor Light
Position #3: Anchor, Navigation & Panel Lights
 
Last edited:

Watermann

Starmada Splash of the Year 2014
Joined
Jan 12, 2013
Messages
13,822
Check out the gauges that are one with the nav and interior lights.

y4m-yQqD85yND1Tsjp6qTKoTe_xP9c_30gbxE5yjyk2-sBhTyRRbrWfmBcho9g_UEbkIe4v4izfTd11iRMzTNqmtPSqkQTu_y__7ABfQSxh8_75yZsn4tjqhTLf2Ox5WdIiw0OrjZREjo82mMEvY_i9fbCccUFMnBRv2m_lIDdJR42L6pO0t3ATdkd3efHkrlTmyiZb3cSAMG2hKyu6TtDNsg
 

mickyryan

Rear Admiral
Joined
Apr 18, 2016
Messages
4,216
im not or wasn't trying to start a issue do as ya like:) i just had a panel light switch on all the boats i ever had from factory , didn't have many factory boats mainly wellcraft and they all had panel light switches :) also if you traveling down water with all those lights on i don't think you are worried about night vision ...
 

66Holiday924

Chief Petty Officer
Joined
Aug 21, 2017
Messages
586
im not or wasn't trying to start a issue do as ya like:) i just had a panel light switch on all the boats i ever had from factory , didn't have many factory boats mainly wellcraft and they all had panel light switches :) also if you traveling down water with all those lights on i don't think you are worried about night vision ...

You're fine! This is why we are here. This is a boat that isn't going to be used at night, very often. If I'm out in the dark, it'll most likely be on a small inland lake, early in the morning fishing. I think I need the ability to light up my boat. That's when I use my anchor light, whether I'm anchored or drifting. Most of the lakes this boat will be on are small enough that you can see or hear if other boats are around and you don't need to light it up at all. I'm only using the anchor light if I'm aware that other boats are around or if I'm on big water. Otherwise if I'm underway my panel lights are good to come on with my nav. lights.

I'm not really worried about night vision. If that became an issue I'd change the bulbs or something. Considering the setup of my boat, my dash and gauges don't point up into the driver's face. My gauges face directly back and usually when you're driving a boat at night, you end up standing up to see over the windshield. So the reality is that my instrument cluster is going to be shining on my stomach while I'm moving. You kind of have to work to look at a gauge on this boat.
 

mickyryan

Rear Admiral
Joined
Apr 18, 2016
Messages
4,216
down here in florida there is lots of night stuff to do so i wanna be prepared but then ill have so many led on roof it will be daylight anyways :)
 

66Holiday924

Chief Petty Officer
Joined
Aug 21, 2017
Messages
586
Day 25:

It's been a few weeks of deliveries from the big brown truck, and now with my new helm wood stationed I can lay everything out and give an idea of what I'm shooting for. I hope the cutouts for these gauges cut smooth.

I went with a multigauge to save space
I went with the GPS Speedo, it works on a built-in antenna, there is no transducer or anything
I went with the Bluesea Charging station. You can see it has a built in switch to kill it while the boat isn't running. I think it is neat because you can change the power supply types. I have 2.1 amp USB chargers, for phones, but they can be upgraded pretty cheap, if I wanted something with higher amp to charge a tablet or something.

I got my dash wood dry fit, 4 through bolts in the corners drilled, so I can get it back in the exact position, and I cut the hole for my helm. I am happy with how it's turning out so far.

After talking to seastar solutions and explaining my project, they recommended putting Big T Rotary Steering back in it. So that's what I got.
 

Attachments

  • photo294992.jpg
    photo294992.jpg
    136.6 KB · Views: 2
  • photo294993.jpg
    photo294993.jpg
    127.7 KB · Views: 2
  • photo294994.jpg
    photo294994.jpg
    109.2 KB · Views: 2
  • photo294995.jpg
    photo294995.jpg
    130.5 KB · Views: 2
  • photo294996.jpg
    photo294996.jpg
    141.3 KB · Views: 2
  • photo294997.jpg
    photo294997.jpg
    127.6 KB · Views: 2
  • photo294998.jpg
    photo294998.jpg
    160.8 KB · Views: 34

66Holiday924

Chief Petty Officer
Joined
Aug 21, 2017
Messages
586
I also made a decision about what I'm going to do with my wood. I don't know how workable the glaze coat will be and It's so thick, it'll change the way the dash fits, so I'm just going to stick to the UV Resistant Helmsman Poly. I'll do multiple coats, but that's all I'm doing.
 
Top