1969 Sea Ray Rebuild (and mods) [SPLASHED Sept 2017]

Patfromny

Lieutenant Junior Grade
Joined
Dec 2, 2012
Messages
1,197
Very nice work. Love the blue and the emblems look great. She's gonna be a real looker.
 

CrazyFinn

Petty Officer 1st Class
Joined
Dec 12, 2016
Messages
357
Very nice work. Love the blue and the emblems look great. She's gonna be a real looker.


Thanks. I hope it looks good when I'm done - it won't be perfect, but it will be a whole lot better than when I got it.

Emblems ready to be re-installed:

sr_logos.JPG

The port side stainless vent was missing the middle louver - my dad made up a replacement out of some scrap stainless he had laying around. Should do the trick just fine, and the price was right!

vents.JPG
 
Last edited:

CrazyFinn

Petty Officer 1st Class
Joined
Dec 12, 2016
Messages
357
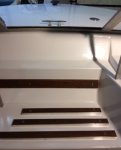
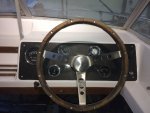
Pulled out the teak trim for the dash, and took a closer look at it - seems that some brilliant individual had stained it with some dark brown stain (that was partly peeling), and had managed to get the stain on the "SRV185" logo as well. So... I sanded down all of the teak, and then refinished with teak oil. Much better!

teak_refinish.JPG

Pulled out the Dremel with a small wire brush on it, cleaned up the logo the best I could, and then touched up around the black decal with some black model paint. Gave the metal logo a couple coats of clear coat and this is what I ended up with (not perfect, but it will do):

srv_185.JPG

A couple of shots of how the teak looks - re-installed:

dash_teak.JPG

teak_bow.JPG
 
Last edited:

CrazyFinn

Petty Officer 1st Class
Joined
Dec 12, 2016
Messages
357
Got the railing re-installed last night:

Rail_1.JPG

Now that the hardware is back on the bow of the boat, I can crawl in there and start working on the wiring and then get the gas tank back in...
 
Last edited:

CrazyFinn

Petty Officer 1st Class
Joined
Dec 12, 2016
Messages
357
The original woodgrain/formica gauge panel was looking a bit tired, so I decided to make up a new one - using a scrap piece of plexiglass I had laying around (hey - the price was right).

Used the original panel as a template to cut the plexi. Then placed the panel in place in the boat to figure out spacing/location for gauges. Decided to not use the original recessed pots for the gauges, and also eliminated the speedometer (it was stuck anyway, and my new sonar/plotter has GPS speed built in). Why spend money on a speedometer I don't need?

Cut the holes for the rest of the gauges in the plexi, this is what I ended up with:

cut_panel.JPG

A bit of primer, and this is how it looked:

primed_panel.JPG

Painted it with some "graphite" wheel paint I had left over, and then sprayed with clear. Let it dry overnight, installed gauges:

Gauges_installed.JPG

Panel installed in the boat:

gauges_1.JPG

This is how it's looking now:

gauges_dash.JPG

Also did some repairs under the dash - the side supports needed a bit of reinforcement due to stupidity by a previous owner, so some strips of plywood with PL and stainless bolts should do the trick.
 
Last edited:

CrazyFinn

Petty Officer 1st Class
Joined
Dec 12, 2016
Messages
357
I also pulled apart the shift/throttle lever assembly for some cleaning and to get it ready for installation once I get the interior to that point. Need to order a new "throttle only" button (mine was missing).

I figure as long as I keep getting a bit done every day or two, I'll get it in the water before too long!

Next step is prepping all of the "under-dash" wiring, then install fuel tank. Additional switches are going in a centre console (yet to be built) that will go under the dash. Then - I have to get going on the engine compartment, drive re-build, and engine installation.
 

archbuilder

Vice Admiral
Joined
Sep 12, 2009
Messages
5,697
looks like, an one thing at a time works....its amazing what an hour here and there will get done!
 

CrazyFinn

Petty Officer 1st Class
Joined
Dec 12, 2016
Messages
357
Haven't had much time in the past week to do much on the boat - had to work on the weekend, fuel pump died in the car one day, had to get towed home, fix the car, fun stuff like that...

But, my retired dad has been cleaning up the trailer under the boat and has it looking pretty good! Part of the reason for getting the boat was so he would have some project to work on as well (he was getting bored after he finished his Jeep restoration).

trailer_paint.JPG
 
Last edited:

CrazyFinn

Petty Officer 1st Class
Joined
Dec 12, 2016
Messages
357
fantastic work thus far , loving seeing these old boats brought back:)

Thanks.

Will have to get some more pics up soon, but the wiring is all done under the dash - new fuse panel, etc. New toggle switches all wired, ready to install in centre console (once I build that).

The boat had a newer 24 gallon aluminum gas tank in it when I got it, but the filler didn't line up properly, and it was installed at a strange angle in the bow. We relocated the filler on the tank, pressure tested it, and I fixed the fuel level sender (replaced corroded wires). The tank is now installed. Discovered that the gas gauge is dead though, not sure about other gauges. Will wait until I get the engine running to determine that. If only one gauge needs replacing, I'll just replace that. If more are dead, might just look for a matching set of newer gauges.

Engine compartment is almost ready - primed it last night, once I get it painted I can start re-installing the drive, cables, wiring, etc.

Planned out and started building the seat boxes this week. Helm seat will be a bucket re-purposed from a Mastercraft ski boat. Port side seating will be a custom built lounge/bench seat, with storage underneath. My wife liked the lounge seating on some new boats we saw at the boat show, so that's what I'm building.

...and in between all of the boat building, looks like I now have to replace the main crank bearings in my car... fortunately, that's a fairly simple thing to do, once the parts show up.
 
Last edited:

CrazyFinn

Petty Officer 1st Class
Joined
Dec 12, 2016
Messages
357
I have the gimbal assembly ready to install on the boat - installed new bellows, bearing, seals last night. Those bellows are no fun to install...

I had ordered the new parts back in the fall, shortly after I got the boat, but realized yesterday that I should probably have some of the proper sealant for the bellows. Went to a local marina to pick that up, and at the same time got a good deal on a new (old stock, unboxed but unused) Teleflex gas gauge.

The engine compartment is ready for me to start installing the drive.

engine_comp.JPG

The "board" that looks like it is leaning against the transom is actually a sealed piece of 3/4 ply that is tabbed/glued to the transom (after the rest of the glass was done) to provide me with a location to attach wiring, etc without having to drill holes in the transom.

The rounded/rectangular holes exposing the tops of the stringers are there to accommodate the front engine mount I fabricated that straddles the stringers.

Got a start on the interior as well:

seat.JPG

Seat is repurposed from a Mastercraft ski boat. Beginnings of the passengers lounge seat in the foreground, complete with cupholders. Boxes will all be glassed in eventually.
 
Last edited:

CrazyFinn

Petty Officer 1st Class
Joined
Dec 12, 2016
Messages
357
More progress today... got the gimbal assembly installed on the boat, steering cable connected, new fuel line run from the tank back to the engine compartment. New blower is installed. Replacement fuel gauge installed. Tested the old Prestolite trim pump that came with the boat. It actually works!

Took a couple pics, but my son borrowed my laptop for work (we have a business we run together), so will have to wait to upload them.

Still looking good to get this thing in the water early this summer...
 

CrazyFinn

Petty Officer 1st Class
Joined
Dec 12, 2016
Messages
357
A couple of pics of my progress from a few days ago.

Gimbal assembly attached:
transom_outside.JPG

How it's looking from the inside:
transom_inside.JPG

Wiring is pretty much ready for the engine, electric fuel pump plumbed and wired, just need to install throttle/shift lever and cables (as well as building that part of the interior so I have somewhere to attach it).

Meanwhile, my dad (he's retired, needs something to do) has been busy replacing the wheel bearings on the trailer, building/attaching side (guide) bunks on the trailer.
 
Last edited:
Top