1970 StarCraft SuperSport Restoration

TkdSilat

Seaman Apprentice
Joined
Nov 10, 2009
Messages
45
Re: 1970 StarCraft SuperSport Restoration

Sorry its been a while... been busy, had a baby!!! But anyway... I decided that Lake Erie is too rough for me (yeah, i get motion sickness easily now). So I removed the original 50hp engine, just the engine, all the controls still in place. I decided that I would stay on inland lakes so I purchased a trolling motor. Walmart has a WaterSnake Venom 54lb thrust motor for $199. From everything I was reading, this is MORE than enough power to move this 16' aluminum boat..... I should have the motor in the next few days.. Any ideas? This motor is more than enough for this boat... right? Here is a link to the motor and the specs....
http://www.walmart.com/ip/Watersnake-Venom-SWET54-42-Trolling-Motor/13228524
 

Triton II

Commander
Joined
Nov 23, 2004
Messages
2,479
Re: 1970 StarCraft SuperSport Restoration

Congrats on the bub! Those specs look OK for the money, but I tend to think you get what you pay for and if it's your sole form of propulsion I'd be getting a Minn Kota for peace of mind... just my $.02.

TII
 

Huron Angler

Admiral
Joined
Apr 7, 2009
Messages
6,025
Re: 1970 StarCraft SuperSport Restoration

That would be enough power to move that boat around.

I've used a 30lb thrust Minn Kota and unless the wind is really strong it does ok. I plan on getting a higher thrust MK later on.

I agree with Triton, I see a Minn Kota 40lb for about the same price. I'd go that route.
 

ezmobee

Supreme Mariner
Joined
Mar 26, 2007
Messages
23,767
Re: 1970 StarCraft SuperSport Restoration

Trolling motors go for cheap on craigslist all the time. Might want to check there. I got a sweet bow mount foot pedal control model for mine for $75!!
 

TkdSilat

Seaman Apprentice
Joined
Nov 10, 2009
Messages
45
Re: 1970 StarCraft SuperSport Restoration

I finally decided to pull the old transom out, just incase I want to put the 50hp outboard back on. It took my friend and I about 2 hrs to pull it out... grinding the head off the rivets took some time... On the inside, there must have been 20 small screws, 8 huge nuts and bolts and few other smaller nuts and bolts. The transom came out in 3 peices.. I am going to clean out the back of the boat before reinstalling a new transom. I have a few questions. The transom is 1.5" thick. WHen i go to rebuild it, whats the best way? Ive read that many people use 2 peices of plywood, use some sort of strong epoxy like pl400 to hold them together. The transom is good enough to easily use as a stencil. If i use two peices of 3/4" plywood on top of each other, then just coat them in fiberglass resin or is there a better product? thanks!!!

IMAG0156.jpgIMAG0158.jpgIMAG0157.jpgIMAG0155.jpg
 

ezmobee

Supreme Mariner
Joined
Mar 26, 2007
Messages
23,767
Re: 1970 StarCraft SuperSport Restoration

Replace the transom as 1 solid piece instead of the 3 piece. Laminate 2 sheets of 3/4" together. What you use to glue them together kinda depends on what you're going to use to seal it up. I epoxied mine and since epoxy is an excellent glue, I used it for the lamination as well. You could also use PL Premium construction adhesive, Titebond III wood glue or Gorilla Glue. Fiberglass resin is typically polyester resin. Poly is useless by itself. You'd need to add some fiberglass mat to it for it to have any strength (otherwise it will crack and flake off). Epoxy resin can be used by itself which is why many of us are using it. You won't find it at Home Depot though. You'll have to order it from somewhere like US Composites, Clark Craft, etc etc.
 

TkdSilat

Seaman Apprentice
Joined
Nov 10, 2009
Messages
45
Re: 1970 StarCraft SuperSport Restoration

I cut the transom out. I used a sheet of OAK hardwood plywood. I was able to the old transom as a stencil. The new transom is one piece, unlike the old transom that was 3 pieces. I purchased epoxy resin (wow, $70). I coated each side of the wood that needed to be glued together, then I mixed up another batch, and spread it out on the wood in a "S" pattern. I then placed the 2 pieces of plywood together, clamped them together (lol ran out of clams, used channel locks). :rolleyes: 
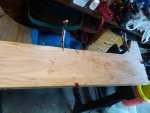
I then screwed in about 10 1" wood screws to make sure it wasnt going anywhere....
Tomorrow, after its dried, I will coat both sides of the new transom in the epoxy resin. Any suggestions? Ideas? Once the transom is coated on both sides, it should be ready to reinstall.... correct? here are some pics...
 

Attachments

  • IMG-20110731-00136.jpg
    IMG-20110731-00136.jpg
    86 KB · Views: 1
  • IMG-20110731-00138.jpg
    IMG-20110731-00138.jpg
    91.5 KB · Views: 1
  • IMG-20110731-00135.jpg
    IMG-20110731-00135.jpg
    124.6 KB · Views: 1
  • IMG-20110731-00137.jpg
    IMG-20110731-00137.jpg
    79.6 KB · Views: 1

TkdSilat

Seaman Apprentice
Joined
Nov 10, 2009
Messages
45
Re: 1970 StarCraft SuperSport Restoration

The transom is complete. 2 coats of epoxy resin on the whole exterior. I was at home depot and saw WOOD HARDENER by minwax. I coated the outside of the transom with that and it absorbed it like a sponge. Then I applied the epoxy resin. This thing is ROCK SOLID! thanks for the input , the epoxy worked great! here are some pics!! and here is my other toy too!! lol 2011-08-02_16-09-31_615.jpg2011-08-02_16-09-23_469.jpg2011-08-02_16-58-48_502.jpg2011-08-02_16-09-17_93.jpg
 

TkdSilat

Seaman Apprentice
Joined
Nov 10, 2009
Messages
45
Re: 1970 StarCraft SuperSport Restoration

Got the engine running... a good carb cleaning and some fresh gas!!! runs like a Swiss watch!! sorry for bad quality, phone sucks!! [video]http://s1092.photobucket.com/albums/i409/Antonio_Brunello/?action=view&current=runningengine.mp4[/video]
 

TkdSilat

Seaman Apprentice
Joined
Nov 10, 2009
Messages
45
Re: 1970 StarCraft SuperSport Restoration

Got the captain's seat installed.... its the original seat from 1970... some bleach and some elbow grease and its very clean. I also mounted the engine.... the original piece of wood on the outside of the back of the boat was 1/2" plywood. I replaced it with 3/4" oak hardwood plywood. I didnt think that the extra 1/4" thickness make a huge difference, but it was tricky getting the motor back on. I used all grade 8 bolts to mount the engine... probably way overkill, but they will never snap. I am going to apply some water proof covering to the all the exposed nuts and bolts ( either silicone or some other water proof caulk. ) The engine runs like a Swiss watch. As you can see in the pictures, there are 3 rocker switches mounted right above the throttle. The middle, biggest switch controls the spot light on the boat, the front rocker switch controls the bow and stern lights, and the rear switch is for the bilge pump (which ill probably never need... its sealed up great!!) It ready for the water!!! Yes, i know its not the prettiest, but mechanically and physically its A-1. I got the boat, motor and trailer for free, and maybe have $600 into it. Next year I will repaint the exterior and finish the interior cosmetics, but for now, its good enough to go fishing!! more pics to follow!! let me know what you think!2011-08-10_16-26-46_702.jpg2011-08-10_16-27-03_560.jpg
 

Triton II

Commander
Joined
Nov 23, 2004
Messages
2,479
Re: 1970 StarCraft SuperSport Restoration

Great job to get her water/fishing ready! Cosmetics can wait! Enjoy... :D

TII
 
Top