1974 Starcraft Mariner 16 floor and transom replacement help

bwingler57

Petty Officer 3rd Class
Joined
Jun 24, 2017
Messages
79
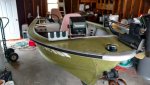
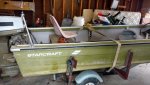
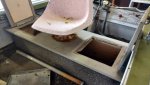
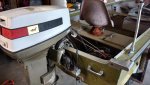
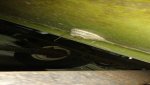
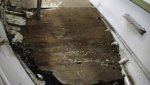
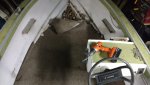
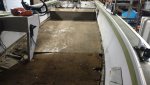
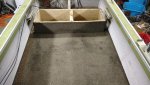
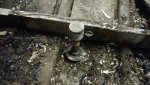
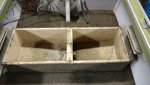
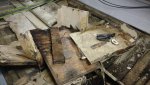
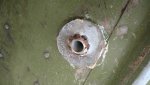
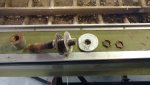
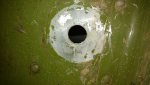
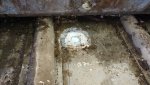
I picked up a 74 mariner 16 and the floor is bad in places and also the transom, Does anyone know how the plywood comes off the floor? And on the transom how can i replace it without pulling the cap off the boat. Also the boat has live wells and i dont see how the come out to replace the floor.

Thanks all
 

Attachments

  • photo275822.jpg
    photo275822.jpg
    69.8 KB · Views: 4
  • photo275823.jpg
    photo275823.jpg
    68.4 KB · Views: 4
  • photo275825.jpg
    photo275825.jpg
    72.7 KB · Views: 4
  • photo275826.jpg
    photo275826.jpg
    67.4 KB · Views: 4

64osby

Admiral
Joined
Jul 28, 2009
Messages
6,826
Nice Mariner.

Floor should be riveted down. Peel off the carpet and see what is underneath.

Pretty sure the transom cap has to come off to replace the transom wood.

Live wells???? Screwed together somehow. Looks like the side supports are riveted to the hull. I would try to leave those in place.

Just dig in, make a mess and replace it with new wood. Have fun.
 

Watermann

Starmada Splash of the Year 2014
Joined
Jan 12, 2013
Messages
13,822
Welcome to the Starmada :wave:

Not sure but I don't think I've ever seen a Mariner with a side console, bench type seat and no splashwell. Someone has done some serious alterations to the boat if so.

So yeah you have to start by removing everything keeping you from the deck, it all has to be gutted out.
 

bwingler57

Petty Officer 3rd Class
Joined
Jun 24, 2017
Messages
79
No Title

Thanks all for the advice, you guys are great! i have started removing the carpet and stuff, i am going to tackle the floor first, i do have a question so i don't drill a hole in the bottom of the boat, how far down do i drill to remove the rivets?

Also here is a starcraft info sheet on the mariner and the star trek.

I will post more pictures as i proceed with the work. I got the boat with the 50 hp powershift johnson, minn kota trolling motor and trailer for $400.00 even the electric trim and tilt works.
 

Attachments

  • photo276039.jpg
    photo276039.jpg
    125.5 KB · Views: 5

Watermann

Starmada Splash of the Year 2014
Joined
Jan 12, 2013
Messages
13,822
Cool add some pics of your progress as you go, it's nice to see a model worked on that I've not seen before. :thumb:

On the blind rivets holding the decking down, the easiest way to remove them is with an angle grinder using a cut off blade to zip the heads off.
 

coostv

Petty Officer 1st Class
Joined
Mar 21, 2010
Messages
230
Awesome! I had the Mariner V 14' version. Mine was pretty hacked up by the time I got it, but it started my obsession for StarCrafts! Can't wait to see some work get done on this one.
 

bwingler57

Petty Officer 3rd Class
Joined
Jun 24, 2017
Messages
79
No Title

Today i got both benches removed, the carpet removed, floor removed which wasn't bad at all, now for the stresser lol, the live well was home made out of plywood with a thin layer of fiberglass and of course the plywood was rotten. Now here is the bad part, they put a hole in the bottom of the boat and ran a 1/2" galvanized pipe up with a cap on it to fill the live well. I don't know what to do about it, the fittings look like Noah brought them over on the ark. I put a pipe wrench on it and no luck on breaking it free so it's soaking tonight with pb blaster. You can see it i the pictures from the top side and bottom side of the boat. What do i do?

Also still have to clean out boat, remove motor and pressure wash
 

Attachments

  • photo276142.jpg
    photo276142.jpg
    48.3 KB · Views: 7
  • photo276143.jpg
    photo276143.jpg
    48.9 KB · Views: 4
  • photo276144.jpg
    photo276144.jpg
    57.3 KB · Views: 4
  • photo276145.jpg
    photo276145.jpg
    72.5 KB · Views: 6
  • photo276146.jpg
    photo276146.jpg
    80 KB · Views: 4
  • photo276147.jpg
    photo276147.jpg
    91.9 KB · Views: 9
  • photo276148.jpg
    photo276148.jpg
    87.8 KB · Views: 6
  • photo276149.jpg
    photo276149.jpg
    103.3 KB · Views: 24
  • photo276150.jpg
    photo276150.jpg
    94.8 KB · Views: 6
  • photo276151.jpg
    photo276151.jpg
    107.5 KB · Views: 6

Watermann

Starmada Splash of the Year 2014
Joined
Jan 12, 2013
Messages
13,822
Man what a mess, jeez who thinks it's a good idea to use iron pipe in a boat. :facepalm:

I think I'd go after that fitting using an angle grinder with cutoff wheel.
 

bwingler57

Petty Officer 3rd Class
Joined
Jun 24, 2017
Messages
79
I will give that a try Watermann, i know right what a mess!! I did find an aluminum welder close by that said they can patch it for about $50 - $75 bucks. Also i found 3/4" 5 x 10 plywood at menards for $99.00 a sheet and they other size they have is 1/2" 5 x 8 plywood for $49.00 a sheet. The floor is just under 5 feet wide.
 

DirtyHarry83

Petty Officer 1st Class
Joined
Jun 5, 2012
Messages
305
That is some form of engineering there. I bet the first idea was started with "Hey watch this, hold my beer."

A welder sealing that mess would be great. Hope it goes well.
 

bwingler57

Petty Officer 3rd Class
Joined
Jun 24, 2017
Messages
79
No Title

After crawling under the boat i found how they attached it, got it all removed and measured the hole and it is 3/4".. Since i would like to have a livewell what do you all think about a 90 degree thru hull fitting ran to a pump and convert a cooler into a livewell? The welder looked at it and said that the hole is close to the rivets and welding could warp the aluminum and cause leaks. I'm open to any thoughts on this lol.
 

Attachments

  • photo276198.jpg
    photo276198.jpg
    104 KB · Views: 1
  • photo276199.jpg
    photo276199.jpg
    100.3 KB · Views: 1
  • photo276200.jpg
    photo276200.jpg
    114.1 KB · Views: 19
  • photo276201.jpg
    photo276201.jpg
    148.2 KB · Views: 1

Watermann

Starmada Splash of the Year 2014
Joined
Jan 12, 2013
Messages
13,822
You could use that hole as a drain for a livewell or cooler but most aerator pumps are impeller types that have to have their intake submerged. You'll also need to find a SS or special composite thru the hull below the waterline fitting. Next issue would be hole size as most drain fittings are 1 to 1-1/8" to allow for proper overflow of the well.

If you want to close off the hole then placing a patch over it on the outside would be super easy.

fetch
 

bwingler57

Petty Officer 3rd Class
Joined
Jun 24, 2017
Messages
79
Hi Watermann, What would i use to patch it? Sorry for the dumb question but i have never done anything like this before and i don't want to be like the titanic out on the lake.
 

Watermann

Starmada Splash of the Year 2014
Joined
Jan 12, 2013
Messages
13,822
I would use a piece of .080 aluminum 5052 is most commonly found on boats and street signs too. :lol:

Use a hole saw to cut 2 x 1.5" patches, one patch for the inside and one for the outside. Use a 1/4" machine screw to run through the hole in the center of the patch. Use a fender type ss washer to put in the 3/4" hole in the hull to take up the gap with one patch on the outside run the screw through the patch and then the washer, next through the inside patch and tighten down the nyloc nut inside. Use 3M 5200 on each surface including the screw head with plenty of squeeze out to seal the deal and be a super strong adhesive.

The other way would be to solid rivet a patch over the hole, no blind rivets should be used below the waterline.
 

classiccat

"Captain" + Starmada Splash Of The Year 2020
Joined
Dec 20, 2010
Messages
3,412
and just when you thought you've seen it all. :facepalm:
fetch


No shut-off and if that rotten livewell springs a leak your boat sinks :eek:

it's surprisingly free of corrosion where the dissimilar metals were in contact.

+1 on the double-patch (inner and outer). Try to pre-form so they conform to the hull skin.
 

bwingler57

Petty Officer 3rd Class
Joined
Jun 24, 2017
Messages
79
No Title

I'm doing what Watermann and Classiccat suggested, i ordered a tube of 5200 sealant and a small piece of 3/32" 5052 aluminum. So in the mean time while i wait for that to arrive, Today i disconnected the motor and built a stand to put the motor on. Hopefully i can round up some help tomorrow to sit the motor on the stand. I also decided to replace the steering with a push pull cable and do away with the old cable and pulleys.

Got a salmon fishing trip coming up next week so i wont be working on the boat lol. Going to be fishing Trail Creek and Calumet River. Next year i will have my boat out on the st. joseph river for the salmon run.
 

Attachments

  • photo276323.jpg
    photo276323.jpg
    153.7 KB · Views: 1
  • photo276324.jpg
    photo276324.jpg
    172 KB · Views: 1
  • photo276325.jpg
    photo276325.jpg
    171.8 KB · Views: 1

Watermann

Starmada Splash of the Year 2014
Joined
Jan 12, 2013
Messages
13,822
Very good idea on the steering upgrade and your motor has a tilt tube for the cable. Besides the new helm and cable you'll need the steering arm and connecting bolts Your motor looks almost identical to my old 55 HP Johnny, darn good motors that go and go when maintained. Parts are cheap and abundant too.

I know they're kind of spendy but I got a Seastar NFB rotary helm for my SS and love it, the helm accepts no feed back from the motor end of the cable so there's zero torque steer issues. I can't see a power tilt & trim on your motor so you could have some torque steer issues to deal with. Something to think about anyway.
 

Coach Dave

Petty Officer 2nd Class
Joined
Apr 3, 2014
Messages
117
I too have a Menards nearby - opened up about a year ago - other than my boys being born and the day my divorce finalized - best day of my life! Wait.........we did just get a Harbor Freight in town. But I digress, I used Menards 1/2" x 4' x 8' Premium ACX Plywood for my floors. It's 5 ply and plenty strong enough in my 15' Jet. Also about $26/sheet right now. I saved a bunch of weight (and money!) vs. 5/8" ACX, 3/4" ACX, and Marine. Even the $99 marine grade needs sealed properly, and uses pretty much the same exterior glue as ACX. I aint gonna argue whichever way you go though. I was being very weight conscious.
 

bwingler57

Petty Officer 3rd Class
Joined
Jun 24, 2017
Messages
79
Hey Coach Dave, What more do we need then a Harbor Freight and a Menard's they have everything lol. I was looking at the 5' wide ply so i would only have one floor seam in the boat. I'm pretty sure i'm going with the 1/2" thick ply that is what came out of it. 2 sheets will be all i need at 5 wide, if i go with the standard 4 wide i would need 3 maybe 4 to cover the floor and have 3 seams. I was going to seal it all with marine varnish before i carpet it.
 
Top