1975 Vator 17 Hardtop complete rehaul...

Status
Not open for further replies.

tiku

Seaman Apprentice
Joined
Jul 23, 2007
Messages
31
Hello all!

Been asking questions on the engine side of this forum but finally decided to start a new thread about the troubles and fun times I have had and shall have in the future.

This is what the boat is supposed to look like after it's reassembled (Or, it this is what it looked like when I started)

4764692582_ef091638bd_z.jpg


Funny thing the boat is based on Slickraft desing and they were orginally manufactured in Finland under lisence from Slickraft until they decided to change the design so no fees had to payed.

So far I have managed to blow the headgasket and decided to tear the original (1975 181cid) Mercruiser apart. Well, it's pretty much gone (literally rusted away so I'm thinking of either squeezing in a v8 or to be more realistic, a v6 version...

This is the old engine being carried away..

4764692904_c39def8c50_z.jpg


Then, in order to get some room and better access the hardtop had to come off. It was easily achieved by using some innovative measures.

4764693714_c7970707a1_z.jpg


I have literally read nearly all the stringer repair threads on this forum and I had secretly hoped that mine would be fine. Especially so because there were really no soft spots around. Well, cant be sure unless you see it for youself... Removed the red vinyl flooring and found out that the floor is glassed..

Yes! no worries then... Right! Upon closer examination this is what I found:
4764694902_315493ecb8_z.jpg


Yup, It's water down there... The boat has been sitting off the water and covered for two years now and there is system of drain pipes that were suppodes to take care of the water but no..

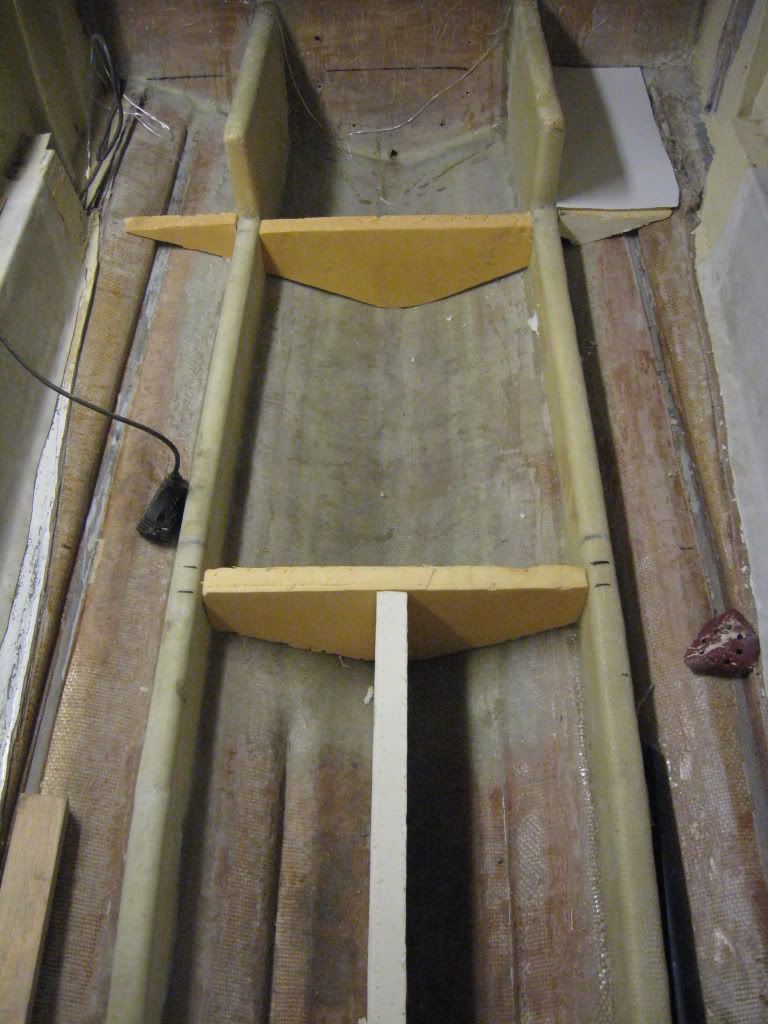
The stringers (plywood) are glassed only up until about 75% of their height, the top and sides are left uncovered and the floor is moist pretty much everywhere.. Damn..

4764059499_b0841db810_z.jpg


I'm not sure but it sure seems strange to have this white "thing" covering the underside of the plywood.. Glass is on the other side..

I decided to dig a little further backwards and it seems the same there..

4764062417_3e18055b24_z.jpg


The work continues.. Back to the site in few days. It seems that I can also contribute to this forum by posting yet another stringer/transom general overhaul thread..
 

tiku

Seaman Apprentice
Joined
Jul 23, 2007
Messages
31
Re: 1975 Vator 17 Hardtop complete rehaul...

Here are couple more pictures that show the 24 degrees deadrise hull.

4764063351_8dff91d499_z.jpg


4764064649_09a80cbac7_z.jpg


And what's left of the interior..
4764061875_dbc17e7371_z.jpg
 

chargerboy

Petty Officer 1st Class
Joined
Apr 28, 2010
Messages
362
Re: 1975 Vator 17 Hardtop complete rehaul...

Neat looking boat! Thanks for sharing the photos, look forward to watching this one getting built. That hull does have a mean looking design to it, that boat looks like it would handle very well.
 

tiku

Seaman Apprentice
Joined
Jul 23, 2007
Messages
31
Re: 1975 Vator 17 Hardtop complete rehaul...

It really handles well for it's size. Here's an old brochure pic of the boat in action:

4764693938_8407a7f4d6_z.jpg


So far I have on question. Should I support the boat better whencutting the old stringers and laying in new ones? Or would it be best to do one side at a time?

Currently the boat is sitting on jacks that can be seen in the pictures.
 

tiku

Seaman Apprentice
Joined
Jul 23, 2007
Messages
31
Re: 1975 Vator 17 Hardtop complete rehaul...

Today started with some fun stringer cutting and transom ripping after the short drive to the boat (100miles).

Managed to get the stringer cut near the transom so they wouldn't be in the way when the transom gets pulled out. I figured that If I dont cut the stringers away now they will still support the hull while I do the transom...

4774536025_2239209ae6_z.jpg


4774535603_200b44721c_z.jpg


The plywood was nicely wet and rotten on the bottom half solid and good above but it all had to come out. I was hoping to get it out in one big piece but instead I got the pleasure of ripping it out in about 15 smaller pieces.

4774537033_27a1e51291_z.jpg


Well, the most importatn thing is that it's DONE. Cutting the stringers away and building ewerything new again is smooth sailing in my book..

4774535315_3a3cbd61ee_z.jpg


It took me 4 hours to cut the ends of the stringers and tear some plywood off the floor plus ripping the transom.

Tools that were used:
- Angle grinder (with diamond blade)
- Circular saw
- Chisels (cheap ones since they wear out quickly)
- Hammer
- a bigger hammer
- Crowbar x 2

Naturally it had to be the warmest day of the summer today, 30degrees (celsius) in the shade.
 

jonesg

Admiral
Joined
Feb 22, 2008
Messages
7,198
Re: 1975 Vator 17 Hardtop complete rehaul...

Keeping the gunwhale cap on will help retain hull shape during the work.
Looks like a neat boat with the hardtop.
 

tiku

Seaman Apprentice
Joined
Jul 23, 2007
Messages
31
Re: 1975 Vator 17 Hardtop complete rehaul...

No pics of days work but rest assured, I have left my marks in the form white fine dust floating around everywhere..

Got the transom plywood cut to roughly right shape and tested them, seems fine enough. Peanutbutter is the way to fill bigger gaps.. I was supposed to put the first coat of epoxy on them but ran out of time again.

One question though:

Since I am using two pieces of plywood to construct the transom would it be best to first glue on the first piece to the existing fiberglass transom and then after it has dried glue the other one on top?

I think that it wpuld be easier to construct it this way but will this have any negative impacts? Like deforming the transom or something similar?
 

tiku

Seaman Apprentice
Joined
Jul 23, 2007
Messages
31
Re: 1975 Vator 17 Hardtop complete rehaul...

Some pics of progress..

Here are the pieces of plywood beeing cut roughly to right shape:
4791516302_940fce106a_z.jpg


Never done any serious stuff with epoxy before so test pieces were had to be made:
4790886121_155132dded_z.jpg


I think I got the ratio right, the pumps were right although I didn't initially trust them. Those pieces are just pushed on the epoxy and I can climb on them with my whole weight, say no more, I'm convinced.

4790886227_d90a5da7e6_z.jpg


These are the pieces that were bonded with epoxy. There is no glass between the pieces since my epoxy specialist told me that the glassfibre would just make the bond weaker, I trusted him and went this way.

All that's left for the transom is to coat the uter sides with epoxy, glue it to it's place, laminate glass over it and fill the gaps with peanut butter and glass. Oh yes, I think I still need to cut the opening for Alpha one once the plywoods are in place and seal the edges...
 

tiku

Seaman Apprentice
Joined
Jul 23, 2007
Messages
31
Re: 1975 Vator 17 Hardtop complete rehaul...

Finally some progress. The new transom plywood is in place.

4838489638_a0d70e29ea_z.jpg


It has been coated with epoxy 2 times from all angles, I glued it by rolling epoxy to the old fiberglass transom as well as rolling a coat of epoxy to the transom and then placing the fiberglass cloth. After wetting it ut and removing any air it was lifted to its position by using guide bolts in the holes that were drilled throught the transom and old transom skin.

If you look close enough you can see that the plywood is not wide enough to cover the total width of the boat. This was because it was not possible to get any wider piece in there while the cap was on.

Naturally this got me thinking, am I losing some rigidity when I still am going to laminate 1cm thickness of glass and thereafter plywood and glass? I guess that it really does not matter... After all I'm going to laminate glass over the transom and over the sides of the boat in order to stay away from creating too sharp corners.. I'm thinking that roundess is the key..

4837876461_b964887845_z.jpg


This is what I came up with the support for the curing time. It surely aint pretty but it gets the job done. The shiny streaks you see under the bottom board is dripping epoxy.

Next I get to practise the art of cutting stringers and gringing all traces away..
 

tiku

Seaman Apprentice
Joined
Jul 23, 2007
Messages
31
Re: 1975 Vator 17 Hardtop complete rehaul...

Another day and some progress. Today I managed to get rid of the floors and most of the stringers.

As a useful tip take pictures, lots of them and take also pictures that show the measuring tape or ruler and so you have evidence of how the measurements were as original.

This is how I did it. I have pics of all the measurements and distances between stringers etc. Didn't take any notes on paper, technology rules..

4841211387_ca3e2940dd_z.jpg


4841851524_9447f2baa5.jpg


This is how the fun begins. Initial grinding was preceeded by a game I like to call "level out your boat". This translates to making sure the bottom is supported and that everything is level and straight, I'd hate to get a twisted hull.

4841211539_b904a0fed0_z.jpg


Small portion of the floor has vanished but there's still a long way to go.

4841827538_c7b4a91f99_z.jpg


This is pretty much the situation I ended up today. It is incredibly slow and tiring work pulling the stringers and floor. Halfway through the job I thought that this doesn't make sense, why am I doing this? The thought was short and I shook it away on a few seconds time as I could see myself hitting the water with this boat...

4841827730_4ce06ce716_z.jpg


The area under the foredeck was a bit tricky to cut as I had to cram myself in there with my nose just a few inches of the diamond blade and dust... Luckily I have a full face mask so none of that white stuff you see there on the floor could do no harm.

4841212053_04e632d01f_z.jpg


Looking at the pictures, it seems that the stringers were not in that bad shape, the dust hides the rot and wet parts really well. Here's another picture of the stringer's and how they were laminated and "sealed", the glass only goes up 3/4 of the way. Was it wet? Yes...

I had to stop work ahead of schedule since the storm and the lightnings were getting too close for comfort. So another day put in, floor out and almost all stringers are gone.

To be continued...
 

tiku

Seaman Apprentice
Joined
Jul 23, 2007
Messages
31
Re: 1975 Vator 17 Hardtop complete rehaul...

Some progress. The boat is in a warm garage so I can continue my work despite the nice -20 (celsius) temperature outside.

I dont have any pics of the progress but in short, I have grinded the inner hull and even laminated some more glass (biaxial) onto it. I even went through the trouble of sanding and filling all the gaps on the places where the new stringers will be attached. I also rounded the corners for easier glass lay-up's.

Here's the problem the attached picture is not from my boat but form a same make and model (sterndrive to outboard conversion) and I really like the way he has done the stringers.. Its polyurethane foam, same stuff that is used in home insulation. It comes in suitable sizes and could be easy to work with.

So what do you guys think, is the structure ok with all the drainholes etc.. ? I,m planning on foaming the excess compartments after I have built the flooring..
IMG_1551.jpg
 

jonesg

Admiral
Joined
Feb 22, 2008
Messages
7,198
Re: 1975 Vator 17 Hardtop complete rehaul...

Foam stringers need more resin + glass than wood.
 

teett

Recruit
Joined
Aug 24, 2015
Messages
2
Greetings from Saarenmaa!
How is your Vator 17HT rebuild project going? I have 79' Vator 17HT which has inboard engine replaced with 2-stroke Yamaha outboard engine by previous owner. I rebuilt all electrical systems and added Lenco electrical trimtabs.
abrukal.jpg
 
Status
Not open for further replies.
Top