1976 Arrowglass transom replacement and then some

jbcurt00

Moderator
Staff member
Joined
Oct 25, 2011
Messages
25,109
Re: 1976 Arrowglass transom replacement and then some

If you have any misgivings about the paint prep, it's application or how well it's currently stuck to the gelcoat, it'd be best to remove it w/ a combination of sanding & stripping. CitriStrip says it's gelcoat friendly. It would be great to leave it, but you'll never know how good a base coat it will provide for your paint until it doesn't. And even for just a $100 paint job per WOG's link, there will still be lots of prep to leave the existing. I'd rather spend the time & effort now, and never wonder if about the existing paint.

Don't be surprised if the gelcoat is a wreck, it often is, that's why so many get painted. So that'd be another reason to remove the existing paint, you can address any areas of questionable gelcoat too.

Whatever paint you plan to finish with, use their primer. The paints & primers all work as a system, so stay w/ 1 system. There have been both glass & tin boats painted w/ the Majic/Valspar paints from Tractor Supply (WOG's link) and as long as the mixing, ratios & 'cook' time are followed, I've not read any bad reviews about either paint. The last 'complaint' was some runs, but Magnumdeke ran short of paint & didn't let the last batch cook long enough before he shot it. I don't remember having Tractor Supply in the Louisville-Lexington corridor so I'm not sure if you'll find the Majic paint line. Valspar's Farm Implement line used to be carried by TS, but it was successful enough that they introduced their own brand, Majic. You should be able to find the Valspar FI or at least someone who carries Valspar & can get the FI.

The addition of the hardener increases the sheen level of the paint & it's resistance to abrasion, and can be used w/ other paints. Rustoleum Pro is another paint used frequently.

But it is paint, not gelcoat & will scratch. WOG scratched his BFF's bow working around it in the garage pre-splash, and nicked the keel getting it on or off the trailer at splash. But it's paint and with good weather and some time over a weekend, it can be touched up, inexpensively ;)
 

GT1000000

Rear Admiral
Joined
Jul 13, 2011
Messages
4,916
Re: 1976 Arrowglass transom replacement and then some

Just to add, once you remove all the paint that is on there and before you do any priming, prep the surface completely...that includes any Marine-Tex, fillers or fairings...sand smooth, then Prime, sand smooth again, if you break through any large spots, re- prime, re-sand, repeat as necessary, then Paint...if you use a high build primer, it will fill a lot of minor imperfections.
 

Seasonally.boating.jon

Petty Officer 1st Class
Joined
Jul 10, 2011
Messages
283
Re: 1976 Arrowglass transom replacement and then some

If you have any misgivings about the paint prep, it's application or how well it's currently stuck to the gelcoat, it'd be best to remove it w/ a combination of sanding & stripping.

Yeah, it has misgivings in PAINT. Some spots are peeling off but some spots are done really well. I'm glad it's showing some signs of pure prepping now instead of later. And thanks for the great info on the piant JB, I feel more confident about it. I have 2 TS stores around, one 18 miles north and one 18 miles south. At work we paint our fork trucks with Valspar paint. I'll find out where we have been buying it.
 

Seasonally.boating.jon

Petty Officer 1st Class
Joined
Jul 10, 2011
Messages
283
Re: 1976 Arrowglass transom replacement and then some

Just to add, once you remove all the paint that is on there and before you do any priming, prep the surface completely...that includes any Marine-Tex, fillers or fairings...sand smooth, then Prime, sand smooth again, if you break through any large spots, re- prime, re-sand, repeat as necessary, then Paint...if you use a high build primer, it will fill a lot of minor imperfections.

GT, I have read that the primer should be applied before any fillers are used AND after the fillers have been used. The article basically said that it would create a better mechanical bond for the filler. But I haven't done this before GT, you have. I can read and read and read, but actual experence has a greater educational value. So I'm just posting what I have read.

HIGH BUILD PRIMER.....its on the list.
What filler should I use?
 

GT1000000

Rear Admiral
Joined
Jul 13, 2011
Messages
4,916
Re: 1976 Arrowglass transom replacement and then some

I would stick with what the manufacturer of the paint "SYSTEM" you plan to use, recommends...I personally do not know of any that would have you prime the surface before filling and fairing, but that doesn't mean they don't exist...There may be some systems that require a particular type of priming substrate before using their particular type of filler...

However, if you are going to be doing a typical re-paint, all of your prep work, filling and fairing, should be done to the 'raw' surface, since most fillers require a good clean mechanical bond with the surface so that they attach themselves solidly, the primer is usually used as a sealant between all the filling and the final layer of color, giving the paint a uniform base with which to provide an even reflection of its color value...most primers do not perform well as a bonding medium for fillers, especially if the filler is more than a few mils thick...you can however, after lightly sanding the primer, use a marine type filler [thin PB, Marine-Tex, etc...] to fill TINY imperfections, such as pinholes or minute scratches, prior to final sanding and cleaning before applying the final top coat.

Like I said, it is the typical way most re-finishing is done, but you need to follow what the manufacturer of your chosen "system" recommends.

L8r,
GT

The first link is for automotive, but is relevant...the other two provide some good info...
Autobody Refinishing - 101

Cosmetic repairs for your fiberglass boat

http://www.jamestowndistributors.com...this link doesn't load correctly, but they have some articles and videos on boat painting...
 
Last edited:

Grandad

Lieutenant Commander
Joined
Jun 7, 2011
Messages
1,504
Re: 1976 Arrowglass transom replacement and then some

Jitterbug, I haven't been following many threads such as yours on FG boats. Mine being aluminum, I don't have much experience to contribute. In reading through your thread and seeing all the work that you're doing, I have a new respect for you glassers. Not for your boats, mind you. You must have a bottomless well of patience to keep at it. Or may you're just crazy. All my lunimum cuts get itchy when I just look at your pictures. I'm gonna have nightmares tonite.

Great work so far. You should be so proud of your accomplishment when you're done. - Grandad
 

Woodonglass

Supreme Mariner
Joined
Dec 29, 2009
Messages
25,929
Re: 1976 Arrowglass transom replacement and then some

Jitterbug,

Applying the primer first is just to help you "SEE" the imperfections. It is usually a VERY LIGHT coating. You can then mark the areas that need attention and then sand of the primer easily to do the repairs. After the repairs are done shoot another light coat to make sure you got all of them and sand and fix what needs fixin. Then use the high build which will take care of the small imperfections and you should have a "Baby's Behind" finish.
 

Seasonally.boating.jon

Petty Officer 1st Class
Joined
Jul 10, 2011
Messages
283
Re: 1976 Arrowglass transom replacement and then some

You must have a bottomless well of patience to keep at it. Or may you're just crazy. All my lunimum cuts get itchy when I just look at your pictures. I'm gonna have nightmares tonite.
- Grandad

:D Thats funny. I like to think we are all crazy.....just different types and levels of crazy. Whatever crazy you are.....just remember to be a good person and do whats right. Make this CRAZY world a better crazy place.

Working on these (whatever type) boats is good for us. Pride of accomplishment, making something drifferent, something we can dream up and make it work for us, or something you can pass down to your children or grandchildren (they will love it more than anything later in life), maybe just don't want to spend 10 or 20k for a new one, its just plain cool. I get a junker wile my family gets a "more than I would pay for myself" boat BTW.:D One reason I'm working on mine. It's all good as long as we have memories and where is a better place to make em than on the water. Everybody loves the water.
 

Seasonally.boating.jon

Petty Officer 1st Class
Joined
Jul 10, 2011
Messages
283
Re: 1976 Arrowglass transom replacement and then some

I've done alot of sanding today. I was wanting to knock it all out today but things came up. I at least want to get the back fishing deck installed and glass the absent area in between the old seating, before Christmas. Hopefully get most of it done during Thanksgiving break.

I'm trying to remove the all the gelcoat from the places that I'll have to lay glass. It might be hard to tell how much I've sanded so far because I haven't cleaned it yet but here it is anyway. LOTS of itching going on right now.

20121118_172345.jpg


20121118_170353.jpg


20121118_170342.jpg


20121118_170334.jpg


20121118_170308.jpg


Have a good one ya'll.
 

Seasonally.boating.jon

Petty Officer 1st Class
Joined
Jul 10, 2011
Messages
283
Re: 1976 Arrowglass transom replacement and then some

I don't know the correct terms for all of the parts for the boat, so feel free to correct me. For now I'm going to call them "storage lids".

Prior to glassing in the ply wood for the rear deck, I'm going to cut out the hole for the storage lids in the rear deck. Now, the original lids had sort of a "gutter" for water to flow around to a thru hull fitting and drain out to the side of the boat instead of draining into the storage and onto the deck. I will keep that going with my custom fishing deck.

After I measure and cut the hole, I will cut half the thickness of the ply with a router (don't have a router yet and this is a good reason to buy one:D) with a flat endmill bit. This will be sort of an eyeball'n thing so I'm not sure if it will be half the thickness of the ply but whatever is done to one side will be done to the next. I'm thinking I'll cut about a inch to 1 1/2 into the ply. After I have it cut to my liking, I'll cut around the lid with a ballnose endmill which will give me the gutter. Should look like the pic.

storage.png


The factory thru hull fittings did not let all of the water drain because they were like this.

factoryfitting.jpg


It would let about a 1/4 inch of water sit in the gutter. I've found flush mount fittings here on Iboats and I'll be ordering those soon.

C-ya'll
 

jbcurt00

Moderator
Staff member
Joined
Oct 25, 2011
Messages
25,109
Re: 1976 Arrowglass transom replacement and then some

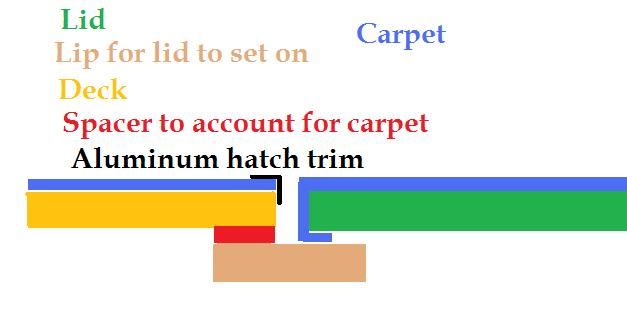
Carpetedhatch_zps76d11bb3.jpg


Something like this ^^^ might make the lip & lid joint stronger

Just skip the carpet, carpet spacer & aluminum angle to hold down the edge of the carpet.

Even if you use 3/4" ply for your deck, after you route out 1/2 the thickness, you'll only have 3/8". To create your water channel, you'll take out even more.....

You could still make the gutter in the lower piece of plywood in my rendering.... but don't make it 1/2 way thru the plywood or your back too thin
 

Seasonally.boating.jon

Petty Officer 1st Class
Joined
Jul 10, 2011
Messages
283
Re: 1976 Arrowglass transom replacement and then some

Ill kind of play it by ear. I'll trim, test fit, trim, test fit. Plan to do a full wrap with can. Then glue it to the current lip that is there now. The pb will help with creating a flat surface. I'll sand the bottom side smooth so that I can lay a few layers of csm. On the top side I'm thinking 2 layers of came and a layer of 1708
 

Seasonally.boating.jon

Petty Officer 1st Class
Joined
Jul 10, 2011
Messages
283
Re: 1976 Arrowglass transom replacement and then some

I've been running this thru my head all day long. I've been debating with myself whether to make the gutter thing or not. Would I get THAT much benifit from it? The boat will be covered when its not is use. I don't think the covers are completly water proof. There will be a battery under the deck along with the trim pump, and tank. Ofcourse I'll try to remember to pull the plug out. It is alot of work to make it were it isn't an eye sore. Still have a few sort days to think about it.

Anyway, JB, I took your advice. Here's my new plan for the gutter if I go for it. Also JB, I think I could counter sink the lid for the carpet.


reardeck.png
 

TruckDrivingFool

Lieutenant Commander
Joined
Jul 30, 2007
Messages
1,818
Re: 1976 Arrowglass transom replacement and then some

Seems like a lot of work for little gain, especially when you add the possibility that it will just end up filled with resin when you try to glass it. I'd just make sure my compartments drained to the bilge one way or another and call it a day.
 

GT1000000

Rear Admiral
Joined
Jul 13, 2011
Messages
4,916
Re: 1976 Arrowglass transom replacement and then some

I tend to agree with TDF, that sounds like a lot of extra work for minimal benefit...
You could build the "shelf" for the hatch to rest on, and just drill some drainage holes in the rearmost corners, IF necessary, then coat the insides with two or three applications of resin to seal the raw wood to allow draining any standing water...
 

Decker83

Commander
Joined
Apr 5, 2011
Messages
2,593
Re: 1976 Arrowglass transom replacement and then some

Take a look at how jasoutside did on his SN. It looked good.

Here's to you and your family having a Great Thanksgiving Day.
 

jbcurt00

Moderator
Staff member
Joined
Oct 25, 2011
Messages
25,109
Re: 1976 Arrowglass transom replacement and then some

From the Admiral & I to you & yours:
thanksgiving-8-07.gif


May you have a great weekend & enjoy the company of friends & family....

John
 

GT1000000

Rear Admiral
Joined
Jul 13, 2011
Messages
4,916
Re: 1976 Arrowglass transom replacement and then some

Happy Thanksgiving to you and yours!
May your plates overflow with food and
May your home overflow with blessings!
 
Top