1977 Johnson 55hp lower unit rebuild

scott_maier

Petty Officer 2nd Class
Joined
Mar 16, 2009
Messages
124
Hello,

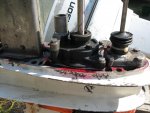
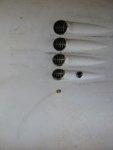
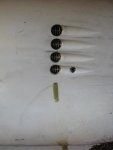
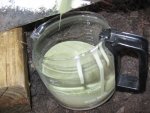
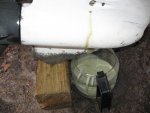
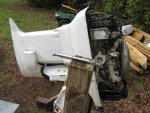
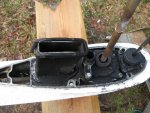
I recently bought a '77 johnson 55hp and unforturnately need to reseal the lower unit. As I posted in another thread the motor was laying on it's side for 3 days and grayish oil starting leaking out the weep hole below the water intake. I was hoping it was just unburned two cycle oil, but when I drained the foot the gear oil looked just like the oil from that small hole. The first two pictures(from left to right) show the oil leaking out the weep hole. The other two show the oil after I removed the bottom drain plug.

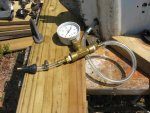
I've got a service manual ordered (eBay) so right now I'm wondering if I need any special pullers or other tools to reseal the foot. Any suggestions would be greatly appreciated.
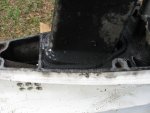
 

Attachments

  • IMG_2666.jpg
    IMG_2666.jpg
    123 KB · Views: 0
  • IMG_2669.jpg
    IMG_2669.jpg
    124 KB · Views: 0
  • IMG_2675.jpg
    IMG_2675.jpg
    144.1 KB · Views: 0
  • IMG_2672.jpg
    IMG_2672.jpg
    144.4 KB · Views: 0

scott_maier

Petty Officer 2nd Class
Joined
Mar 16, 2009
Messages
124
Re: 1977 Johnson 55hp lower unit rebuild

I finally pulled the foot and thought I'd post some pics and see what ya'll think. The pics show what it looked liked just after I got it off the motor and i haven't touched it yet. You can see what looks like the inner exhaust tubing tilted and the seals on both ends are bad. I'm not sure if this piece is the inner exhaust tube or not. i can't see it in the manual I have. Anyway any comments on the mess I might have are welcome!
 

Attachments

  • IMG_2714.jpg
    IMG_2714.jpg
    144.9 KB · Views: 0
  • IMG_2719.jpg
    IMG_2719.jpg
    149.1 KB · Views: 0
  • IMG_2718.jpg
    IMG_2718.jpg
    132 KB · Views: 0
  • IMG_2715.jpg
    IMG_2715.jpg
    145.9 KB · Views: 0
  • IMG_2717.jpg
    IMG_2717.jpg
    152.6 KB · Views: 0

SigSaurP229

Commander
Joined
Oct 1, 2008
Messages
2,123
Re: 1977 Johnson 55hp lower unit rebuild

both seals look bad to me but that wouldn't cause water in the foot. I wouldn't think.

The main seals to cause water in the foot are the Driveshaft seal, Prop Shaft Seal, Shift housing seal, and the drain and fill plug screws.

Ordering a Seal kit probably around $70 bucks will take about four hours.

Easyiest way to find the leak is to drain the oil, pressurize to around 15 PSI spray soapy water around the seals and find the bubbles :) or do like I did and just change all of the seals.
 

scott_maier

Petty Officer 2nd Class
Joined
Mar 16, 2009
Messages
124
Re: 1977 Johnson 55hp lower unit rebuild

Yeah, those two seals are definitely shot. I wasn't sure if that tube was supposed to be in the lower unit or up in the power head. There's not a clear picture in my manual.

Do I have to pull the drive shaft to change the seal or can i get to it by just taking off the bearing housing? If I have to pull the drive shaft do you have a trick for pulling it without using that special puller shown in the shop manual (Tool #387206). The manual also states "Remove the pinion lock nut from the bottom of the driveshaft using Drive shaft holding socket (special tool #316612)." Is this tool necessary? Can I use a regular wrench?

The other seals seem straight forward.:)

thanks.
 

scott_maier

Petty Officer 2nd Class
Joined
Mar 16, 2009
Messages
124
Re: 1977 Johnson 55hp lower unit rebuild

Well, I bought a seal kit for $60 and only replaced the driveshaft housing oring seal, and shifter rod seal and gasket, lower exhaust tube gasket(i have the upper on order), and water pump housing oring. So i could of saved some cash buying those individually.Oh well. The shifter rod seal was probably the culprit, it was real bad. I was going to pull the bearing carrier and change that oring, but i didn't have the right puller setup so i skipped it. Anyway, i rigged together a pressure tester, pumped it up to 14 psi and slathered soapy water on the seals and didn't see any bubbles. the connection at the oil fill port wasn't leak tight so I couldn't just pump it up and see if the pressure dropped. Then I filled up the lower unit oil and let it sit upside down for awhile. I didn't get any oil leaking out. So I'm gonna call it good.

I do have another question. The shifter rod screws into the lower unit and I don't know if it was completely screwed in when I took it out or not. So now when I'm reassembling I'm wondering if it matters how far i screw it in? The manual shows a tool for measuring this, but I don't have that, and the tool is just a rod . It would be helpful if they listed the length of the rod...I know the shifter rod is supposed to be leaning aft when installed, I'm just not sure how far to screw it in.

Thanks!
 

Attachments

  • IMG_2728.jpg
    IMG_2728.jpg
    152 KB · Views: 0
  • IMG_2727.jpg
    IMG_2727.jpg
    148.1 KB · Views: 0
  • IMG_2726.jpg
    IMG_2726.jpg
    147.9 KB · Views: 0
  • IMG_2731.jpg
    IMG_2731.jpg
    140.6 KB · Views: 0

mark1961

Ensign
Joined
Apr 30, 2007
Messages
940
Re: 1977 Johnson 55hp lower unit rebuild

Gday Scott, the hieght is important, almost impossible to get the shift rod screw back in if its not spot on and the control cable adjustment will be out as well. You can make do with a tape measure to check it. Measure from the mating face of the lower unit to the centre of the hole in the top of the shift rod, run a small straight edge from the centre of the hole out to the tape, make sure you have it in the appropriate gear for your particular motor refering to your manual or the link dew posted up......
 

scott_maier

Petty Officer 2nd Class
Joined
Mar 16, 2009
Messages
124
Re: 1977 Johnson 55hp lower unit rebuild

Gday Scott, the hieght is important, almost impossible to get the shift rod screw back in if its not spot on and the control cable adjustment will be out as well. You can make do with a tape measure to check it. Measure from the mating face of the lower unit to the centre of the hole in the top of the shift rod, run a small straight edge from the centre of the hole out to the tape, make sure you have it in the appropriate gear for your particular motor refering to your manual or the link dew posted up......
Hello Mate! thanks for the tips. I'll be putting them to use later today. (It's 5 am here right now). I figured the control cable would be thrown off if I didn't get this right so I was hoping to get some help here. I'm getting pretty close to having this motor ready for the water, just need to finish the boat it'll be going on...
 
Top