1981 Sea Nymph rebuild

jbcurt00

Moderator
Staff member
Joined
Oct 25, 2011
Messages
25,179
Re: 1981 Sea Nymph rebuild

Man, if a little goo is good, more must be better right? :confused:

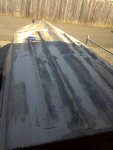
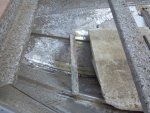
No idea what that might even be, let alone a way to remove it. Looks like someone just dumped the leftover goo in there & left it:
attachment.php


Best of luck getting it out... Don't use too much heat. Heat cycling the hull isn't a good idea, but overheating the seams might force some of the sealer out of the seams, which wouldn't be good either.
 

Pmccraney

Lieutenant Commander
Joined
Jul 26, 2011
Messages
1,734
Re: 1981 Sea Nymph rebuild

This boat was obviously a leaker...

That appears to be "coat - it" on the bottom of your hull (similar to gluvit - expoxy sealant)... Usually goes on the inside of the hull...

I have no idea what the puddle of spilled paint/silicone is???

However, I think you are on the right track by getting all that crap off of there, so you can get to the underlying rivets and seams...

When you do a leak test you can really see where your problems are and then fix them properly..
 

trashcat2

Cadet
Joined
Jun 5, 2012
Messages
19
Re: 1981 Sea Nymph rebuild

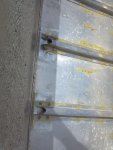
I'm not lucky enough for it to be silicone that would be soft enough that I could just dig it out. The white/tan stuff inside the boat has to be some kind of epoxy, it's brittle and will flake off in chunks where it did not adhere properly. It's also painted over the dark Coat It or Gluvit stuff on the exterior, you can see it flaking off in the picture about a possible crack at rib 8.
Doe anybody know if a paint stripper that works on epoxy paint would work on whatever kind of epoxy this is?
 

Streetgang

Petty Officer 1st Class
Joined
Oct 13, 2012
Messages
251
Re: 1981 Sea Nymph rebuild

Perhaps a thought or two on your puddle.

Since you can get some bits up with the power washer, maybe by drilling some small holes in a line a few inches in from edge would be enough to loosen it up.

Obviously dont drill deep. You then might try a 1/4,1/2 or even a 3/4 wood chisel to see if can crack it loose between the drill holes, on top of the puddle.

Good luck and I'll try to hurry up.:lol:
 

Watermann

Starmada Splash of the Year 2014
Joined
Jan 12, 2013
Messages
13,824
Re: 1981 Sea Nymph rebuild

I had a similar problem with my keel. There's a reason why the goo dealing goof put that stuff in the keel and if like mine, the other side has been worn down. My keel was cracked, pitted and leaking when the PO decided to squeeze at least a large tube of clear silicone into the keel, then coat the outter hull with a wad JB. You can check my thread to see what I did to repair it. If it were me, and it won't chisel out, get one of the porous 3M wheels to grind it down. Either way, take your time and just keep coming back to it every day until it's cleaned up.

If I had to guess what that stuff was, I would say the guy had some left over snow seal from his trailer roofing job. OK, I'm still getting a laugh out of the bacon grease and hungry weasel.

Best of luck with your resto, it's a worthy boat!
 

trashcat2

Cadet
Joined
Jun 5, 2012
Messages
19
Re: 1981 Sea Nymph rebuild

Well the puddle of goop turned out to be less of a problem than I had initially though and I'll take that scenario over the reverse any day. All it took was some pain in the back labor a cold chisel and patience. I think Waterman was correct about what it was when I started breaking out chips it smelled like oil based paint not epoxy so probably roof seal or similar. I don't see any more cracks yet but it wasn't sealing anything the only thing holding it in there was the mechanical grip where it flowed under the edges. The aluminum was a little corroded and the goop broke away cleanly once the edges were broken. Ironically clearing out the front two limber holes took more time, more back soreness, a longer punch, and some threats with a heat gun.
To get off the rest of the painted on "sealer" I might try some citristrip and pressure washer before I fall back to the 3M wheels and angle grinder.
 

Watermann

Starmada Splash of the Year 2014
Joined
Jan 12, 2013
Messages
13,824
Re: 1981 Sea Nymph rebuild

Good news there, I had visions of "the thing" being bonded down tight.
 

trashcat2

Cadet
Joined
Jun 5, 2012
Messages
19
Re: 1981 Sea Nymph rebuild

An update with my fight against the goop. I used some cirtistrip and pressure washer on the reset of the inside goop that was painted on some of the rivets and I think I've cleaned it off enough that gluvit will stick. I've tried using citristrip on the bottom grey goop with much less success. It works somewhat with a 6-18 hour soak time but it'll take multiple applications to remove it all.
flipped-goop.jpg
Considering I want to have this ready for the lake by May 16 I've made the executive decision to not worry about the exterior other than fixing cracks and holes in this round of repairs. I don't care about a few more scratches in the hull paint so I just replaced the bunks with plain fir, no carpet.
Now I need to flip it back over, scrub it down with tsp (or something better if there are any suggestions), patch the cracks and holes, and fill with water and mark all the leaks so I can make sure to gluvit them. For patching the cracks I don't want to weld it because I think it's to close to the seam with a rubber gasket so I'll just use an aluminum plate, 5200, and ss bolts/nuts.
 

Streetgang

Petty Officer 1st Class
Joined
Oct 13, 2012
Messages
251
Re: 1981 Sea Nymph rebuild

I notice you mention more cracks:

After thinking about it for a bit it rang some bells to a previous post by Grandad, one of the true skilled and intelligent people I have come across....and there are some very good people here.

Anyway, you may have a similar problem to what he found. At the very minimum his thread is well worth the read and only 3 pages.

He has a Starcraft with a bit different hull / stringer / bulkhead design but he gives the root problem some good thought, let alone his solution is amazing. His crack ran quite a good distance and the pics and details are very good.

Where this rang a bell for me is he mentions loose rivits tieing in his 2 stringers to the ribs for quite some distance. Check out his comments in post 13.

http://forums.iboats.com/boat-resto...tarcraft-holiday-reno-hull-repair-517895.html

After I read this went back to my hull and noticed how many loose or broken rivits were on the bulkheads which in our design ties deck to the upper stringers, to the bulkheads to the ribs. So am replacing quite a few rivits and you may want to check yours.

For the actual repair may be relatively easy to run a strip on outside of hull and rivit /5200 to hull and probably into some of the ends of the ribs, replacing those rivits.

Just some thoughts and I by no means am an expert, just a hacker trying to get it done and not look back.

Good luck, fair winds and smooth seas.
 

trashcat2

Cadet
Joined
Jun 5, 2012
Messages
19
Re: 1981 Sea Nymph rebuild

That is an excellent thread with great ideas, I've been wondering why I didn't see more hot wire cutters on this forum.
I was going to just patch the cracked areas with external pieces and pc-11 and stainless bolts but now I might use internal patches and a bracket to tie in the bulkheads at the ends. In my boat the bulk heads are only attached to the ribs with one rivet out of five which could easily explain the increased flexing and cracks at the outer rib rivets. Good thing I didn't need to rely on the flotation foam I think the deck would have popped off.
I filled it up with water yesterday and found the two biggest leaks (and many small leaks) one is the large crack which is hardly surprising the other was a loose center rivet in the middle of rib 7 that practically poured out water. No wonder I had to run the bilge pump at least every hour.
 

trashcat2

Cadet
Joined
Jun 5, 2012
Messages
19
Re: 1981 Sea Nymph rebuild

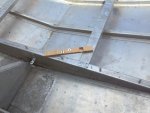
It's been a while since I've been able to work on the boat and my hopeful splash date is quickly approaching. To fix the cracks I drilled the ends and used patches scavenged from the live well I removed, stainless bolts, and pc-11. I also got the gluvit put down when it finally warmed up enough for it to cure.
crack-patches.jpg

I didn't want to rivet down the deck and I thought screws wouldn't stay tight so I'm using stainless bolts and wood inserts. Here's a picture of a test piece and you can see the stainless bolts in the bulkhead where it's installed.
deck-fastener.jpg

I also have the deck and transom cut and painted with porch/deck oil enamel. It's been a while since I've worked with oil paint and I sort of forgot that it takes more than just overnight to dry so I'm not installing the deck today. There's been a lot of talk about deck coatings epoxy/carpet/vinyl/bedliner/etc but I just want something that will protect the wood and slow down not prevent the absorption and drying of water. I chose Ace porch/deck enamel paint ($30 gal) so far there's one coat on the bottom side and one coat on the top I'm going to take it out like this and see if it needs a texture additive before I do a second top coat.
 

Watermann

Starmada Splash of the Year 2014
Joined
Jan 12, 2013
Messages
13,824
Re: 1981 Sea Nymph rebuild

Looking good TC! I enjoy seeing innovation and I agree with not using rivets. Post up a pic of your deck finish when you get a chance. I would think you will need some texture to keep the paint from being "slippery when wet".
 

trashcat2

Cadet
Joined
Jun 5, 2012
Messages
19
Re: 1981 Sea Nymph rebuild

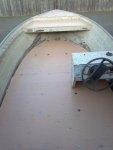
I did a lot of work last week to get the boat ready for a weekends camping trip. I put all the old styrofoam back because it was perfectly dry and not deteriorating. However I did carry on the pool noodle tradition, the rear foam boxes were only about half full of foam when I tore it apart so I filled up the remaining room with noodles.
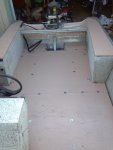
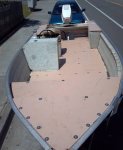
Half inch plywood with porch paint on both sides (my girlfriend picked the color) held down with stainless 1/4" 20 cap head bolts and 1 1/4" stainless fender washer.
deck2.jpg

I riveted some aluminum angle to the bow as a bolt area for the deck.
bow-deck-support.jpg

The transom is also in and held down with all stainless bolts. Plus a nice smearing of 5200 when I was installing the splash well.
deck1.jpg

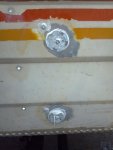
I'm planning on selling this before we move so I didn't want to completely block up the live well holes, a couple aluminum discs a bolt and nut plus a ludicrous amount of 5200 seals them up.
live-well-patches.jpg

Since I removed the side storage box I added D rings to the deck and cargo nets that will hold things against the foam boxes and D rings to hold down the fuel and battery.

And here we are on Trinity Lake in far north CA, I didn't have time to install seating for this trip so there was an ice chest and a couple bleacher seats which is not ideal but better than not taking the boat camping.
lake1.jpg

After several hours on the water there was about a gallon of water in the bilge, not completely leak free but much more manageable than 5 gallons every half hour like it was before.
 

trashcat2

Cadet
Joined
Jun 5, 2012
Messages
19
Re: 1981 Sea Nymph rebuild

I was only able to take it out on the water once. I just got a new job and I'm moving to Atlanta if I could figure out how to take it with me I would but I just don't have the towing room.
bow.jpg
 
Top