1981 Springbok 18' Restoration/Renovation

SlipperyOar

Petty Officer 2nd Class
Joined
Apr 12, 2024
Messages
119
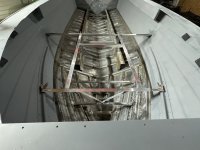
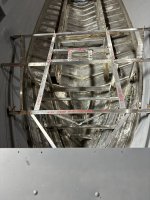
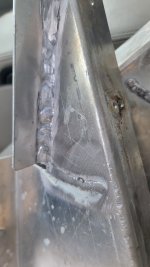
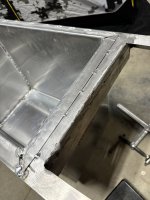
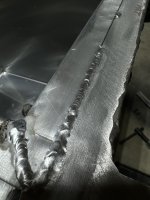
The gluvit on all the seams cured nicely, I riveted the stringers back into the boat.

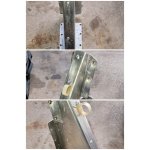
There was a few spots with some signs of corrosion so I cleaned with soap and water, then wire brushed away any of the corrosion, then acid etched and primed each spot. I then used 2 part epoxy to fill any small corrosion pitting spots and allowed that to cure.

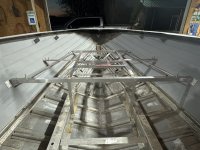
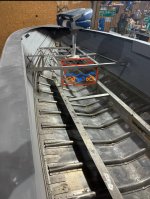
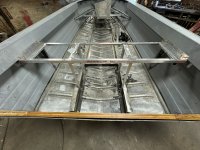
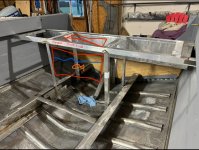
I then began building the front casting deck framing. Using 1/8” thick angled aluminum varying between 1-1/2” and 1-1/4” leg lengths, the longer leg lengths in the middle and the shorter lengths towards the front as I plan on having a pedestal base for a seat. Have a few more pieces to add in tomorrow to tie into the hull between the front and rear cross beams. I opted to use solid rivets where I could access both sides for added strength and the resistance to vibrations possibly loosening them.

Coming together nicely!
 

Attachments

  • IMG_9896.jpeg
    4.7 MB · Views: 4
  • IMG_9901.jpeg
    IMG_9901.jpeg
    2 MB · Views: 5

SlipperyOar

Petty Officer 2nd Class
Joined
Apr 12, 2024
Messages
119
Continued on with framing the casting deck. I’ve got 4 vertical supports still needed and 1 more horizontal brace at the very front to allow to fore-most part of the future deck to be secured and be a meeting spot where the deck will connect perpendicularly to a cover beneath the cap. Hoping to have some time tomorrow or Sunday to finish these last bits up!

Back to work next week and likely won’t get any work done on it for the next 2 weeks with my busy schedule so this has been a nice productive stretch!
 

Attachments

  • IMG_9903.jpeg
    4.5 MB · Views: 2
  • IMG_9904.jpeg
    IMG_9904.jpeg
    2.3 MB · Views: 5

SlipperyOar

Petty Officer 2nd Class
Joined
Apr 12, 2024
Messages
119
One thing i noticed last night as i cleaned my workspace, i may have slightly miscalculated the dimensions of my splashwell. The splashwell fits perfectly from gunnel to gunnel in the boat, but the two pieces of aluminum that were supposed to rivet to the side of the hull and join with the side storage pieces may not fit in there now. Doesnt seem like too large of an issue, i'll likely need to cut back on the side piece and fold tabs on it to reattach and just use solid rivets with 5200 on any unused holes. Minor mistake made by me but shouldnt hold me back
 

airshot

Vice Admiral
Joined
Jul 22, 2008
Messages
5,361
One thing i noticed last night as i cleaned my workspace, i may have slightly miscalculated the dimensions of my splashwell. The splashwell fits perfectly from gunnel to gunnel in the boat, but the two pieces of aluminum that were supposed to rivet to the side of the hull and join with the side storage pieces may not fit in there now. Doesnt seem like too large of an issue, i'll likely need to cut back on the side piece and fold tabs on it to reattach and just use solid rivets with 5200 on any unused holes. Minor mistake made by me but shouldnt hold me back
We call that an engineering design change, very common !
 

SlipperyOar

Petty Officer 2nd Class
Joined
Apr 12, 2024
Messages
119
Welded some 2” flat bars onto the bow casting deck framing. Added it to the 3/4” leg sections to add some area needed when I have storage compartments and need the area to support the hatches. Everything went well with the welding; 110 amps, 30% AC balance, grey tungsten, 3/32” 5356 filler.

Also did some welding after the initial fit up was perfect for the aft deck. It’ll tie in to both sides of the hull with angled pieces of aluminum riveted to the hull, as well as being riveted to the gunnels for rigidity. Tied into the stringers with 1-1/4” leg angled aluminum. Tied into the splashwell as well. Not quite done yes as I’d like to reinforce it a bit more to add some more lateral strength along the bottom.

Next up will be adding a few more 2” strips to the bow framing for another storage hatch, and finishing up with the bracing for the aft deck.

Thinking about running some rectangular or angle aluminum parallel with the stringers along the sides of the hull to give the floor more locations where it can be tied it, as well as adding additional strength.

Happy with what it’s come to so far, hoping to be done all the structural framing shortly and begin measuring out all the wooden flooring and getting that cut and fit up.
 

Attachments

  • IMG_9960.jpeg
    IMG_9960.jpeg
    1.6 MB · Views: 5
  • IMG_9961.jpeg
    5 MB · Views: 4
  • IMG_9962.jpeg
    5 MB · Views: 3

SlipperyOar

Petty Officer 2nd Class
Joined
Apr 12, 2024
Messages
119
Upon getting the main frame of the rear decking in, I kept on looking at it for a while and thought how much of a pain in the a$$ it always is to bring a big cooler in my other boat whenever I’m fishing to hold the catch of the day.

With all of the scrap aluminum I’ve got from other things I’ve fabricated I’ve got roughy enough for 4/5 of the panels to fabricate a livewell to go beneath the two angled pieces and fit within the 4 vertical beams. Roughly 24” wide, 13” deep, and up to 22” of height from the stringers to the top. I don’t plan on going all of the way to the bottom to give me some space for the drain tubing to run off but I really like the idea of having a livewell.

I’ve seen lots of boats with the aft mounted livewell, and lots with the bow mounted livewell. I do have a spot in the bow where I could mount a livewell as well, with slightly smaller capacity. If anyone could chime in on what’s best for weight distribution it would be great. Both would be directly in the middle along the keep so it shouldn’t cause any excess weight to either side. Regardless if they become livewells. Having two aluminum boxes for storage could be amazing and eventually transforming 1 or both into a livewell would surely open up deck space to eliminate the need for bringing a cooler or bucket for fish.

I looked into it lots at these Flow-Rite systems and the V3 looks really appealing. I like the functionality of them with limited holes through the hull and of course adding a seacock to any ports to add leak prevention redundancy.
 

Attachments

  • IMG_0005.jpeg
    IMG_0005.jpeg
    312.3 KB · Views: 2
  • IMG_0020.jpeg
    IMG_0020.jpeg
    443.3 KB · Views: 2

SlipperyOar

Petty Officer 2nd Class
Joined
Apr 12, 2024
Messages
119
I haven’t had the time to get much done lately, the cold snap we’ve been facing held me out from working in my uninsulated shop until our insulated one cleared out.

I got the remaining bracing in for my rear deck and modified the sidewall compartment pieces to fit perfectly with the rear framing.

Final measurements taken and aluminum sheets are in so it’ll be time to cut and weld my livewell. I’m still trying to determine the best way to allow most of the water to drain, whether it be a creased bottom or cutting a 3” hole and welding a collar to lower the drain completely.

I don’t have a picture but I have an outside patch epoxied and riveted onto the bottom of the hull for some extra beef where the knee brace rivets are going to be. I plan on getting my knee brace work done in my next days off and getting it fully installed before I create a motor mounting hole jig to drill the holes for the outboard.

A few old holes from existing stuff in the sides of the hull so I plan on cleaning those up well and installed some solid rivets with adequate 5200.
 

Attachments

  • IMG_0150.jpeg
    IMG_0150.jpeg
    2.5 MB · Views: 3

SlipperyOar

Petty Officer 2nd Class
Joined
Apr 12, 2024
Messages
119
Knee brace modified to give it a sheet of aluminum that will span to the lower motor mounting bolts. The deadrise of my transom was 1-2° off from what I bent and fabricated the knee brace to. chopped the vertical tabs off and welded some angle to the knee. Fits like a glove now.

Not sure if anyone is reading in on this thread but I’m enjoying posting a lot keeping a little log lol. It’s nice to look back on the progress I’ve been making. Having to bracing storm and design and then fabricate every piece has been the biggest factor in this build that’s kept me slowed down but enjoying the progress. Christmas coming up so progress will come to a halt here.

Merry Christmas and happy new year to all!
 

Attachments

  • IMG_0187.jpeg
    5.3 MB · Views: 9
  • IMG_0188.jpeg
    4.8 MB · Views: 8
  • IMG_0189.jpeg
    5.3 MB · Views: 6
  • IMG_0190.jpeg
    4.6 MB · Views: 5

neex

Recruit
Joined
Jun 22, 2022
Messages
5
Phenomenal work! I've enjoyed living vicariously through your progress and seeing a few similarities. A quick note on that knee brace. Those tabs should be reinforced up top as they are definitely a weak spot in my experience. Now, if there's no flex it likely will never crack. I repaired and reinforced my knee brace when I redid the transom.
 

Attachments

  • PSX_20230804_153641.jpg
    PSX_20230804_153641.jpg
    2.1 MB · Views: 10
  • 20230715_102911.jpg
    20230715_102911.jpg
    4.1 MB · Views: 10
  • PSX_20230804_153403.jpg
    PSX_20230804_153403.jpg
    3.7 MB · Views: 10

SlipperyOar

Petty Officer 2nd Class
Joined
Apr 12, 2024
Messages
119
Progress on the boat has been at a standstill lately, the -10° days in my shed and holidays were no help to me. My Christmas present to myself was this Primeweld 225X. Got a cart all built for it today to tackle the rest of the fab work on the boat (livewell, consoles, etc.)

Waiting for our other heated shop to be empty so I can head down and put the last few rivets in and seal them up with 5200 for the week so they cure. Once done I’ll be ready to install the last 2 support stringers on the outside of the main stringers so the floor has more to grab onto as well as the hull getting some more strength.

It’ll be rather tough to find a good week or so at this point but hoping I’ll be flipping the boat upside down and painting the outside as I’ll be done sealing up any rivet holes through the hull with a couple hours of work.
IMG_0448.jpeg
 

SlipperyOar

Petty Officer 2nd Class
Joined
Apr 12, 2024
Messages
119
Phenomenal work! I've enjoyed living vicariously through your progress and seeing a few similarities. A quick note on that knee brace. Those tabs should be reinforced up top as they are definitely a weak spot in my experience. Now, if there's no flex it likely will never crack. I repaired and reinforced my knee brace when I redid the transom.
Thank you, what did you do to reinforce the tabs?

For mine I used the 1/8” angle and welded it to both the knee brace as well as the back sheet. I did lap joints all the way around, inside and out. I figured the sheet would be good so when mounting the motor and knee brace it’ll have the aluminum backing and tie everything into the hull for optimal load distribution.
 

neex

Recruit
Joined
Jun 22, 2022
Messages
5
Thank you, what did you do to reinforce the tabs?

For mine I used the 1/8” angle and welded it to both the knee brace as well as the back sheet. I did lap joints all the way around, inside and out. I figured the sheet would be good so when mounting the motor and knee brace it’ll have the aluminum backing and tie everything into the hull for optimal load distribution.
We just welded a few cross brace coupons beside the under the 'tunnel' portion and used a thicker gauge for the new tabs. When put new flooring in or rework the rear/bilge, I'm planning on adding several more braces (bottom angle of splashwell is so steep that there's no storage value there anyway). I'd love to hear more about how you like that tig machine for aluminum fab.
 

SlipperyOar

Petty Officer 2nd Class
Joined
Apr 12, 2024
Messages
119
Was a bit milder today, a nice -5° C so got some work done in the old uninsulated shed.

Measured, measured again, cut, measured again, bent the sheets needed for my livewell design. Initial fit up went well and it fits within my rear framing perfectly. Tomorrow before work I’m hoping to get it welded together. May have to remove some material from the top on the rear framing to it slides in once assembled but shouldn’t be an issue.

Once I get it fit in the framing within the boat, I’ll add some angled aluminum beneath the livewell to provide support. Then I should be able to take measurements and get some foam sheets cut for insulation surrounding the livewell.

I picked up some aluminum piano hinges that I still need to mess around with and determine how they’ll mount and how the lid will be.

If anyone has any pictures of their livewell lid set-up it would be greatly appreciated if you could share some insight.
 

Attachments

  • IMG_0485.jpeg
    4.1 MB · Views: 3
  • IMG_0486.jpeg
    3.9 MB · Views: 3
  • IMG_0487.jpeg
    3.8 MB · Views: 3
  • IMG_0483.jpeg
    3.6 MB · Views: 4

SlipperyOar

Petty Officer 2nd Class
Joined
Apr 12, 2024
Messages
119
got my livewell welded up and did a leak test on it, managed to hold all 21.5 gallons at full capacity overnight without any leakage. Drained it out and went to work on drilling my fill and overflow holes. With the location of the overflow it’ll hold about 12.5 gallons and be about 60% full. Welded the livewell into my rear framing and I’ll work on getting a bottom support for it to stabilize it next time I’m working away at it.

Side note, the Primeweld 225X is an incredible machine. My welding skills aren’t the most aesthetically pleasing but the machine sure does a nice job.
 

Attachments

  • IMG_0531.jpeg
    IMG_0531.jpeg
    1.6 MB · Views: 3
  • IMG_0534.jpeg
    3.7 MB · Views: 1
  • IMG_0535.jpeg
    4.3 MB · Views: 1
  • IMG_0532.jpeg
    IMG_0532.jpeg
    1.6 MB · Views: 3

SlipperyOar

Petty Officer 2nd Class
Joined
Apr 12, 2024
Messages
119
Slower production lately but the one afternoon this week I had the chance to take the two 4” strips I had cut off the 4’x8’ sheet used for the livewell. I used the brake to bend it to fit against the existing gunnel sidewall and then wrapped it along the bent aluminum angle. Where the two strips meet at the bow I took it over to the workshop and welder them together. The fit-up was super nice and I’m happy with how it appears. I’m gonna get them scuffed up with a coat of self etching primer before riveting everything together and then the bow section will be near complete and ready for painting.
IMG_0647.jpeg
 

MikeSchinlaub

Petty Officer 2nd Class
Joined
Jan 14, 2025
Messages
179
FYI, I don't know about the whole country, but self etch primer has been phased out for direct to metal primer. It doesn't have acid in it, but still bonds to metal. No need for sealer after unless you sand through or want a smoother finish.
 

SlipperyOar

Petty Officer 2nd Class
Joined
Apr 12, 2024
Messages
119
FYI, I don't know about the whole country, but self etch primer has been phased out for direct to metal primer. It doesn't have acid in it, but still bonds to metal. No need for sealer after unless you sand through or want a smoother finish.
Good to know, thank you!
 

SlipperyOar

Petty Officer 2nd Class
Joined
Apr 12, 2024
Messages
119
Been making some good progress lately, the angle aluminum flat bar is all fully riveted in and installed, i pre-primed everything prior to installing so when it comes time for paint i wont be struggling as much to etch the surface and apply primer. I used solid rivets all the way around on both the top and side faces for better strength. I welded the aluminum angles together at the bow joints to connect them all, hoping to provide extra strength as well as eliminating a point where fishing line could get caught up. Behind the curved flat bars i bent some scrap i had and riveted it to the existing brackets through the hull to take out any play it had. This significantly stiffened up the gunnels and they seem much stronger.bow gunnel angle.jpg

Going on with an I/O to outboard conversion, i fabricated up two additional knee braces running from the stringers to the transom, i used all 1/8" aluminum and cut the triangle to the transom deadrise, and then welded some 1/8" - 3/4" leg angle to the triangular shape for added strength. I installed these with rivets along the sides and top of the stringers to distribute the load better. These bolt through the transom with two bolt holes on each.View attachment stringer knee brace.jpg

I also created a bracket beneath the livewell to better support it with the weight it will carry in water, as well as put self adhesive foam tape on the top to contact the bottom of the livewell. I'm used the foam tape to act as a sound deadener so the livewell aluminum wouldn't be in direct contact with the aluminum from the bracket and it provides a snugger fit to hold everything stationary. I'm going to use some foam insulation around the livewell further down the road.
View attachment livewell supports.jpgView attachment livewell supports - side.jpg

As shown in the pictures, i welded 2' of aluminum angle to an 8' section and added additional stringers just outside of the main ones, i'm using these for further places to be able to attach flooring and when i install the pedestal seat bases it will be used to mount to.

Going to rivet the side compartments in this week and drill the splashwell drain tube holes in at some point, getting close to having all the internals installed and then it'll be time to flip er over and paint the bottom.
 

SlipperyOar

Petty Officer 2nd Class
Joined
Apr 12, 2024
Messages
119
Still working away at getting all these components riveted in to the hull, it’s been a tedious job but taking my time to ensure everything is lined up before I drive the solid rivets in. I put a light coat of paint on the inside skin of the transom to supply some sort of coat and hopefully prevent any rusting or corrosion issues.

The splashwell got installed with solid rivets the other day, I slid the transom into place and bolted it up to align everything in its final positions and it was satisfying that everything went together as it was supposed to. I’ve got the port side angle aluminum yet to install and then I’ll get the rear livewell framing in. I have to wait on it because I’ll lose access for the backing bar for my air hammer with the rivets.

I picked up some international 345 DTM epoxy primer which I’ll use over all aluminum surfaces that will be seen and painted, I’ve got the SDS and application guide so I know which paint will be compatible and I’ll get that ordered up soon. Once all the interior is riveted into place I’m planning on flipping the boat over to prime and paint the bottom and the sides.

I tested the livewell pump now that I got the cable for the valve and everything was sealed up perfectly around the fittings. Glad to see things starting to resemble a fishing boat lol
 

Attachments

  • IMG_0883.mov
    29.7 MB · Views: 0
  • IMG_0888.jpeg
    3.5 MB · Views: 2
  • IMG_0889.jpeg
    3.8 MB · Views: 2
  • IMG_0891.jpeg
    5.2 MB · Views: 2

SlipperyOar

Petty Officer 2nd Class
Joined
Apr 12, 2024
Messages
119
Last 6 solid rivets put in today with some 5200 around the head, officially no more rivets to do through the hull (only on the internal connection points). Waiting until my schedule lines up will to bring it down to our A-frame and flip the boat over for painting the outside of the hull at this point.

Before cleaning up my work area today, had some time and the materials to get my livewell lid fabricated. Used an aluminum piano hinge I had ordered butt welded to an aluminum rectangle I cut, and fastened to the livewell frame with rivets. Got the handle hole cut and fitted it up while I was at it.
 

Attachments

  • IMG_0910.jpeg
    4.2 MB · Views: 5
  • IMG_0911.jpeg
    4.4 MB · Views: 5
Top