jdaghir
Seaman Apprentice
- Joined
- Apr 1, 2010
- Messages
- 45
1983 V-150 S/N 6313170 on a 28' foot Lowe Regency pontoon.
After a fair amount of work last season, motor has ran well for most of this season, but recently it has become somewhat difficult to start and I also noticed that the rpms tend to vary or float around a little bit above 2000 rpm - for example, the motor will be running smoothly at say 3500 rpm, but then will drop down to 3300 rpm for 5 seconds or so, then go back to 3500 rpm and stay there for a minute or so, and then repeat.
Since I hadn't put new spark plugs in at the start of the season, I hoped that possibly it was just fouled plugs, so I put new plugs in (NGK BU8H). While changing the plugs I noticed that the bottom plugs on both the starboard and port sides were very clean and looked almost brand new, while the other 4 plugs all looked the typical black and sooty around the center electrode.
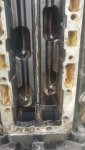
That didn't seem right, so I used a cheap USB boroscope and took a look inside the starboard cylinders. The tops of the top two pistons were completely covered in carbon, but the top of the bottom cylinder was mostly covered in carbon with a few clean and shinny spots. I think the clean spots more or less lined up with the intake & exhaust ports. I clumsily managed to drop the boroscope and break it before I had a chance to take a peek at the port cylinders.
I took the boat out and ran the motor for an hour or so and the new plugs seems to have resolved the difficult starting, but the rpm variations under load are still there. I pulled the plugs again, but at this point in time they all still look brand new & clean.
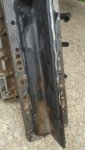
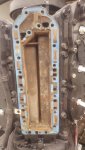
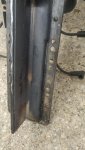
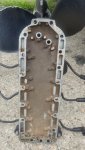
After doing some research, I suspect the cause of the clean & shiny bottom plugs/piston top is water getting into the cylinders and causing one or both cylinders to occasionally miss or not fire which could be the source of the rpm variations. The water is most likely coming from leaky bottom crankshaft seals or less likely a leaky exhaust manifold gasket or cylinder head gasket.
Questions:
Does this sound correct or should I be looking for some other problems?
Should I start with replacing the crankshaft seals first since they are the most likely suspects, or should I replace the exhaust and cylinder head gaskets first since they are easier to get to?
Assuming it is in fact bad lower crankshaft seals and I pull the powerhead to replace them, do I need anything other than 2 new seals, a new o-ring for the end cap and a new exhaust plate gasket?
Is there anything else I should consider doing while I have the powerhead removed? Specifically should I replace the packing & carrier assembly that is on the end of the crankshaft while it's exposed?
Thanks in advance for sharing your knowledge and experience!
After a fair amount of work last season, motor has ran well for most of this season, but recently it has become somewhat difficult to start and I also noticed that the rpms tend to vary or float around a little bit above 2000 rpm - for example, the motor will be running smoothly at say 3500 rpm, but then will drop down to 3300 rpm for 5 seconds or so, then go back to 3500 rpm and stay there for a minute or so, and then repeat.
Since I hadn't put new spark plugs in at the start of the season, I hoped that possibly it was just fouled plugs, so I put new plugs in (NGK BU8H). While changing the plugs I noticed that the bottom plugs on both the starboard and port sides were very clean and looked almost brand new, while the other 4 plugs all looked the typical black and sooty around the center electrode.
That didn't seem right, so I used a cheap USB boroscope and took a look inside the starboard cylinders. The tops of the top two pistons were completely covered in carbon, but the top of the bottom cylinder was mostly covered in carbon with a few clean and shinny spots. I think the clean spots more or less lined up with the intake & exhaust ports. I clumsily managed to drop the boroscope and break it before I had a chance to take a peek at the port cylinders.
I took the boat out and ran the motor for an hour or so and the new plugs seems to have resolved the difficult starting, but the rpm variations under load are still there. I pulled the plugs again, but at this point in time they all still look brand new & clean.
After doing some research, I suspect the cause of the clean & shiny bottom plugs/piston top is water getting into the cylinders and causing one or both cylinders to occasionally miss or not fire which could be the source of the rpm variations. The water is most likely coming from leaky bottom crankshaft seals or less likely a leaky exhaust manifold gasket or cylinder head gasket.
Questions:
Does this sound correct or should I be looking for some other problems?
Should I start with replacing the crankshaft seals first since they are the most likely suspects, or should I replace the exhaust and cylinder head gaskets first since they are easier to get to?
Assuming it is in fact bad lower crankshaft seals and I pull the powerhead to replace them, do I need anything other than 2 new seals, a new o-ring for the end cap and a new exhaust plate gasket?
Is there anything else I should consider doing while I have the powerhead removed? Specifically should I replace the packing & carrier assembly that is on the end of the crankshaft while it's exposed?
Thanks in advance for sharing your knowledge and experience!