1984 19' Searay Seville Cuddy transom. stringer, and floor rebuild.

WOEISMEIGOTTA470

Petty Officer 1st Class
Joined
Aug 31, 2012
Messages
375
i actually started motor for 30 seconds, with fuel line in gas can as i don't want to put fuel in actual tank until I am almost done. i had to put fuel in filter and pump to get it going. i had to hook up throttle and shift cables. I was really happy that went well. I am really stoked its been along time everything apart.
CONGRATULATIONS BRICKIE! That's awesome! Has to be the best feeling starting that engine and knowing that your that close to the finish line! Engine is looking sweet and cozy in it's new home! Nice work on those seat boxes too! I need to really figure out how I'm going to attack the rear seating doghouse situation on mine...awesome work my friend! Hat's off to you sir :yo:
 

snowman246

Petty Officer 2nd Class
Joined
Oct 13, 2015
Messages
193
Nice work. I don't know if I could wait 2 1/2 years to finish my project. I started in September with a full restoration of my Glastron and will launch the boat for its first test run on the 28th of this month. Really nice work tho, I will keep up with your progress.
 

Brickie

Seaman
Joined
May 15, 2013
Messages
59
Thank-you DRS4164 my father is deceased and i know he was proud of his service he was drafted and he had told me it was part of the peace keeping in 1958 and 1959. Its to bad the patch took the rumors in early 50s. Glad its worn with pride now!
 

Brickie

Seaman
Joined
May 15, 2013
Messages
59
Thanks Snowman. I have been real busy last 2 years, 2 kids in college and i work full time and part time on weekends and nights. When i am busiest is in summer and that's best time for fiberglass work, so it just was slow going . I am going to gitr done now:laugh: Good luck on Glastron , I will be checking it out. I think of a James Bond movie when they were blasting around on Glastrons in a harbor.
 

Brickie

Seaman
Joined
May 15, 2013
Messages
59
Thanks WOEISMEGOTTA470 sounds like your cruise was a blast . Nothing like a good vacation to get you fired up . We went to Outer Banks Last year and had a blast. My son caught a nice Cobia and we caught Sea Trout on a charter, that made me really want to finish boat up.
 

snowman246

Petty Officer 2nd Class
Joined
Oct 13, 2015
Messages
193
I have never seen the movie but I looked it up. That boat and mine have very similar body lines and features. Specifically, the side step-downs. Clean lines you dont see on boats anymore.

I completely understand the lack of time...actually I relate more to "lack of sleep" now. I will catch up on sleep once the boat is done lol. I have never been able to put off a rebuild. If it needs done, I WILL get it done hahaha. Good luck to you and the boat. I will def be keeping up with the progress.
 

Brickie

Seaman
Joined
May 15, 2013
Messages
59
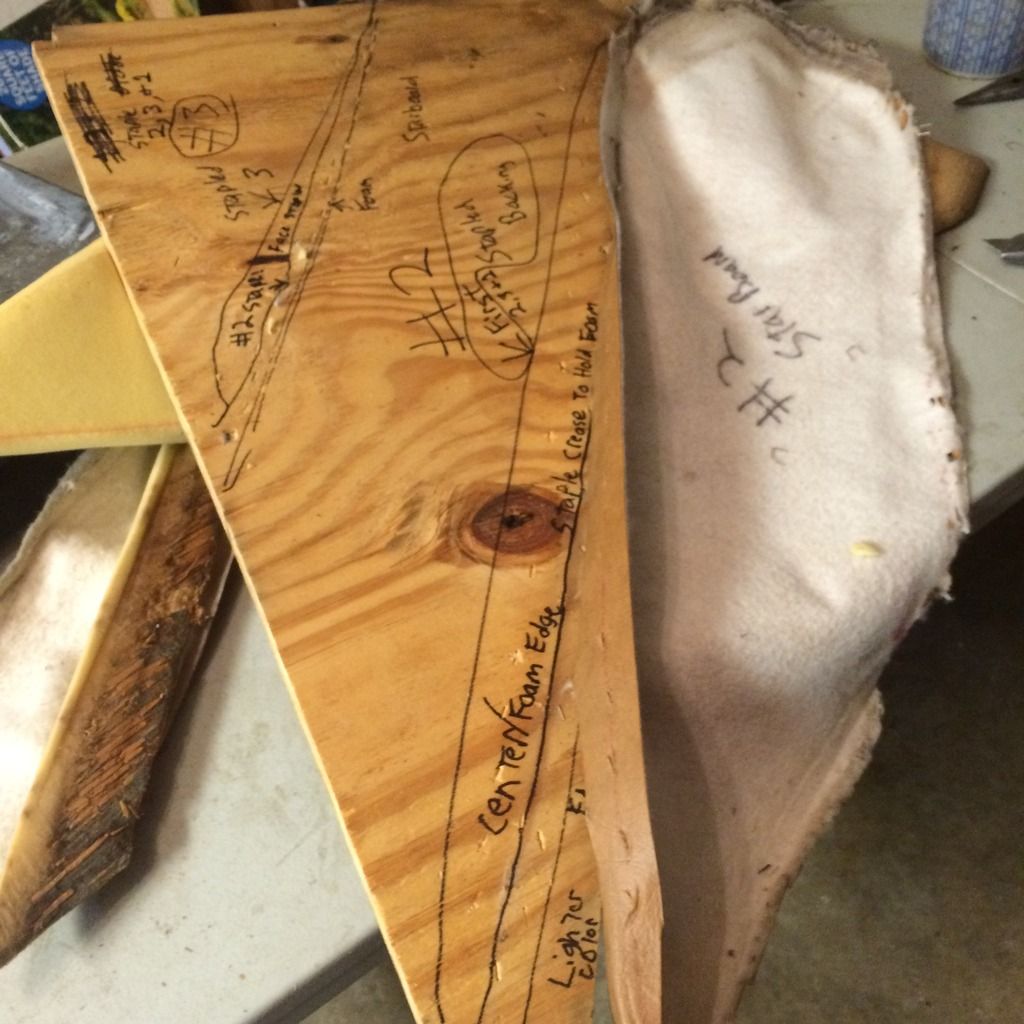
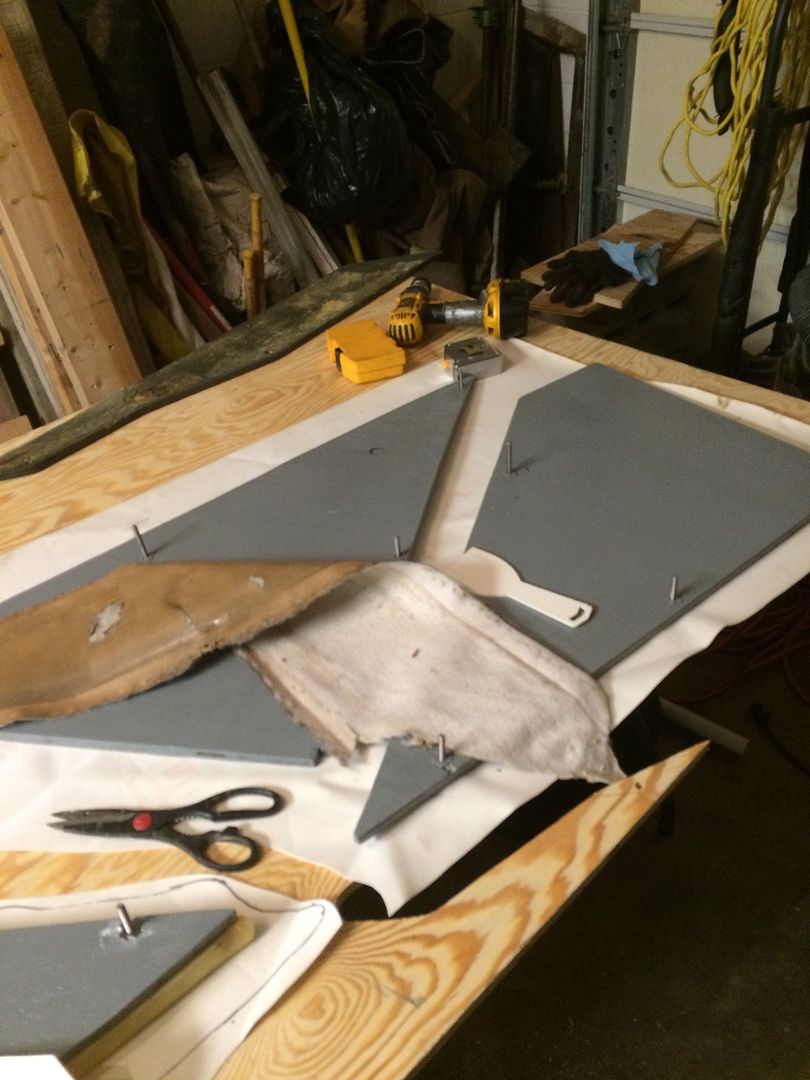
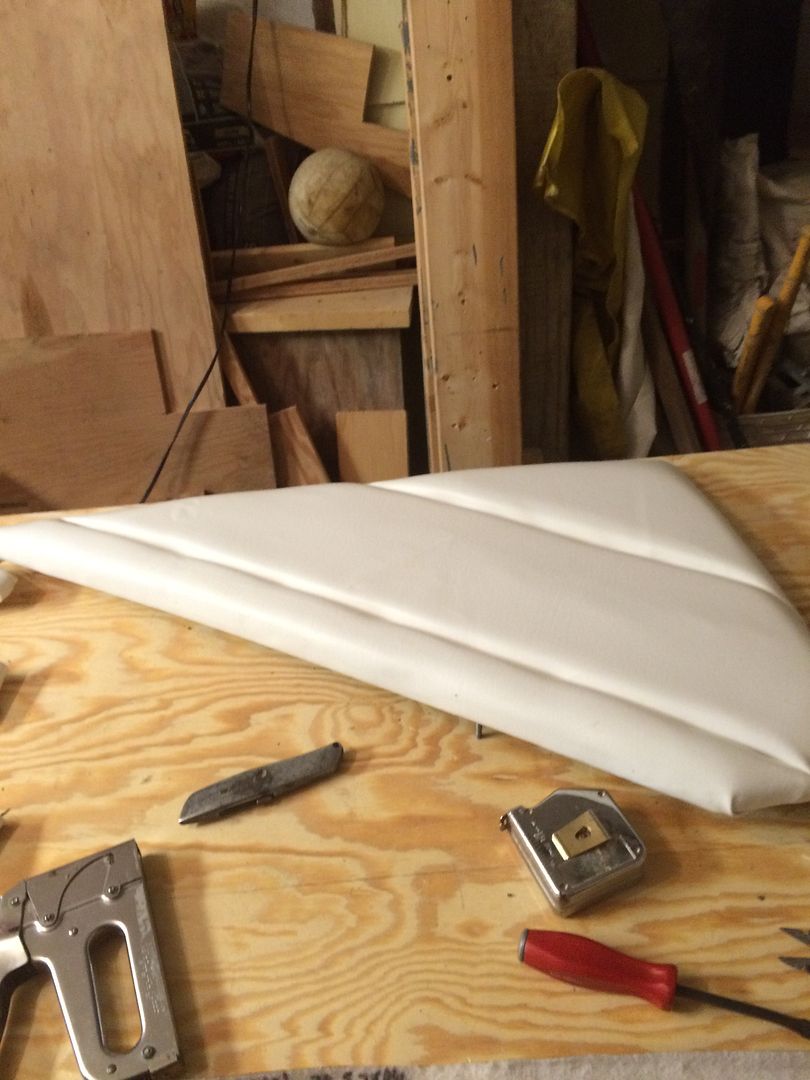
Hey guys soggy day today, thought I would update some progress on the boat. I did some side panel upholstery repair. The old panels toward the back of boat had worn and torn vinyl, with rotted plywood backing panels. I had white marine vinyl left over from replacing stern cockpit canvas storage compartment lid years ago. I decided since i don't have experience with vinyl I would practice by using what i had and left over materials to get me by this year .I did order stainless hardware though, T-Nuts, screws , washers , and locking nuts all in 1/4". I carefully removed staples from panels , marked foam , plywood,and vinyl, I used all existing removed materials to cut out new replacements, laid out plywood panels in boat to mark and drill for new hardware , T-nuts and screws. I painted the panels front and back 2 coats bilge coat. Then laid vinyl down, foam, and plywood , then stapled with stainless steel staples.
 

Brickie

Seaman
Joined
May 15, 2013
Messages
59
Decal and out drive install. I thought it might freshen up the old out drive, these are not OEM however i searched for after market period correct. I have an R - Drive its not a pre Alpha and not an Alpha so it seems harder to get decals for it. I still need to find the 140 hp decal and 4cyl decal for the rear.
 

Brickie

Seaman
Joined
May 15, 2013
Messages
59
I had to get the swim plat form mounted . The hardware is all new stainless, the holes were all drilled larger when new transom were installed and peanut buttered in and re-drilled so no . wood exposed in mounting holes. I chose 3M 4200 for sealant.
 

Brickie

Seaman
Joined
May 15, 2013
Messages
59
First start up with out drive with new water pump and trim cylinders hooked up. The only time i ran motor since it was pulled 2.5 years ago was a quick 30 second fire up with no water or out drive hooked up after initial engine install. I did not get the video of the whole process as i was to busy making sure the water was going and had to add a little fuel to carburetor I put Flame Arrester back on and had extinguisher just in case. It took a couple tries firing each time. but stalling then it fired a little black smoke came out exhaust and then went to smooth running. The shift worked in forward, neutral, and reverse flawlessly. The trim worked perfect, what a great day :D.
 
Last edited:

WOEISMEIGOTTA470

Petty Officer 1st Class
Joined
Aug 31, 2012
Messages
375
Sounds smooth! Nice work! I hope I can get to mounting my trim pump and installing hydraulic lines this weekend myself.
 

WOEISMEIGOTTA470

Petty Officer 1st Class
Joined
Aug 31, 2012
Messages
375
2016-03-02%2018.29.43_zpsyttrzigi.jpg
[/URL]

Brickie, I must ask how you created those creases in the panel? Did you staple the foam down in a line and then use upholstery glue on the backing of the vinyl? Was that how it was done from factory? I like the creases they add a nice accent, thinking ahead for myself when I get to it.
 

Brickie

Seaman
Joined
May 15, 2013
Messages
59
Woeismeigotta 470, The foam is in 3 pieces, the middle piece of vinyl is stapled first in a line to plywood and folded over its foam, then the lower piece of vinyl is stapled below it and folded over its foam and then folded over back of panel and stapled. then same process is done for top. The trick is to lay the vinyl upside down and staple then fold over foam to give the finished pleat look.The foam was lightly glued , how ever I did not, I will see if I have a picture.
 

Brickie

Seaman
Joined
May 15, 2013
Messages
59
Woe I actually re-used the existing foam as I am just trying to get by until next winter when i want to re-do all upholstery and seats. I did go to a Jo-Ann fabrics and they had marine vinyl and foam. Hey I wanted to ask about gel coating floor. I want to smooth out the 1708 tabbing and gelcoat. I originally was going to carpet and was not worried about 1708 edges . I want to gelcoat and have it look decent. How do I feather edges out ? How much gel coat will I need for floor and turn up sides a foot? I'm guessing 80 sq.ft. I would like to do 2 or 3 coats. Any input would be appreciated :).
 

WOEISMEIGOTTA470

Petty Officer 1st Class
Joined
Aug 31, 2012
Messages
375
Sure, I'd say your looking at 3 gallons. You get about 80sq.ft coverage to a gallon of gel. You need to catalyze w/ MEKP at 2% minimum typically. In order to get a nice smooth surface before gel, you'll need some fairing compound to smooth out the transitions of all your tabbed joints or any edges of fiberglass. Think drywall spackle, the same way you tape joints on a wall, you need to fair those transitions out smooth. After you feel everything is more or less level after sanding, your ready to apply gelcoat. Pickup some autobody sanding blocks if you wish, such as Durablocks found here: (http://www.amazon.com/Trade-Associa...UTF8&qid=1458668673&sr=8-2&keywords=durablock)

I had good results rolling the gel on using a very short nap roller (3/16"), you are spreading it around more than painting it if that makes sense. I used a foam roller too with good results, might be even better because I found once the gel gets a bit tacky, it likes to pull off fibers from the nap roller. Trick is to get it down ASAP before it gets too tacky, and it will self-level out smooth on its own. I worked in 500ml batches, first coats use unwaxed, last coat use gel with the wax in it or PVA.
 

Brickie

Seaman
Joined
May 15, 2013
Messages
59
Thanks Woe, I went back and reviewed your pages on the prep and gel coat you did on your boat. I was wondering what kind of filler you used. I thought about 3M premium Marine. I don't want to put something down that won't hold up and then do the Gel over top. Hey on another topic did you get your trim pump mounted and hydraulic lines done on your boat yet?:fish2: around the corner.
 

WOEISMEIGOTTA470

Petty Officer 1st Class
Joined
Aug 31, 2012
Messages
375
Thanks Woe, I went back and reviewed your pages on the prep and gel coat you did on your boat. I was wondering what kind of filler you used. I thought about 3M premium Marine. I don't want to put something down that won't hold up and then do the Gel over top. Hey on another topic did you get your trim pump mounted and hydraulic lines done on your boat yet?:fish2: around the corner.

Nope, still been very busy with other "distractions"...shame on me. I'll be getting back into it after Easter festivities this weekend. I've been cleaning up in the garage a bit which is a plus.

I bought my fairing compound through my local composites supply house, it's a polyester filler and uses the same MEKP you use for poly resin as a catalyst. I dyed it different colors with some gelcoat pigment just to ensure thorough mixing, and also to keep track of my sanding. Since it's poly based, it will have excellent bonding with poly resin and gelcoats. It takes a bit of trial and error getting the mix right to have enough working time, but it's nice that it sets up very quickly which saves time so you can get to sanding sooner.

This is the same stuff pretty much, only fiberglast products use BPO hardener instead of MEKP:
http://www.fibreglast.com/product/L...airing-Compound/fairing-and-filling-compounds

Good luck!
 
Top